Atrain's Going Organic! - Prep & Grow Journal - Empty Compost Bins to Buds in a Jar

Re: Atrain's Going Organic! - Prep & Grow Journal - Empty Compost Bins to Buds in a J

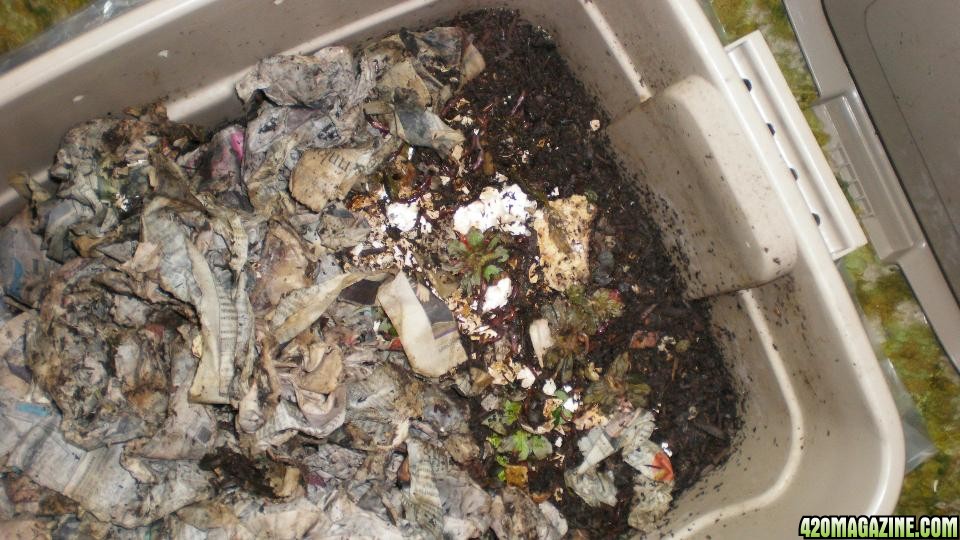
Here's a couple of shots of my w-b.

wb23.jpg

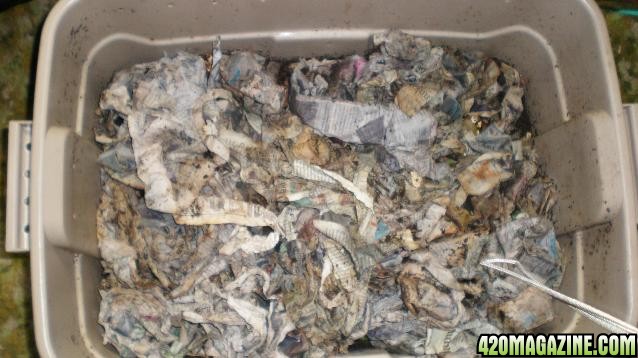
I keep the top covered in old newspaper (dampened) it's the way I got it and it works well.

wb32.jpg
 
Re: Atrain's Going Organic! - Prep & Grow Journal - Empty Compost Bins to Buds in a J

Maybe we should start a worm bin porn thread. :laughtwo:

How crazy is it that we find these pictures exciting? I immediately went "Ooooo, cool!" :laughtwo::green_heart:

Edit: OK. Went back and looked at both bins again. Definitely, new bin, on the balcony, this weekend. I'll just add my small container community into a larger container and stick them in the shadiest spot out there.
 
Re: Atrain's Going Organic! - Prep & Grow Journal - Empty Compost Bins to Buds in a J

Sue, don't want them getting over 85 outside, shady spot with minimal sun would be good.


Atrain, they will handle being spread out but they're not much for being deep.
In nature they stay in the top 3" of the the soil.
If you have the space a larger squat bin is better than a smaller tall one.

I'm going to start a second bin in another two weeks to stagger getting the vermicompost.
What I was told was that the bin would be ready to "harvest" 8-14 weeks.
I plan on taking a good sized handful of the little wigglers from the old one.

The key to starting with a few is not to overfeed them.
You don't want too much moisture in the bin, never water and watch the amount of real juicy foods.
Balance against how many worms.

I don't know how many are in my old bin but I sometimes move the newspaper and there will be a pile of them 6x6 inches on either end.
LoL

Edit to add: I'm going to get some horse manure locally to use as the base bedding.
That's what my bin had been started with. Just make sure it's aged, ie cool to the touch.
 
Re: Atrain's Going Organic! - Prep & Grow Journal - Empty Compost Bins to Buds in a J

damn atrain I envy u,although I don't chime in and tell you so.thank you for taking the time and effort to show us what you are doin.you inspired me to start my own worm bin,and my own compost pile.this is a great thread ,and very much needed here.here is little write up from a site called compost junkie.com,very informative site focused purely on composting.
The Most Important Ingredient


The most important ingredient in determining which type of tea you produce is your compost. Your compost will ALWAYS be the biggest factor in determining whether you brew a balanced tea, or a tea dominated by bacteria or fungi. If your compost doesn't have any fungi in it, and you don't add any, then there is no way your finished compost tea will have fungi in it.

So how do you make each type of compost?

Each of the different types of compost are determined by their initial ingredients. Bacterial-dominated compost begins with materials that have a lower carbon to nitrogen ratio (C:N); whereas, fungal-dominated compost begins with materials that have a higher C:N. Said another way, the more fungi you want in your compost, the more woody materials you are going to have to include.


use straw for compost ingredient For example, bacterial compost can be made using 30% dry straw (brown material), 45% alfalfa (green material), and 25% manure; whereas, fungal compost can be made using 45% dry straw, 30% alfalfa, and 25% manure. If you would like to create a more balanced compost, we suggest using 35% dry straw, 35% alfalfa, and 30% manure.
 
Re: Atrain's Going Organic! - Prep & Grow Journal - Empty Compost Bins to Buds in a J

and some more from compost junkie

Did you know that the different plants in your garden, may need different types of compost tea?

That's right, annual plants, such as vegetables, prefer a more bacterial-dominated soil, whereas, trees prefer a more fungal-dominated soil. Therefore, you would want to brew compost tea that is more bacterial-dominated for your vegetables, and tea that is more fungal-dominated for your trees.

To complicate things a little further, the type of tea you make, may also depend on the type of soil in your garden; so you must consider two variables: plant type and soil type. This may seem a little confusing at the moment, but just keep reading and soon it will all make sense.
sunflower after compost tea There is one thing to always remember when working with any compost tea recipe: mother nature is very forgiving. If, by accident, you apply a fungal-dominated tea to a bacteria-loving plant, you're not going to harm it; However, your plant won't benefit as much as if you had applied a bacterial-dominated tea
 
Re: Atrain's Going Organic! - Prep & Grow Journal - Empty Compost Bins to Buds in a J

Various Teas for Various Plant Types


If you know what type of plant your are growing, than it's easier to determine which ingredients to include in your compost tea recipe.


Type of Plant Type of Tea
Most brassicas Highly Bacterial
Vegetables, Grasses Moderately Bacterial
Berries Balanced Bacteria to Fungi
Deciduous Trees Moderately Fungal
Coniferous Trees Highly Fungal


What if your specific plant is not included in the above list? Simply find the type of plant that is most similar to the one you want to grow, and use it as a guide. For example, if you want to apply compost tea to a bed of perennial flowers, we would suggest using a more balanced (equal bacteria to fungi) compost tea recipe.

Without going into too much detail about specific teas for specific soil types, we would just like to point out two important things:

First, if you're growing any type of plant in really sandy soils, you would benefit from applying fungal-dominated teas. Fungi help to build soil structure, which is always needed in sandy soils. Otherwise, we suggest you cater your tea to the type of plant, as shown in the table above.

Second, don't be afraid to experiment. If you apply several bacterial-dominated teas, and nothing seems to happen, try a fungal tea for a couple applications.
 
Re: Atrain's Going Organic! - Prep & Grow Journal - Empty Compost Bins to Buds in a J

To keep things simple, when learning how to compost there are two different methods - static and dynamic.
Static composting refers to a method in which you find a compost recipe, gather all of the ingredients, mix them all together, and then walk away. If you've balanced the pile correctly (i.e. used the right ingredients, moisture levels, and oxygen) you should have finished compost within a couple months (assuming surrounding temperatures are warm enough). Needless to say, this won't happen as fast if it's winter time and you're living in Canada.

Dynamic composting (a.k.a. hot composting) refers to a method in which you continuously monitor and turn (i.e. aerate) your pile until it is finished. The advantages of this method, over static composting, are that you'll produce compost at a faster rate, and it will be more uniformly decomposed; however, you do have to put in more time and effort. Most large-scale composting farms use a dynamic method for the first part of their composting process, and then a more static method to allow their compost to cure/finish. If you would like to learn more about large-scale composting, check out our page on building a compost pile like a professional.

Whether you're into large-scale or small-scale composting, we guarantee you'll feel empowered after reading our article on composting at home.
 
Re: Atrain's Going Organic! - Prep & Grow Journal - Empty Compost Bins to Buds in a J

Basic Compost Tea Recipes


Please note, the amounts indicated in the following recipes are intended for a 5-gallon brewer.

Balanced Compost Tea Recipe
1.5 pounds of balanced compost
(equal parts bacterial to fungal biomass)
1.6 ounces of humic acids
1 ounce of liquid kelp*
1 ounce of soluble unsulphured black-strap molasses*We've specified liquid kelp here, however, sometimes we like to add a tablespoon of kelp meal as well to provide surfaces for the fungi to attach too.
The black-strap molasses is great, because it naturally contains a number of beneficial minerals (e.g. potassium) that feed your microbes and soil

Bacterial-Dominated Compost Tea Recipe
1.5 pounds of bacterial-dominated compost (vermicastings work well)
2 ounces of cane sugar
1 ounce of soluble kelpBacteria love simple sugars, so feel free to add in a teaspoon of maple syrup, or even white sugar.

Fungal-Dominated Compost Tea Recipe
2 pounds of fungal-dominated compost (see tips at bottom of page)
2 ounces humic acids
2 teaspoons of yucca extract*
1 ounce of liquid kelp
2 tablespoons of ground oatmeal*We like to add yucca extract near the end of the brewing process, since it has a tendency to create a lot of foam. Also, you'll want to make sure your yucca doesn't have any preservatives, but does have a high saponin content

Common Compost Tea Recipe Ingredients


Ingredient Feeds Ingredient Feeds
White Sugar Bacteria Maple Syrup Bacteria
Corn Syrup Bacteria Cane Sugar Bacteria
Molasses Bacteria/Fungi Fish Emulsion Bacteria
Fruit Pulp Bacteria/Fungi Fish Hydrolysate Fungi
Kelp Bacteria/Fungi Ground Oatmeal Fungi
Rock Dusts Bacteria/Fungi Yucca Fungi
Humic Acids Bacteria/Fungi Soybean Meal Fungi


Note - Fungi like to attach to the surfaces of various ingredients while they grow. Some of the above ingredients feed bacteria, and also provide surfaces for fungi to attach too (e.g. kelp).

A Few Fungi Tips from the Experts


Tip #1
If you want to increase the diversity of your compost tea, we suggest adding a cup or two of garden soil. Better yet, if your compost tea recipe calls for fungal compost, include a cup or two of soil from a nearby forest.

By adding these additional soils, you're ensuring your tea is inoculated with a wide range of soil microbes. These soils are like a biological catalyst, or compost tea activator.


Tip #2
When we want to ensure we've got fungi in our tea, we will brew it, and then add spores of mycorrhizal fungi. Mycorrhizal fungi act as a wonderful inoculum to any fungal compost tea recipe. These fungi naturally form beneficial relationships with approximately 95% of all plant species. They aid in nutrient transfer to plants, and help to create better soil conditions. Here is a great site if you'd like more information on mycorrhizal fungi.

Tip #3
We can't claim this last tip to be our own. It comes from the incredible book, Teaming with Microbes, by authors, Jeff Lowenfels and Wayne Lewis. In it, Lowenfels and Lewis suggest you "give fungi a head start." Since it can be difficult to get fungi to multiple (they do grow in size, just rarely in number) during the compost tea brewing process, the authors recommend growing them prior to the brewing process.

To do this, you'll want to moisten a couple cups of compost (just damp, not dripping wet), and then put it in a light-resistant container. Then grind up some simple proteins (fungal foods), such as oatmeal, and mix them in with the moist compost. Cover partially with a lid, and then place in a warm, dark area. We typically put ours under our sink, or above our fridge in a cupboard. After about 3 days, you'll remove the lid, and find a bunch of fungal mycelia throughout the compost. You can now use this compost to brew your fungal tea.


Tip #4
Don't accidentally filter out your fungi (and nematodes) when straining your tea. When filtering your tea, be sure your screen is as close to 400 micrometers as possible. Paint strainers, from your local hardware store, work quite well for this function. Avoid using socks or pillowcases, since their fibers are too tight.

Ultimate Compost Tea Recipe


Please note, the amounts indicated in the following recipe are intended for a KIS 5-gallon brewer.

- 1/4 cup vermicompost (worm castings)
- 1/4 cup fungal-dominated compost
- 1/4 cup garden soil
- 1/4 cup forest soil
- 1.5 ounce of soluble unsulphured black-strap molasses
- 1 ounce of soluble kelp
- 1 ounce humic acids
- 1 ounce fish hydrolysate
- 3 tablespoons rock dust
 
Re: Atrain's Going Organic! - Prep & Grow Journal - Empty Compost Bins to Buds in a J

sorry for throwing all this in here like this but I don't know how to do a link job yet.there was a lot more interesting stuff there like not using plastic for worm bins,so they come up with the worm bag ,it just hangs down allowing air to all sides.i hope this helps and doesn't jam up ur thread here man.anywho ,ur rockin it brother keep it comin
 
Re: Atrain's Going Organic! - Prep & Grow Journal - Empty Compost Bins to Buds in a J

18 Day Compost: The Berkeley Method

Posted on January 26, 2013 | 1 Comment


In the 1970s a formal study was conducted to determine the fastest way to rot organic material. Robert D. Raabe, Professor of Plant Pathology, at the University of California, Berkeley developed what he called the Fast Composting Method, but many call it the Berkeley Method. Raabe discovered that heat-loving bacteria convert plant material to usable compost the fastest, with the most nutrients and fewest harmful elements, like weeds and plant diseases. To attract the right kind of bacteria, a few simple conditions must be met.

The requirements for hot composting using the Berkley method are as follows:
1.Compost temperature is maintained between 55-65 degrees Celsius: This is the ideal range because it is the temperature at which weeds seeds and pathogens will be killed. The hotter the compost, the darker your compost will become. Most importantly this is the ideal temperature range where the compost will get most diversity of life.
2.The C:N (carbon:nitrogen) balance in the composting materials is approximately 25-30:1. It is important that you find what combinations 18 Day Compost: The Berkeley Method

Posted on January 26, 2013 | 1 Comment


In the 1970s a formal study was conducted to determine the fastest way to rot organic material. Robert D. Raabe, Professor of Plant Pathology, at the University of California, Berkeley developed what he called the Fast Composting Method, but many call it the Berkeley Method. Raabe discovered that heat-loving bacteria convert plant material to usable compost the fastest, with the most nutrients and fewest harmful elements, like weeds and plant diseases. To attract the right kind of bacteria, a few simple conditions must be met.

The requirements for hot composting using the Berkley method are as follows:
1.Compost temperature is maintained between 55-65 degrees Celsius: This is the ideal range because it is the temperature at which weeds seeds and pathogens will be killed. The hotter the compost, the darker your compost will become. Most importantly this is the ideal temperature range where the compost will get most diversity of life.
2.The C:N (carbon:nitrogen) balance in the composting materials is approximately 25-30:1. It is important that you find what combinations you can make your compost heap out of. (See Carbon to Nitrogen list)
3.The compost heap needs to be roughly 1.5m high. This is important because a higher heap will create compaction in the middle which will result in anaerobic decomposition. If you want to make more, make the heap as long as you want, but keep the height the same.
4.If composting material is high in carbon, such as tree branches, they need to be broken up, such as with a mulcher.
5.Compost is turned from outside to inside and vice versa to mix it thoroughly.

What do you need?

A pitch fork, a rake and a plastic cover.


activator (optional): They will make the compost decompose faster. Some are high in minerals, others in nitrogen compounds, all stimulate fast and diverse life cycles in your compost heap. Activators can be: Urine, blood, animal or fish remains, comfrey, nettles, yarrow, or a handful of good compost.


With the 18 day Berkley method, the procedure is quite straightforward:
1.Build compost heap
2.4days – no turning
3.Then turn every 2nd day for 14 days


With 1/3 manure, 1/3 greens, 1/3 dry materials, alternate layers of each onto a ground layer of small sticks and twigs. If you are using and activator dont forget to put in in the middle of your heap.

Saturate your heap with water until moisture content of a sample barely drips when squeezed. Then put sticks on top of your pile so that when you put the plastic cover it doesn’t stick to the pile.

This is your starting point, leave the pile in a shaded area if you can (if in the sun check moisture content) – Leave the pile for 4 days.

On day 4: This is your first turning over. You need to peel off the outer layer, which will now become the center of the heap, and the inner layer of the heap become the outer layer. Again check the moisture content and cover.

Two days later on day 6: Turn the pile again like on day 4. Cover.

Two day later on day 8: This is the hottest the compost heap should ever get. If you have a thermometer, check that our heap is between the range of 55 and 65 degrees Celsius. If you don’t have one, there is a simple trick you can do to find out. Stick your arm in the heap until your elbow, if you can do it your compost heap is not hot enough. If you can’t, good news you are on the right track. Turn the pile for the 3rd time and cover.

Two days later on day 10: Turn the heap, you should be noticing that your heap has gotten cooler, this is normal. The compost heap will continue to get cooler everyday from this day onwards


Day 12: you should be turning the pile for the 5th time now. Cover.

Day 14: Turn again.

Day 16: And again, this is your last time turning the pile.

Day 18: The compost heap should be the same size as when started, just warm and have a nice small, dark crown color, with just a few chunks here and there.

What do you do on day 8 if temperature range is not reached?


Ask yourself these questions if your compost heap is not hot enough on day 8:
◾Is my compost heap big enough?
◾Is it too wet? too dry?
◾Is my nitrogen to carbon ratio wrong? too big chunks?

What happened? You probably added too much water, in which case you need to cut your heap into 2, like making a chimney to facilitate evaporation. You might have not put enough water in which case you need to add some. If not too dry or too wet, you probably put in too much carbon and need to balance it out with some more nitrogen content.


Ask yourself these questions if your compost heap is too hot on day 8:


◾Nitrogen levels too high?
◾Does it smell bad? (nitrification)
◾Is it dropping in volume very fast?

What happened? You probably added too much nitrogen, you need to add more carbon material to heap to balance it out as carbon acts like a sponge

Remember any mistake you do in the process will take you back 2 days in the overall process

found this hiding ,looks promising what do u guys think
 
Re: Atrain's Going Organic! - Prep & Grow Journal - Empty Compost Bins to Buds in a J

Advantages of fast composting: -Finished compost in a few weeks
-Higher nutrient content due to less leaching of nutrients
-Fewer viable weeds and weed seeds

Disadvantages of fast composting: -Additional effort required
-Large amounts of materials are required at one time
 
Re: Atrain's Going Organic! - Prep & Grow Journal - Empty Compost Bins to Buds in a J

Hey brother you dont have to apologize for anything informative here. This is a place of learning and I hope to document everything and get as much input along the way. This is my first all organic run and once complete I hope this thread will be something a person with no experience with organics can read and be able to start there own organic grow without having to put in hrs and hrs of research on many others sites
 
Re: Atrain's Going Organic! - Prep & Grow Journal - Empty Compost Bins to Buds in a J

I really enjoyed the Berkeley method share. I'll be trying that soon. 18 day thermophylic compost would be sweet! I don't mind turning the pile that frequently. I'll do mine mainly with horse manure and straw. After it cools down I will add all sorts of dry organic stuff I have laying around. Once it ages a bit I'll add worms to process it further. Gets me excited thinking about the whole process.

I'd have to say I agree with Rado, the above tea recipe looks like a bit much. Check out Microbe Organics for solid info on compost teas. I really like the info on this site, and I know many knowledgable organic growers refer to it for compost tea information.
 
Re: Atrain's Going Organic! - Prep & Grow Journal - Empty Compost Bins to Buds in a J

Wow urdaddy! How impressed am I that you info bombed atrain's journal. Well done sir. You've tremendously increased the value of these pages in one fell swoop.

Is this what you were hoping for atrain?

I'm going to go ahead and buy Teaming With Microbes. I think I deserve it. Yep! I'm sure I deserve it.
 
Re: Atrain's Going Organic! - Prep & Grow Journal - Empty Compost Bins to Buds in a J

yes I agree also bout the tea recipes,i was just tryin to get the composting info over here ,not really the tea info.i am somewhat new to computers ability .I honestly didn't mean to put all that here just some of it,i couldn't figure out how to link a page,but I had a grandson show me last night,so I will not info bomb no more like that,lol
 
Re: Atrain's Going Organic! - Prep & Grow Journal - Empty Compost Bins to Buds in a J

and hell yes you deserve it swsue,that should be a great read.
 
Re: Atrain's Going Organic! - Prep & Grow Journal - Empty Compost Bins to Buds in a J

Check out Microbe Organics for solid info on compost teas. I really like the info on this site, and I know many knowledgable organic growers refer to it for compost tea information.

Reading the part "Organic Growing from a Microbial Perspective" right now. Interesting.

Thanks for the link.
 
Back
Top Bottom