DramaMonkey’s First Grow: Power Plant

DramaMonkey1

Well-Known Member
Hey guys! I’ve been hesitant (8 weeks of hesitating... ) to start a journal, but I finally told myself that I would! I’m done with my inner saboteur trying to stop me from doing things I want to do! So, like I said above, I started this grow back in beginning of December, so I will be starting from the beginning, and posting pictures as well! Enjoy my journey, and feel free to comment about if you did things differently that you found worked better for you!

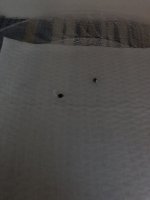
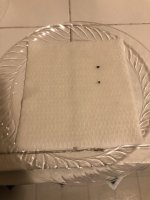
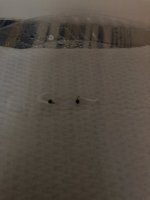
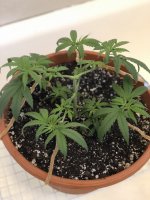
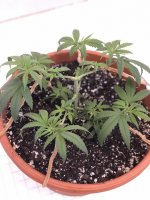
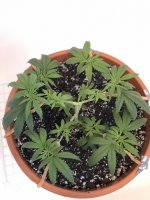
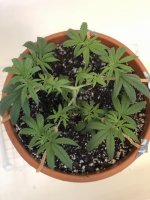
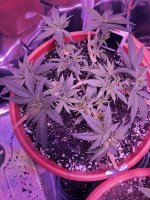
So, one day I had the impulse to grow my own cannabis, and so I ordered my seeds from Growers Choice Seeds. I got Feminized Power Plant seeds, and since it is my first grow, I only started with 2 seeds. I followed the websites germination guide (as they have a guarantee, that if the germination doesn’t work, they will send you new seeds. I’ll post it below!) and they germinated exactly as they should.
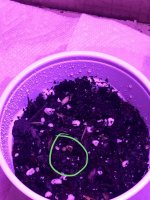
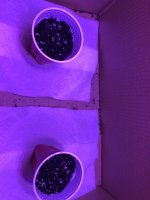
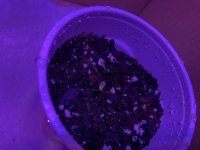
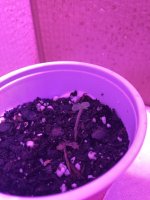
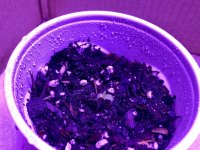
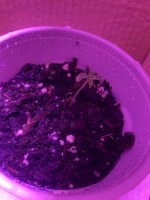
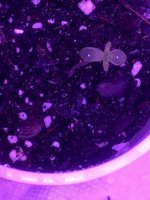
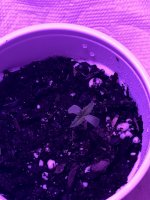
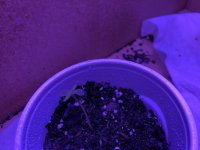
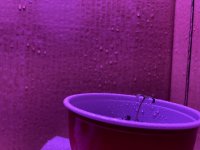
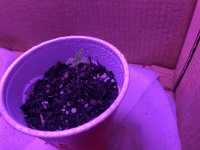
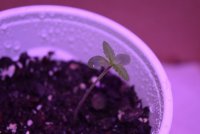
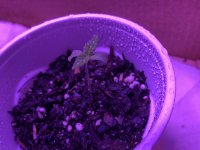
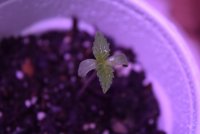
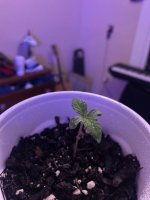
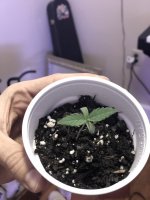
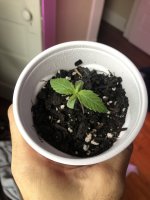
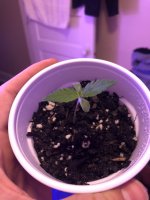
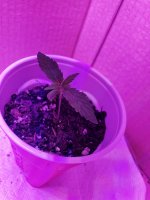
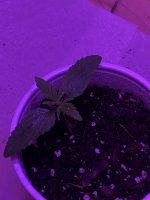
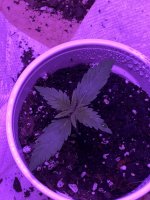
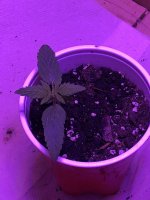
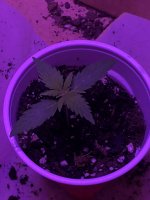
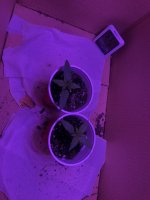
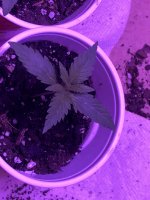
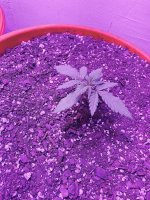
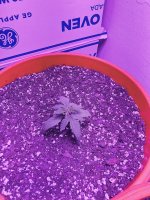
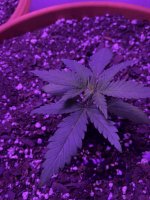
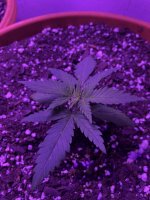
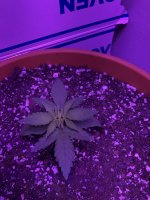
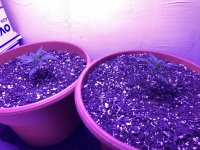
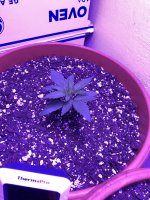
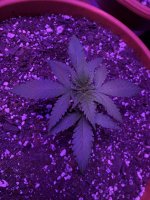
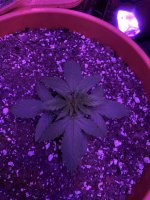
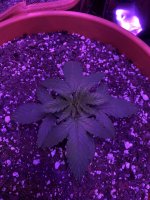
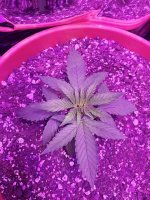
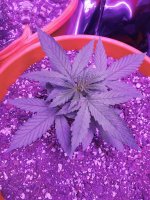
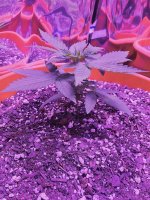
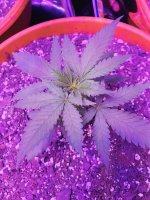
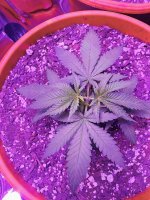
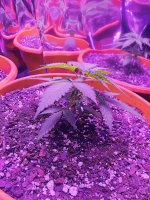
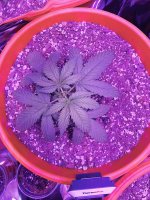
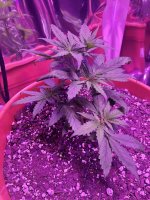
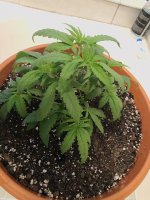
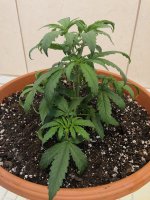
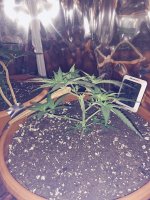
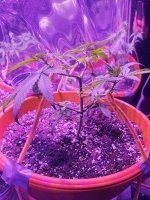
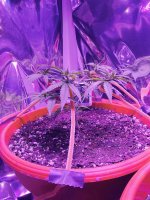
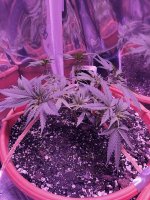
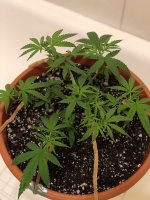
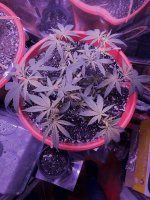
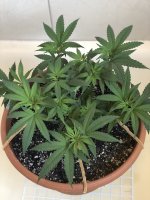
Once the roots were about 1 1/2 inches, I planted them in Fox Farm Ocean Forest potting soil, mixed with a general all purpose potting soil. I mixed the two, because fox farm ocean forest has lots of nutrients, and I have read that seedlings shouldn’t have too many nutrients. I also think I could have planted them earlier, as I’ve read that you can plant them once they’re 1/2 inch long.
 

Attachments

  • A78C52EA-A8B5-4239-BCBD-E07171CE9188.jpeg
    A78C52EA-A8B5-4239-BCBD-E07171CE9188.jpeg
    336.4 KB · Views: 84
  • 4793C75F-1051-4A04-82BA-64B0644F1566.jpeg
    4793C75F-1051-4A04-82BA-64B0644F1566.jpeg
    366.7 KB · Views: 84
  • 76B30200-17FB-41F0-BC60-06A475BB8DC8.jpeg
    76B30200-17FB-41F0-BC60-06A475BB8DC8.jpeg
    309.9 KB · Views: 88
When I started this endeavor, I wasn’t extremely serious at first. I just wanted to plant the seeds and see what happened. Then, the more research I did, the more I realized, that this isn’t going to work. So, I went ahead and prepared for what would be a more invested journey. I my setup is in a closet that is 4ft x 2ft x 8ft. I built a shelf to hold my light, which is the VIPARSPECTRA 300w full spectrum light from amazon. Once again, I know my whole process would have benefited from two lights initially, but I was still slightly hesitant how much to invest. I also have a fan, and there is a vent leading from the closet to the room, so no vent problems. I planted them on december 7th and on December 9th they started to sprout. I was ecstatic for my plants to start growing! I’m posting a bunch of pictures from when my seeds sprouted, and 4 days later.
 

Attachments

  • 2FC2FA67-696E-4AA3-A294-E716DDBFF467.jpeg
    2FC2FA67-696E-4AA3-A294-E716DDBFF467.jpeg
    631.8 KB · Views: 78
  • 12198ACB-B71D-416D-9CA2-B9F0023BF2FD.jpeg
    12198ACB-B71D-416D-9CA2-B9F0023BF2FD.jpeg
    532 KB · Views: 87
  • 72F7ACC7-734C-4F47-8D77-2F2BCEECFB99.jpeg
    72F7ACC7-734C-4F47-8D77-2F2BCEECFB99.jpeg
    470 KB · Views: 90
  • D77F19F4-AE73-4101-AE30-72B7C2BC0D49.jpeg
    D77F19F4-AE73-4101-AE30-72B7C2BC0D49.jpeg
    468.7 KB · Views: 89
  • 34E0B422-D9BA-4D81-92B0-90764C0AA528.jpeg
    34E0B422-D9BA-4D81-92B0-90764C0AA528.jpeg
    438.3 KB · Views: 94
  • 0E04DBAC-1B56-44E9-B608-601761C0ABFD.jpeg
    0E04DBAC-1B56-44E9-B608-601761C0ABFD.jpeg
    780.5 KB · Views: 85
  • 4C3441F9-FC21-40D9-A0DC-97F5C6141DF1.jpeg
    4C3441F9-FC21-40D9-A0DC-97F5C6141DF1.jpeg
    459.9 KB · Views: 83
  • 217C411D-609C-442B-8FCA-A28FD1C7F2D5.jpeg
    217C411D-609C-442B-8FCA-A28FD1C7F2D5.jpeg
    563.8 KB · Views: 75
  • 38372548-B4EC-493D-AB72-83545DFCDC3C.jpeg
    38372548-B4EC-493D-AB72-83545DFCDC3C.jpeg
    586.9 KB · Views: 89
  • 7B50E999-DB08-4DB9-809D-A0D67542D40B.jpeg
    7B50E999-DB08-4DB9-809D-A0D67542D40B.jpeg
    488.4 KB · Views: 79
I also understand my quality of photos at the beginning were not great.
 

Attachments

  • 91BA43BD-927E-47AE-A23E-4BCBE327E76F.jpeg
    91BA43BD-927E-47AE-A23E-4BCBE327E76F.jpeg
    402.2 KB · Views: 93
  • 9DD1691A-6CBA-4968-B7DA-F46DCEFC9AC0.jpeg
    9DD1691A-6CBA-4968-B7DA-F46DCEFC9AC0.jpeg
    455 KB · Views: 91
  • 48EE3C61-15DF-494C-BAA1-F83BF84DA5AE.jpeg
    48EE3C61-15DF-494C-BAA1-F83BF84DA5AE.jpeg
    491.4 KB · Views: 89
  • 26E0593A-39E9-422F-B916-F2C625655F85.jpeg
    26E0593A-39E9-422F-B916-F2C625655F85.jpeg
    271.9 KB · Views: 90
  • 293E90A9-8EB9-4ADC-8A37-FAB2596074C8.jpeg
    293E90A9-8EB9-4ADC-8A37-FAB2596074C8.jpeg
    459 KB · Views: 93
  • D381BFBD-84F9-4853-9307-516535937096.jpeg
    D381BFBD-84F9-4853-9307-516535937096.jpeg
    267 KB · Views: 94
I did not leave my plants alone. If I was at home, I was checking on them every hour or so. Maybe just to check to see if they grew some more? Maybe to spray them so to increase the humidity, or just to give em a quick drink. Some days they grew more than others, and I thought I was doing something wrong, when sometimes, all it boils down to, is that they are plants, and just like all living things, it’s way of life is going to ebb and flow. (I still check on them all the time, I just think they’re pretty haha)

I’m posting a few pictures showing growth over 6 days from the last pictures I uploaded.
 

Attachments

  • 1FCF2E4C-7487-4A8D-A4D0-B3C77A2AEFEF.jpeg
    1FCF2E4C-7487-4A8D-A4D0-B3C77A2AEFEF.jpeg
    363.2 KB · Views: 87
  • 7CBDCA68-8CFC-45C3-A831-4BBF48486594.jpeg
    7CBDCA68-8CFC-45C3-A831-4BBF48486594.jpeg
    394.8 KB · Views: 83
  • 9F597ACB-D4EF-4580-A771-8FC0B178F143.jpeg
    9F597ACB-D4EF-4580-A771-8FC0B178F143.jpeg
    419 KB · Views: 86
  • 0DE28AE8-076A-4915-8E12-D5CCBDAD0DB1.jpeg
    0DE28AE8-076A-4915-8E12-D5CCBDAD0DB1.jpeg
    370.6 KB · Views: 86
  • 0F49A803-B06B-44DE-B0FF-8066CF8E5149.jpeg
    0F49A803-B06B-44DE-B0FF-8066CF8E5149.jpeg
    411.2 KB · Views: 87
  • A0EFA159-642E-43F9-B30F-EA97DAAE5391.jpeg
    A0EFA159-642E-43F9-B30F-EA97DAAE5391.jpeg
    436.5 KB · Views: 87
  • 410D0DDD-CDC6-48D5-ACE4-ED93E18AF876.jpeg
    410D0DDD-CDC6-48D5-ACE4-ED93E18AF876.jpeg
    496.2 KB · Views: 88
  • 0998F6BA-38CB-4A9B-8DAE-3EDA899C074D.jpeg
    0998F6BA-38CB-4A9B-8DAE-3EDA899C074D.jpeg
    435.4 KB · Views: 78
  • 923F05FC-BC48-4715-928E-9D4E7965C9AA.jpeg
    923F05FC-BC48-4715-928E-9D4E7965C9AA.jpeg
    389.2 KB · Views: 94
The last of the photos from my last post:
 

Attachments

  • 058944C0-50DD-48A3-BADE-4477441318EA.jpeg
    058944C0-50DD-48A3-BADE-4477441318EA.jpeg
    484.2 KB · Views: 79
  • 62C65FC1-6E4C-4014-B7A7-BEAAA937141F.jpeg
    62C65FC1-6E4C-4014-B7A7-BEAAA937141F.jpeg
    622.7 KB · Views: 84
  • E63EE66C-8F2D-4181-AC33-3443582FEC72.jpeg
    E63EE66C-8F2D-4181-AC33-3443582FEC72.jpeg
    560.9 KB · Views: 86
  • B9B74B51-717E-4336-BD27-3B0CC13C1A19.jpeg
    B9B74B51-717E-4336-BD27-3B0CC13C1A19.jpeg
    486.1 KB · Views: 86
  • 95D42A19-E29E-434D-906D-8546EEAD71FE.jpeg
    95D42A19-E29E-434D-906D-8546EEAD71FE.jpeg
    464.3 KB · Views: 81
  • 7117F1A3-2B36-4CA6-AA5F-603F68E7683C.jpeg
    7117F1A3-2B36-4CA6-AA5F-603F68E7683C.jpeg
    579.5 KB · Views: 91
Week 2 of Veg:
From this point on, and for the next 3 or 4 days, I start to notice a decrease in growth. They both had been growing pretty steadily over the last week, and then they sort of halted. I did so much research to find out why they stopped growing! Did it have to do with nutrients? Was the ph of my soil incorrect, causing nutrient lockout? Do they not have the proper nutrients? Or have their roots outgrown their container? OH! That must be it! They just be ready to be transferred to a larger container! So I mosey on down to the local nursery (which is right down the street, which is such a blessing) and get myself two 12” 5 gal pots, ready to transfer my girls to their forever homes.

Now, with all the research I had been doing, I’m not sure as to why I didn’t take an extra few minutes to find the best way to transplant. This part of my journey is sort of where everything kind of takes a turn, and I truly thought I lost my girls. For some reason, as I prepared to transplant, instead of researching, I drew from memory what I read once: cut the red solo cup away from the soil. So I took my scissors and started cutting, and by the time I was able to actually get the whole of the soil and plant out of the cup this way and into it’s new pot, a lot of the soil had broken away, and even some of the smaller roots. I was devastated. Just get everything, put it in the new pot, and add some soil, and give it some support to stay straight up. After about 5-10 minutes of fumbling to try to fix the big mistake I just made, they were repotted, and back under the light. I also gave them a gulp of water, but only in the center where I knew the roots were.

My takeaway from this part of my journey? First off, I definitely transplanted them too early. They were not rootbound at all. I’m still not sure why they stopped growing for a few days, but like I said, I was crazy attentive and always drew bad conclusions, so we could always just chalk it up to plants being plants, and maybe they wanted a break from growing! Second, as soon as I started cutting away the solo cup, I did the slightest bit more research, to find that flipping them over with your fingers between the stem, giving support, is the best way to do it, so I will definitely be doing that next time. And waiting longer. Definitely waiting till more of a root ball was formed before transplanting them.

Below, I’ve posted photos after the transplant. I failed to take photos between this point and my last post.
 

Attachments

  • C69291AE-4B54-46E2-AD23-3E5A539693B6.jpeg
    C69291AE-4B54-46E2-AD23-3E5A539693B6.jpeg
    1.3 MB · Views: 98
  • 4F62A7AB-B5C5-4AAF-B15B-83BDA2022683.jpeg
    4F62A7AB-B5C5-4AAF-B15B-83BDA2022683.jpeg
    1.1 MB · Views: 97
  • 42B1601B-129D-42CA-A78C-A8584EFD352C.jpeg
    42B1601B-129D-42CA-A78C-A8584EFD352C.jpeg
    1.1 MB · Views: 85
Week 3 of Veg:
At this point, my Grow room was still quite simple. The walls were a glossy off white color, which I new added a little bit of bounce of light, but not much, so I added a few panels of an extremely glossy white cardboard from a box, which actually added quite a bit of bounce of light! Cheap and resourceful! Although, I knew if I wanted optimum yields, then I needed to update my space. The next week was a pretty good one. My two plants, whom my fiancé and I have named Mary and Martha, are growing pretty well! They start to grow fuller leaves, and they even start to get much taller.

A quick interlude of the story of Mary and Martha. So Mary had always been the strongest of the two plants, growing more and faster. Martha, was the first to stop growing before I transplanted them, and she became quite droopy in her leaves, and the hue of her leaves got a little darker. After the transplant, she bounced back and became bigger and stronger than Mary! (I’m not sure what this says about the transplant. I definitely thought I transplanted them too early, BUT it did seem to restart their growth. But then again, had I left them, I’m sure they would have restarted anyway. I don’t know, any insight on this?)

So I went ahead and bought Mylar to put into my closet. I might as well get the most out of my one light! So sometime during this week, I add Mylar to the room, and it seems to really help! I will post a few pictures below!
 

Attachments

  • FD4BAD98-4009-47A9-8034-3CAD6EF15866.jpeg
    FD4BAD98-4009-47A9-8034-3CAD6EF15866.jpeg
    577.8 KB · Views: 74
  • 5E24E56A-FB31-4E12-8404-35C010A09616.jpeg
    5E24E56A-FB31-4E12-8404-35C010A09616.jpeg
    562.7 KB · Views: 80
  • B27B7010-6033-46E9-8BF9-D3EE9F0FBE27.jpeg
    B27B7010-6033-46E9-8BF9-D3EE9F0FBE27.jpeg
    632.8 KB · Views: 93
  • 1910806C-1611-41DF-8CA9-2059E208016E.jpeg
    1910806C-1611-41DF-8CA9-2059E208016E.jpeg
    855.6 KB · Views: 74
  • BB48862D-82D1-4591-AC94-53198FD46A90.jpeg
    BB48862D-82D1-4591-AC94-53198FD46A90.jpeg
    895.5 KB · Views: 84
  • 26B63258-98CF-4383-AA1E-E57F146BE20C.jpeg
    26B63258-98CF-4383-AA1E-E57F146BE20C.jpeg
    676.1 KB · Views: 85
  • 8B2919FE-8652-453A-A484-459DA9B5C216.jpeg
    8B2919FE-8652-453A-A484-459DA9B5C216.jpeg
    689.4 KB · Views: 84
  • 759C4ACC-0DA4-47FD-A380-840ADA4D3BAE.jpeg
    759C4ACC-0DA4-47FD-A380-840ADA4D3BAE.jpeg
    671.6 KB · Views: 81
  • 9A0120A9-35FA-4F81-BC9E-E37841F56D19.jpeg
    9A0120A9-35FA-4F81-BC9E-E37841F56D19.jpeg
    1 MB · Views: 89
  • 8F07476B-A1A6-4CE8-9B10-971C09207572.jpeg
    8F07476B-A1A6-4CE8-9B10-971C09207572.jpeg
    959 KB · Views: 92
Week 4 of Veg:

Towards the end of the 3rd week of Veg, I started reading more about LST methods, and one that caught my attention was the Topping method. (As a gay man, it’s a funny connotation ) So the day before week 4, I went ahead and topped both plants. At this point, they each had 5 nodes, so I seemed it fit. And they continued to grow, quite well! Martha’s fan leaves are larger than Mary’s, and the structures are about similar in size, although Martha looks stronger, yet Martha’s leaves are still more on the droopy side, where as Mary’s leaves are straight and even pointing towards the light more so. I figured since we were in week 4, I could go ahead and start administering fertilizers. Since I am using FoxFarm Ocean Forest soil, I went ahead and bought Big Bloom Fertilizer. I chose to feed my plants every other watering from this point. This continues, and towards the end of this week, we begin to notice Martha experiencing something unusual.
So, I went back to researching like crazy. Okay, what can it be this time? Am I over watering her? That must be it, it looks like her leaves are curling and drooping . Or, it kind of looks like her leaves are wilting, she must not be watered enough. Or is it nutrients??? And that is when I found this forum, and how amazing it is! I started a forum to see if anyone recognized what I might be dealing with, and thefanleaf and Emilya, two awesome members, came to the rescue. Thefanleaf had good insight into the fact that I didn’t need to start fertilizing, since Fox Farm Ocean Forest soil is so nutrient rich. Emilya had shared with me her article of proper watering, and I started doing this with my plants. With the proper watering technique and not administering nutrients for the next few waterings, they’ve began to thrive.

I’ve posted photos from week 4, including some clawing pictures.
 

Attachments

  • 482698D5-C699-4E1F-90DD-924CB23E98E1.jpeg
    482698D5-C699-4E1F-90DD-924CB23E98E1.jpeg
    946.5 KB · Views: 84
  • 4411281E-55E0-4F45-9B14-3774D539FF7F.jpeg
    4411281E-55E0-4F45-9B14-3774D539FF7F.jpeg
    1.1 MB · Views: 87
  • 2ED9A7AB-DCEE-492C-B733-E3E074679F9E.jpeg
    2ED9A7AB-DCEE-492C-B733-E3E074679F9E.jpeg
    993.4 KB · Views: 94
  • 8889993C-65E6-44DA-A53B-6DF7C0300C54.jpeg
    8889993C-65E6-44DA-A53B-6DF7C0300C54.jpeg
    873.9 KB · Views: 90
  • 34B9A610-D817-40D0-9443-11C73E07AA7D.jpeg
    34B9A610-D817-40D0-9443-11C73E07AA7D.jpeg
    1.1 MB · Views: 77
  • 2832C770-64EB-4DCA-A80F-DEB9C88178AE.jpeg
    2832C770-64EB-4DCA-A80F-DEB9C88178AE.jpeg
    922.5 KB · Views: 77
  • AC42B96A-C7EC-451B-ABC8-C2E64909B637.jpeg
    AC42B96A-C7EC-451B-ABC8-C2E64909B637.jpeg
    967.6 KB · Views: 84
  • 2F2CE2B9-5E4B-4C71-984B-DAECABBD4747.jpeg
    2F2CE2B9-5E4B-4C71-984B-DAECABBD4747.jpeg
    793.7 KB · Views: 82
  • 45F350F0-FDB8-410D-9FBC-1AF1A71ED918.jpeg
    45F350F0-FDB8-410D-9FBC-1AF1A71ED918.jpeg
    730.8 KB · Views: 94
  • 90ED0567-3778-4FF1-BB9F-89BF52B0F5EE.jpeg
    90ED0567-3778-4FF1-BB9F-89BF52B0F5EE.jpeg
    1 MB · Views: 84
Week 5 of Veg:
It is about January 13th, and Martha has been bouncing back from her leaves clawing, and after doing more general cannabis growing research, I decided to try some LST (Low Stress Training) to help increase my yield. I conveniently have pipe cleaners around, so I used these to tie down my two new cola’s on each plant, not only to allow light to more areas on those cola’s, but to allow light to get to the whole center of the plant.

After I discovered Emilya’s amazing method of watering, I watered my plants 3 times (about a week and a half) before administering nutrients again. I followed the foxfarm feeding schedule to the corresponding week, feeding it Big Bloom and Big Grow. As more plant growth ensues, I decide to tie down the next two major branches, and after a few more days, I tie down the last two lowest branches.

Below I have some pictures from throughout the week!
 

Attachments

  • 3F17683D-FFEB-4A34-B8D8-4476A599F8D5.jpeg
    3F17683D-FFEB-4A34-B8D8-4476A599F8D5.jpeg
    1 MB · Views: 75
  • 6F1C4D7E-7457-4FA4-9B14-01B89678AF71.jpeg
    6F1C4D7E-7457-4FA4-9B14-01B89678AF71.jpeg
    939.9 KB · Views: 85
  • 3B5757F0-15A1-4015-BC42-F0176CE25BD4.jpeg
    3B5757F0-15A1-4015-BC42-F0176CE25BD4.jpeg
    804.5 KB · Views: 80
  • 13C2B6C1-CFFF-4823-96DF-6BE7923CABD7.jpeg
    13C2B6C1-CFFF-4823-96DF-6BE7923CABD7.jpeg
    931 KB · Views: 76
  • 1BDA453C-B170-4914-865A-0B0F1FEB4AA9.jpeg
    1BDA453C-B170-4914-865A-0B0F1FEB4AA9.jpeg
    976.1 KB · Views: 80
  • 1C968D6C-FA07-4D03-9BEC-463BCAE498CA.jpeg
    1C968D6C-FA07-4D03-9BEC-463BCAE498CA.jpeg
    838 KB · Views: 83
  • 85173CE2-421E-44D2-85F7-26B2097382E0.jpeg
    85173CE2-421E-44D2-85F7-26B2097382E0.jpeg
    1 MB · Views: 81
  • F34D9FE5-CDFF-492A-AC96-260EA3652897.jpeg
    F34D9FE5-CDFF-492A-AC96-260EA3652897.jpeg
    1,008.2 KB · Views: 87
  • AA37369E-1F96-46AE-AC9F-D465C7AE17E6.jpeg
    AA37369E-1F96-46AE-AC9F-D465C7AE17E6.jpeg
    947.8 KB · Views: 83
  • 45329411-CF4F-4980-8184-377938DFAE5C.jpeg
    45329411-CF4F-4980-8184-377938DFAE5C.jpeg
    964.2 KB · Views: 81
More pictures from week 5 of veg:
Hey DramaMonkey! Ill be watching your grow too! Im just starting out myself, hope your journey goes extremely well! :Namaste:

Thank you so much AfroBunny!! It’s definitely been a journey, and I’m glad to finally share it! Both plants are about to head into flower so, I can’t wait for that! Glad to have you following along!
 
Week 6 and 7 of Veg:

It started getting colder (I live in a warmer climate, so we just experienced some 40/50 degree weather) and the house I live in is old and drafty, so I definitely have some obstacles to face. It is very humid naturally, so humidity normally isn’t a problem, at least so far during veg. During the colder days, I put in a small personal heater, but the humidity was already, only at 50%. So with the heater on to maintain 70+ temperature, my humidity would drop to around 45%. I knew this wasn’t the biggest problem, and it was only a few days. Besides this, the plants didn’t have any obstacles they had to face these last few weeks, which has been nice.

Some things I forgot to note as I have been journaling. Along with bending the branches for my LST technique, I have been trimming back some of the big fan leaves that cover up parts of the plant that needed light. I’d say I’ve trimmed about once every other week, or as I seemed fit, on each plant. When I put the Mylar in, I went ahead an installed a fan onto the shelving, rather than using my stand up fan (it took up too much space in the closet and needed a better system). Also, around week 5, I bought Organocide spray, to help keep pests away. I haven’t dealt with them, but just in case. I administer that spray once a week right before it’s dark period. I also bought a moisture meter on amazon. The one I got works really well. It tells pH (not exact, ex: 6, 6.5, 7, 7.5), but I mainly use it to keep track of the moisture in my pot.

So in weeks 6 and 7 in veg, I just worked to maintain a good schedule that my plants really liked. I use my moisture meter about a day and a half to two days to see if the plant(s) is ready to be watered. They started off on separate schedules, but on caught up to the other, and I have been watering them on the same days. (Now if one dries up quicker than the other, I will definitely water it before the other). My plants continued to grow quite a bit these two weeks. The LST has been treating the plant very well, as by the end of the 7th week, each plant seems to have about 10 tops!

Below are pictures throughout weeks 6 and 7!
 
Week 6 pics:
 

Attachments

  • 67B5930D-2995-4420-8240-E7F757866401.jpeg
    67B5930D-2995-4420-8240-E7F757866401.jpeg
    1.3 MB · Views: 79
  • 49EEC61E-CAAF-43E8-BBAF-6A7EB4FB94E3.jpeg
    49EEC61E-CAAF-43E8-BBAF-6A7EB4FB94E3.jpeg
    1 MB · Views: 91
  • 40A0612F-6906-4876-A012-0BF08728FD38.jpeg
    40A0612F-6906-4876-A012-0BF08728FD38.jpeg
    1 MB · Views: 87
  • 03BEF13D-01B1-4DB0-9E1E-24524098207D.jpeg
    03BEF13D-01B1-4DB0-9E1E-24524098207D.jpeg
    998.2 KB · Views: 85
  • 4B84D94C-7DA1-4E3A-B9A4-B3FC65D12962.jpeg
    4B84D94C-7DA1-4E3A-B9A4-B3FC65D12962.jpeg
    1 MB · Views: 87
  • CDDF71C7-2B1A-475E-B0CB-5BBD368C77B9.jpeg
    CDDF71C7-2B1A-475E-B0CB-5BBD368C77B9.jpeg
    1 MB · Views: 88
  • 94018744-7381-4D05-815E-B840802FE569.jpeg
    94018744-7381-4D05-815E-B840802FE569.jpeg
    1,004.9 KB · Views: 89
  • CB21BB4E-5B32-48AC-B00B-4DDE135E412B.jpeg
    CB21BB4E-5B32-48AC-B00B-4DDE135E412B.jpeg
    1.1 MB · Views: 89
Week 6 pics cont:
 

Attachments

  • CB1D6139-AC0F-4D45-98D9-03696C431579.jpeg
    CB1D6139-AC0F-4D45-98D9-03696C431579.jpeg
    708 KB · Views: 88
  • E4FB6C60-14B7-49CC-A2B9-C700CB6B0787.jpeg
    E4FB6C60-14B7-49CC-A2B9-C700CB6B0787.jpeg
    919.2 KB · Views: 87
  • A8199095-06D7-4DCC-AF8B-6D2BF43974A3.jpeg
    A8199095-06D7-4DCC-AF8B-6D2BF43974A3.jpeg
    919.2 KB · Views: 93
  • 0EB49D1C-B350-464A-84AD-C9FF3F62B110.jpeg
    0EB49D1C-B350-464A-84AD-C9FF3F62B110.jpeg
    859 KB · Views: 94
  • 7D097CA8-3CB9-4465-8AC6-EA4818E35992.jpeg
    7D097CA8-3CB9-4465-8AC6-EA4818E35992.jpeg
    599.6 KB · Views: 82
  • 5042CDF5-125A-4C8D-85AA-5F2845A67079.jpeg
    5042CDF5-125A-4C8D-85AA-5F2845A67079.jpeg
    503 KB · Views: 79
Hey guys!!

So, I’m in week 8 of Veg, and come next week, I will be flipping to veg! Until then, I will continue to update you guys on my journey! Week 8 started on Friday, and growth is steady. Both plants are showing pre-flowering signs; calyx’s are forming on node sites, and on the main branches, there are multiple. I decided to add another light so that there are two lights instead of one (yay, I’m investing more and more the further along we get!)

I’ve noticed throughout this process that marks appear on some of the fan leaves. There never have been so many marks to make me worry too much, and there still aren’t too many, but I am curious as to what some of these marks mean? Some of their leaves have small brown marks. I think they could be from the light, but I haven’t kept them closer than 18”, although I try to keep them around 20” from the light. I’ll post some pictures in a separate post with those specific markings!

Below are some recent pictures I’ve taken! The last few are pictures of the calyx’s!
 

Attachments

  • C8A0DCC9-2323-4255-9F41-152321A7117A.jpeg
    C8A0DCC9-2323-4255-9F41-152321A7117A.jpeg
    509.7 KB · Views: 80
  • 0A2D16B3-34A7-4E9F-A07E-43CAFD018B7F.jpeg
    0A2D16B3-34A7-4E9F-A07E-43CAFD018B7F.jpeg
    526 KB · Views: 87
  • DD449582-B20F-4ED6-BA96-1DF01BFE600E.jpeg
    DD449582-B20F-4ED6-BA96-1DF01BFE600E.jpeg
    813.5 KB · Views: 87
  • 065CE542-A0FD-4BDD-85AD-250F8E80B3A5.jpeg
    065CE542-A0FD-4BDD-85AD-250F8E80B3A5.jpeg
    780.6 KB · Views: 86
  • 92164370-6623-4541-9924-54E35B6DE56B.jpeg
    92164370-6623-4541-9924-54E35B6DE56B.jpeg
    1,020.7 KB · Views: 80
  • A97F0EBB-A1A2-408C-899C-C11D2D5EA9FB.jpeg
    A97F0EBB-A1A2-408C-899C-C11D2D5EA9FB.jpeg
    904.7 KB · Views: 93
  • D3FFC0AA-0B19-4137-A89C-C79455CB08B5.jpeg
    D3FFC0AA-0B19-4137-A89C-C79455CB08B5.jpeg
    866.4 KB · Views: 86
  • C086C2FF-6C13-4B78-9751-8F37AEF6A5EA.jpeg
    C086C2FF-6C13-4B78-9751-8F37AEF6A5EA.jpeg
    535.7 KB · Views: 98
  • 186A24A9-BB69-42A2-9351-E9530589CBC2.jpeg
    186A24A9-BB69-42A2-9351-E9530589CBC2.jpeg
    510.5 KB · Views: 83
Back
Top Bottom