Goldbud's Ebb and Flow White Russian - 2011

Goldbud420

New Member
Hey everybody,

This is my first grow journal, so bear with me. If anybody has any suggestions or questions, fire away.

I am writing this grow journal to evaluate Blue Planet Nutrients Elite 3-part series. First off, I'd like to encourage everyone to check out this link. Secondly, thanks a bunch to Blue Planet Nutrients for their speedy processing and delivery.

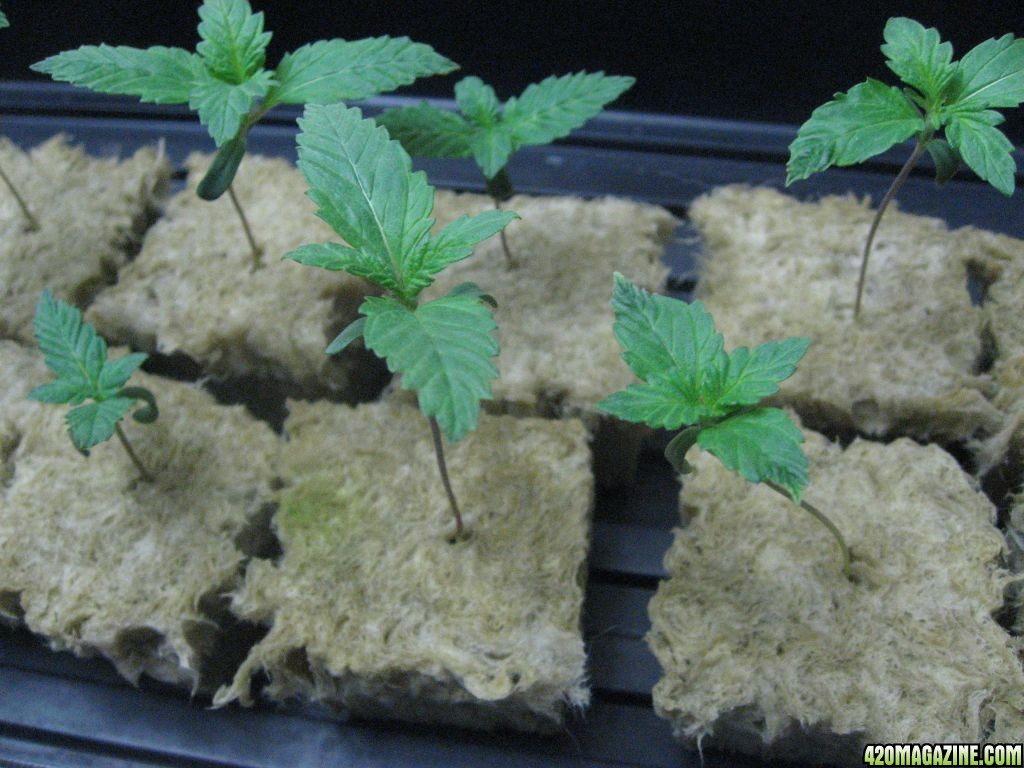
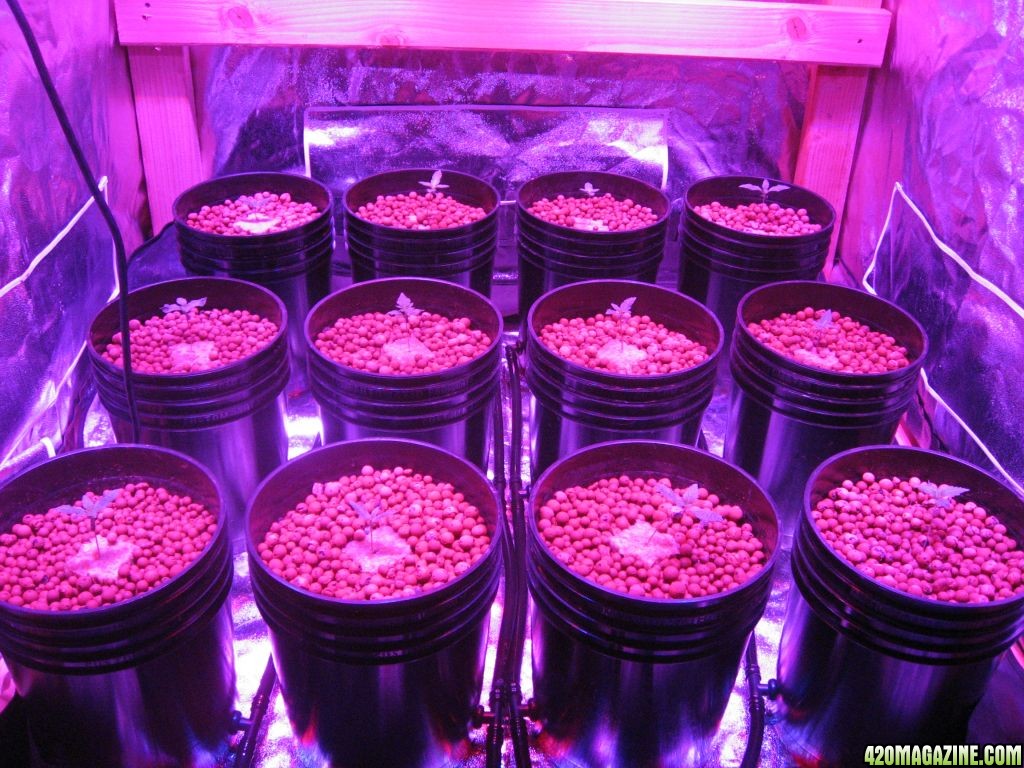
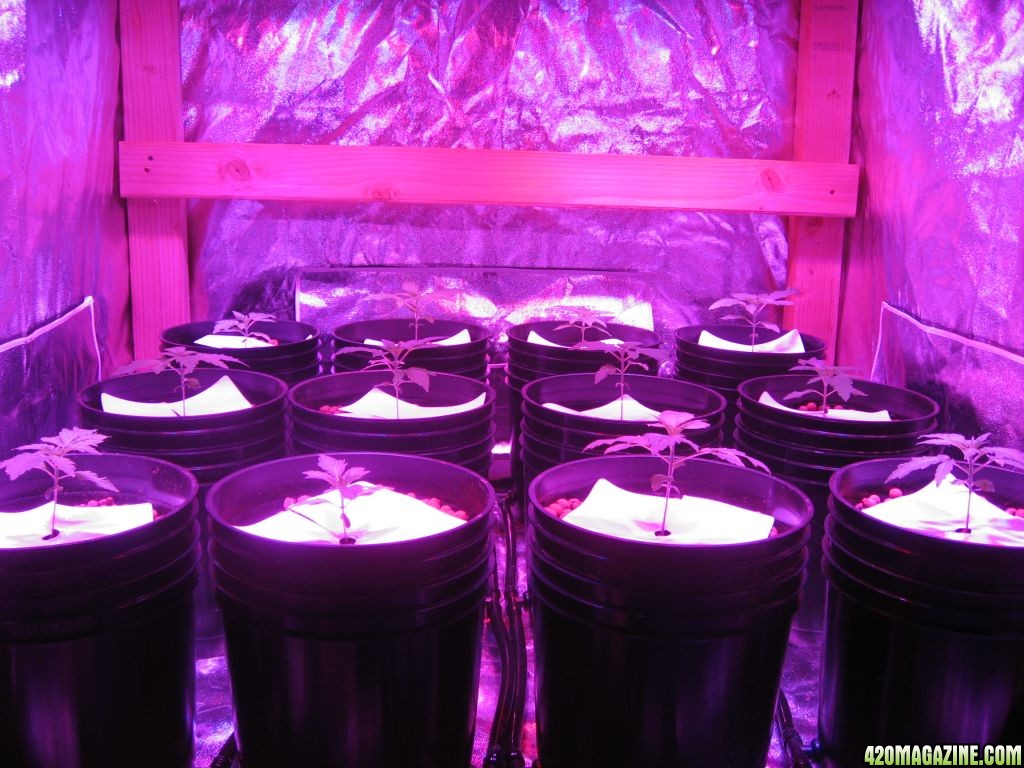
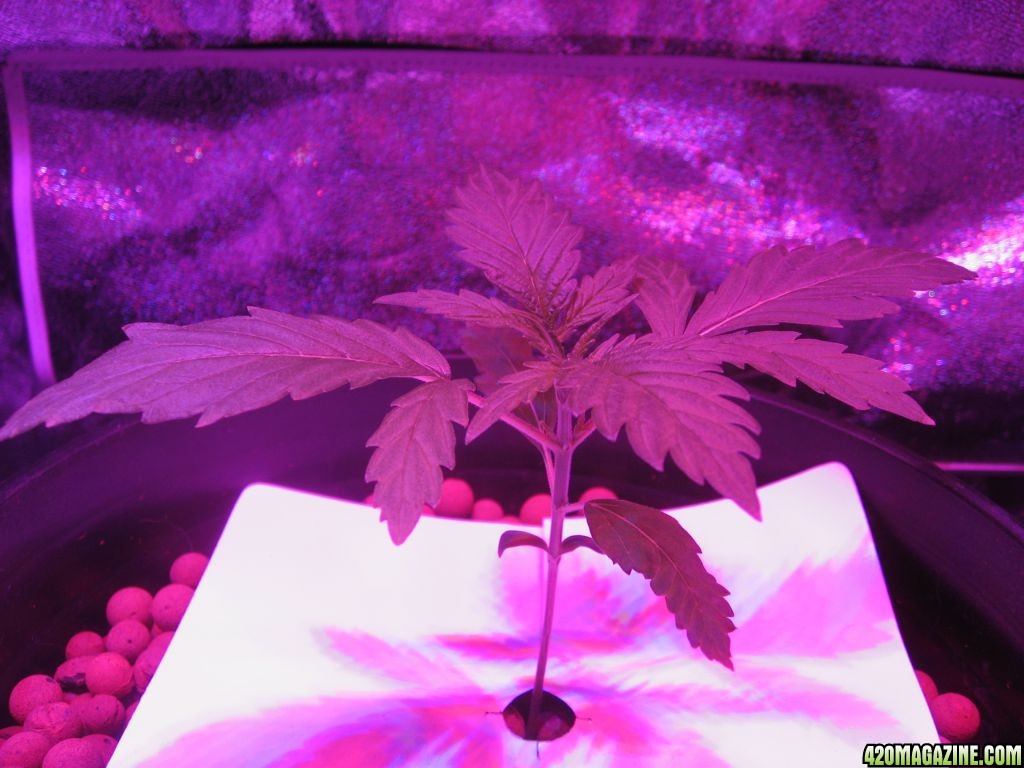
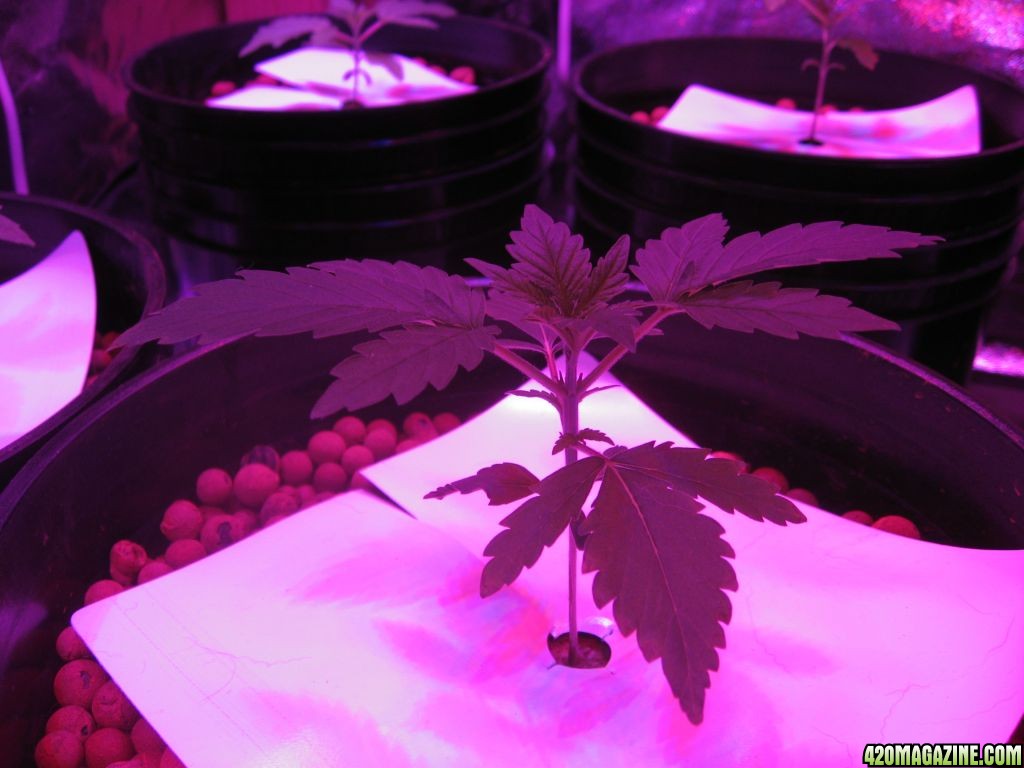
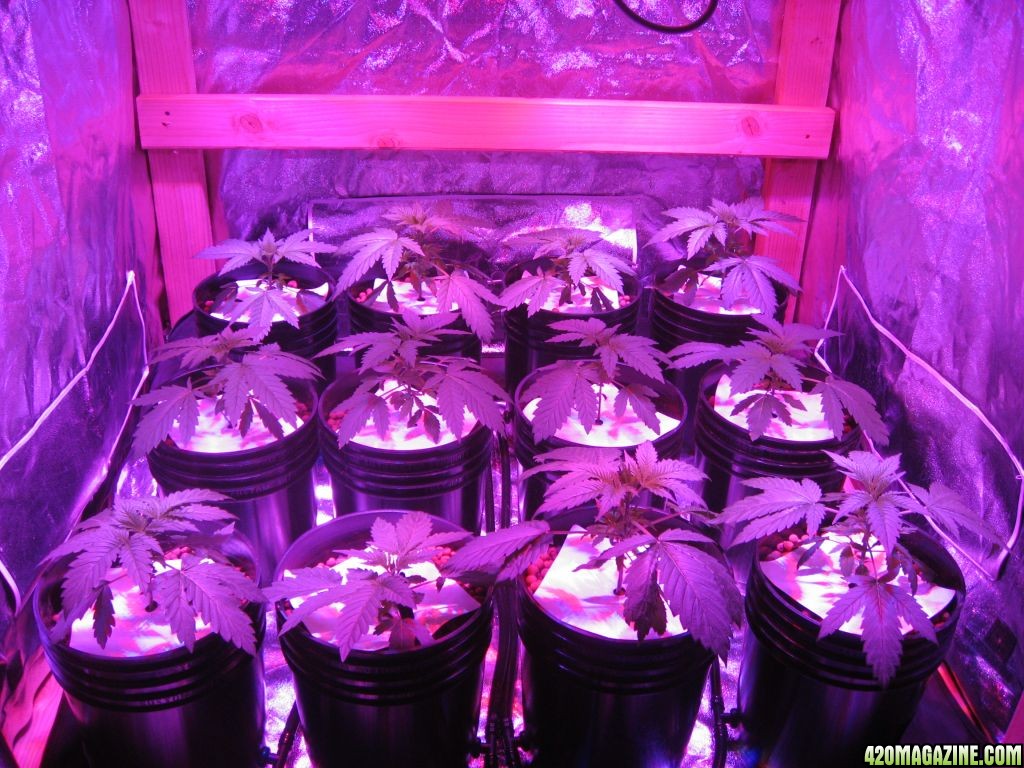
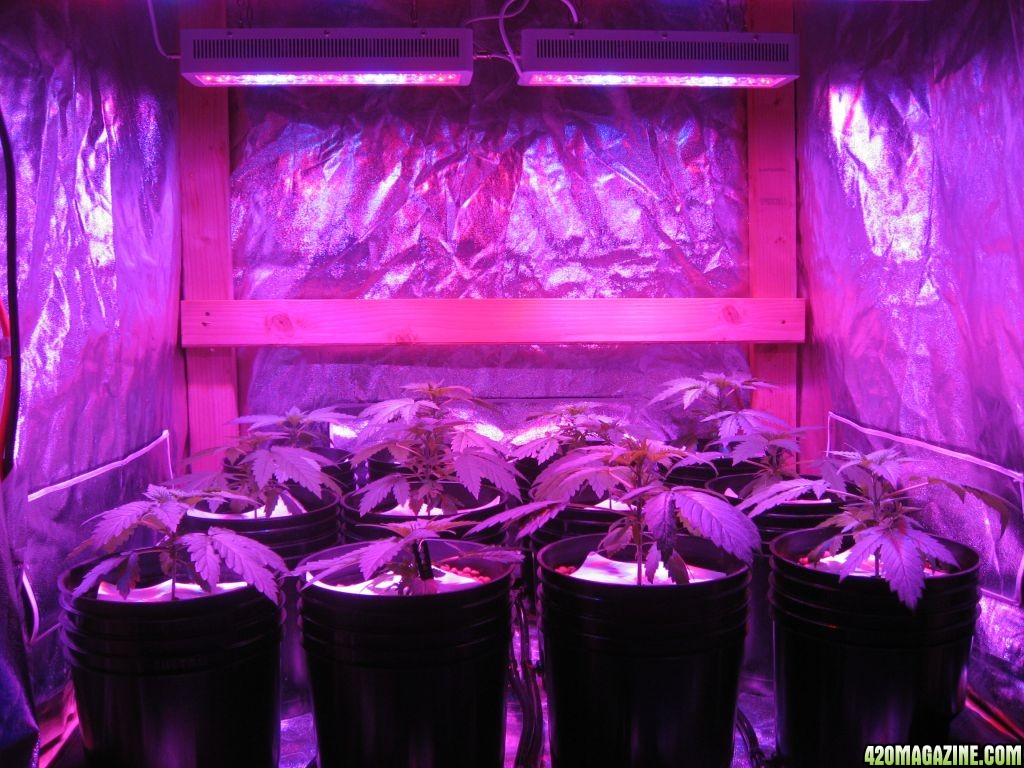
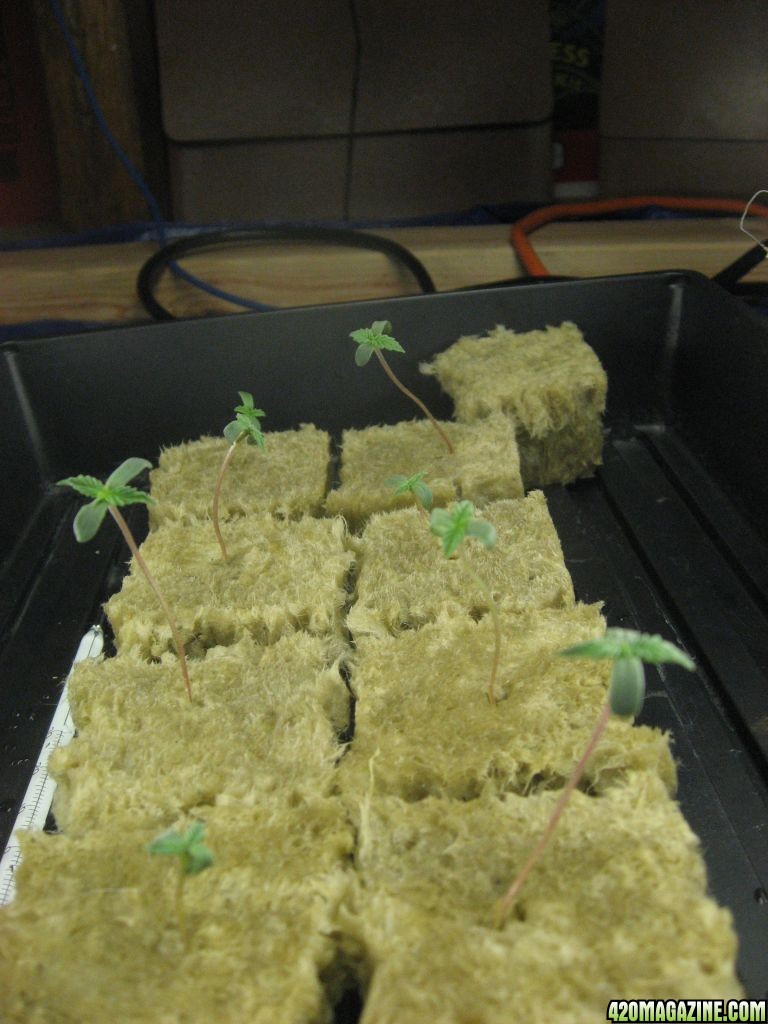
I've started 15 feminized White Russian seeds in 2" rockwool cubes, prepared as instructed on the package. I incubated the cubes on a heated seedling mat, under a humidity dome. When the seeds began sprouting, I removed the humidity dome and put the cubes under lights. Currently, they are under 2 x 20 w fluorescent tubes, placed 4" above the seedlings, with a 15 w tube on either side.

IMG_19557.JPG


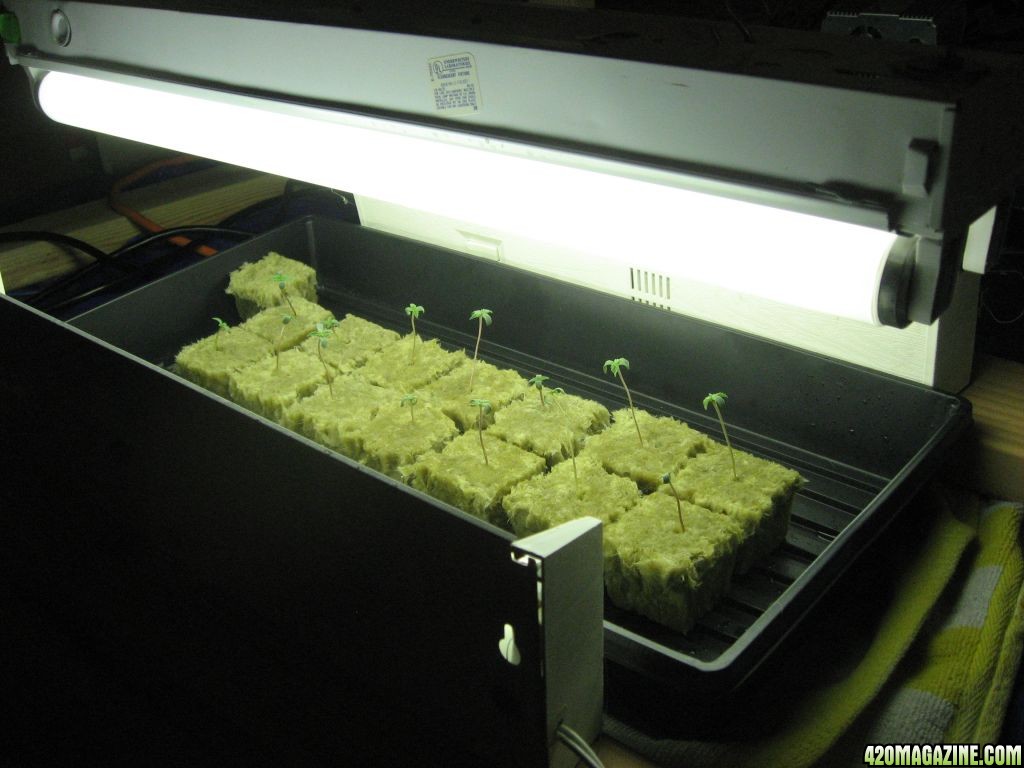
The seedlings are only 2-3 days old, and today they received their first feeding. I moistened the cubes thoroughly with a solution made of 2.5/2.5/2.5 mL of Grow/Micro/Bloom, pH corrected to 5.6. The strength of the solution was 268 ppm.

IMG_19525.JPG


Stay tuned for more fun...
 
After a week of growth, my seedlings are doing pretty well. I have been feeding them every other day with a solution of 2.5 mL each of BPN Grow, Micro, and Bloom per gallon (ph adjusted to 5.6, 268 ppm). The seedlings are now 9-10 days old, and are putting out their 2nd set of leaves.
IMG_19584.JPG


Likewise, the roots have begun to emerge from the bottom of the rockwool cubes, so yesterday (11/12) I transferred my seedlings into my hydroponic set-up. I am using the Ebb 'n Grow system from C.A.P products. It has 12 sites, so I selected my 12 best seedlings to load it up with.
IMG_19627.JPG


I am growing in a 4'x4' grow closet that I have re-built with a frame of 2x4's. Though a good closet, the original frame was as sturdy as a wet noodle, hence the obligatory rebuild.
IMG_19616.JPG


I am lighting the space with 4 x 100w LED lights with a 18:6 light period. This is a first for me, but so far I am impressed with the amount of light that they are putting out. They are BRIGHT, and put out virtually no heat. We'll see how the bud is, but so far so good.

There are two modes for the light; currently, only about half the LEDs per light are on, so it will be even brighter when the plants get a bit more established.
IMG_19635.JPG


I've planted the seedlings in hydroton thoroughly washed in RO water. I've filled the reservoir with 30 gallons at 2.5 mL/gallon each of Grow, Micro, and Bloom. My source water (RO) is 17 ppm; after mixing and correcting the pH to 5.5, my solution is at 275 ppm. The system is set to flood for 15 minutes every 3.5 hours.
IMG_19627.JPG


Ventilation is maintained with a 6" inline fan and a clip-on oscillating desk-fan.
 
I have always preferred to use Oasis cubes for my clones and seedlings due to their neutral pH but I don't think that that's such a big deal one way or another.

What are the guidelines for the use of the LED lamps? Did the manufacturer provide guidance specific to your application? At what point will you light the lights to their maximum level?

How long do you plan to grow the seedlings at the 18/6 cycle? When you switch to a flowering schedule, will you go to 12/12 or will you use one of the more esoteric schedules? How long do you think the entire process (from seed to harvest) will take?

In the past, I've taken clones that were from mature plants that had flowered but were reverted to vegetative growth. As such, I never was concerned about rushing the growth cycle. From taking the clones to harvest, it took 10-12 weeks. It would appear that you should be close to 12 to 14 weeks which is far less than the normal 5 to 6 months it would take to grow the plants from seed in nature. Do you think this will adversely affect such things as potency, yield, aroma etc.?

My compliments to you. For a small, closet-like setup, this is great.

Have you thought about CO2 injection?
 
I love The setup. I and XLR8 use an ebb and grow, although a tad different. Expect to see great results from that system. My 2 cents: put more hydroton in those buckes, filling them to just under the leaves and the brim of the buckets, and covering the rockwool. You dont want any light on that rockwool or it will grow algea. Looking good tho. Those diamond series lights are great; i recently completed a test grow in and they gave satisfactory results!
 
Thanks for the support, @253Chiefin.

@dean47- Thanks a bunch. The manufacturer says to start seedlings at 30" under the veg lights, and gradually lowering to 20" for maximum production. They advise 16" above the plants at a minimum, and warn that at 12" you risk bleaching your plants. I figure I'll crank them up to full blast come flowering. They seem to be responding well to the current configuration, starting to put out some nice growth with tight internodes.

I will probably switch to flowering when the canopy is about 50%, it should fill in the rest during flowering (being an indica). I want to err on the side of a little less full, as I tend to let it get a little too crowded. I will go straight 12:12, I want to try and get a feel for the nutrients and lights before doing anything too tricky. I think I should be able to switch to flowering in 3-4 weeks. Add flowering time, it should be ready in 11-13 weeks, hopefully the former.

As far as any ill effects to potency, yield and aroma, I sure hope not. Personally, I think if it has the light and nutrients (and air flow) it should be fine. I have considered CO2, I think that is probably the next step. The lights may be cool enough to fill the closet with CO2 without the need to vent, in which case I would really get bang for my buck.
 
As long as you not use a CO2 generator (propane flame), you shouldn't have a heat issue. CO2 is heavier than air, so even if you are venting it as long as the fan is off during the gas induction phase you should see major benefits.

There are several ways you can proceed. I have excerpted the following from Hydrofarm's website as it contained a great deal of pertinent information on the subject.

Carbon Dioxide Enrichment Methods
By Roger H. Thayer, Eco Enterprises

CARBON DIOXIDE (CO2)
Carbon dioxide is an odorless gas and a minor constituent of the air we breathe. It comprises only .03 % (300 parts per million, or PPM) of the atmosphere but is vitally important to all life on this planet!

Plants are made up of about 80-90 % carbon and water with other elements like nitrogen, calcium, magnesium, potassium, phosphorous and trace elements making up only a small percentage. Almost all of the carbon in plants comes from this minor 300 PPM of carbon dioxide in the air.

Plants take in CO through pores, called stomata, in their leaves during daylight hours. They give off oxygen at the same time, the results of a process called photosynthesis. This oxygen that they give off is used by humans and all animal and marine life on this planet. Without it, animal and human life would not be possible.

Oxygen comprises almost 20 % of the earth's atmosphere. Most of it was generated by plant life. The process of photosynthesis combines CO2 and water to form sugars and free oxygen. Simple sugars like C6H12O6 provide plants with energy and are formed into the more complex plant parts such as carbohydrates, amino acids, protein, cellulose, leaves, roots, branches and flowers.

People and animals breathe in oxygen generated by plants and breathe out the CO2 that the plants needóa truly symbiotic relationship. In ancient times, millions of years ago, when there was only plant life on the earth and no animal life, the atmosphere was quite different. There was much more volcanic activity, one of nature's sources of CO2, and the air contained three to four times as much of it than now. Plants thrived. Giant tree ferns reigned supreme and much of our coal, gas and oil deposits were created by them during that long-ago time.

Plants would benefit from more CO2 in the air today, and actually are benefitting as we burn more fuels, one by-product being carbon dioxide. CO2 in the air has increased from 270 PPM to over 300 PPM, more than an 11% increase, in just the last 40 years! This has also worried many scientists because of what is called the greenhouse effect.. The more CO2 there is in the atmosphere, the higher the planet's temperature will go. Too much warming of the planet can melt ice caps, flood coastal cities, spread deserts and famine and drastically change the climate. This effect is somewhat self-regulating however. The oceans absorb a great deal of CO2 giving algae and plankton, 90% of the plant matter on earth, more CO2 to grow on and giving the rest of the plant matter on land more also. This decreases the amount of CO2 in the atmosphere, thereby regulating it. Scientists are just now learning to understand the self-regulating systems that stabilize most factors in our environment.

CO2 ENRICHMENT
Biologists and plant physiologists have long recognized the benefits of higher CO2 content in the air for plant growth. Horticulturists and greenhouse growers have used CO generators to enhance growth rates on plants for many years with good results.

With the advent of home greenhouses and indoor growing under artificial lights and the developments in hydroponics in recent years, the need for CO2 generation has drastically increased. Plants growing in a sealed greenhouse or indoor grow room will often deplete the available CO2 and stop growing. The following graph will show what depletion and enrichment does to plant growth:

Below 200 PPM, plants do not have enough CO2 to carry on the photosynthesis process and essentially stop growing. Because 300 PPM is the atmospheric CO content, this amount is chosen as the 100% growth point. You can see from the chart that increased CO can double or more the growth rate on most normal plants. Above 2,000 PPM, CO2 starts to become toxic to plants and above 4,000 PPM it becomes toxic to people.

With the advent of ideal growing conditions conditions provided by metal high-intensity discharge (H.I.D.) lighting systems, hydroponics, environmental controls such as temp., humidity, etc. and complete, balanced plant nutrients such as Ecogrow, the limiting factor on plant growth rate, quality, size and time to maturity becomes the amount of carbon dioxide available to the plants.

There are five common methods of generating extra amounts of CO2:

1. Burning hydrocarbon fuels

2. Compressed, bottled CO2

3. Dry ice

4. Fermentation

5. Decomposition of organic matter

We will discuss these five methods briefly in turn. In order to make an effective comparison of CO2 generation, benefits and drawbacks, a std. 8' X 8' X 8' or 512 cu. ft. growing area will be used.

1. BURNING HYDROCARBON FUELS:
This has been the most common method of CO2 enrichment for many years. A number of commercial growers and greenhouses use it in their larger structures. The most common fuels are propane, butane, alcohol and natural gas. Any of these fuels that burn with a blue, white or colorless flame will produce carbon dioxide, which is beneficial. If a red, orange or yellow flame is present, carbon monoxide is being generated due to incomplete combustion. Carbon monoxide is deadly to both plants and people in any but the smallest quantities. Fuels containing sulfur or sulfur compounds should not be used, as they produce by-products which are harmful.

Most commercial CO2 generators that burn these fuels are too large for small greenhouse or indoor grow room applications. Some small ones are avai fable or a Coleman lantern, bunsen burner or small gas stove can be used. All of these CO2 generators produce heat as a by-product of CO2 generation, which is rarely needed in a controlled environment grow room but may prove beneficial in winter growing and cool area greenhouses.

The rate of CO2 production is controlled by the rate at which fuel is being burned. In a gas burning CO2 generator using propane, butane or natural gas, one pound of fuel produces approximately 3 pounds of carbon dioxide gas and about 1.5 pounds of water vapor. Approximately 22,000 BTUs of heat is also added. These figures can vary if other fuels are used.

To relate this to our standard example in an 8' X 8' X 8' growing area, if you used ethyl or methyl alcohol in a gas lamp or burner at the rate of 1.3 oz. per day, we would enhance the atmospheric concentration of CO2 to 1300 PPM if the room was completely sealed.

An enrichment standard of 1300 PPM was chosen as it is assumed that 1500 PPM is ideal, and that the plants will deplete the available CO2 supply by 100 PPM per hour. Remember, the normal atmosphere contains 300 PPM of CO2. A 100% air exchange (leakage) every two hours is assumed to be the average air exchange rate in most grow rooms and tight greenhouses. If many cracks and leaks are present, this exchange rate will increase significantly, but added CO2 (above 300 PPM) will also be lost. If a vent fan is in use, disregard CO enrichment, as it will be blown out as fast as it is generated.

A circulation fan is beneficial, as it moves the air about in the greenhouse or grow room. If the air is still, it can cause a "depletion layer effect". This effect causes the CO2 right next to the plant leaf to be quickly depleted. If fresh air carrying additional CO is not brought to this surface, photosynthesis and growth will diminish and eventually cease.

There are a number of factors involved in keeping the CO2 content at the desired concentration level. 1. If the greenhouse or grow room is not tightly sealed up, add up to 50% to the CO2 generator production volume. 2. If temperature is increased fiom 70 F to 90 F, add 20% to the volume generated, and vice-versa. 3. If the grow area contains large or tightly spaced plants, add 20% to 30% to the CO2 volume generated.

If more light is used, more CO2 can be utilized and should be produced proportionately up to the practical limit of 5,000 footcandles per square yard and 1500 PPM CO2 atm. content. When more CO is generated, more water and plant nutrients should be used, again to a practical limit of 2X normal. lf your plants are going to grow faster because of CO2 enrichment, they will need more nutrient and water.

The last factor to consider in maintaining a set CO2 level is the size of your growing area. This is simply done for gas burning and following methods by setting up a mathematical ratio. In our "standard" room (8' X 8' X 8'), we have 512 cubic feet. If your growing area measures 10' X 10' X 20', you have 2,000 cubic feet of volume to contend with. If you want to use the ethyl alcohol/gas-lamp enrichment method, set up the ratio using l.3 oz. by weight of alcohol per day gives:

1.3 oz./day = 512 cu. ft.
------------------ -------------------

X oz./day = 2,000 cu. ft.

Then cross multiply: 512 X = 1.3 X 2,000. Dividing both sides by 512 gives you X = (1.3 X 2000)/512, solve for X. X = 5 oz.
You need 5 oz. of ethyl alcohol per day in a 10' X 10' X 20' grow area to generate the same amount (1300 PPM) of CO2 as in a 512 cu. ft. room.

To generate 1500 PPM above the available CO2 (200 PPM) in the same size area, set up the ratio:

1300 PPM = 5 ounces

-------------- ------------

1500 PPM = X

X = (5 X 1500)/1300 = 5.77 ounces.

NOTE: One pound of CO is equivalent to approximately 8.7 cu. ft. of gas at standard temperature and pressure.

If different hydrocarbon fuels are used, the heat content, in terms of B.T.U. should be taken into account. If the BTU per hour rate is half that of ethyl alcohol, twice as much must be burned to generate the same approximate amount of CO2 desired. The amount of CO2 generated depends on the carbon content of the fuel being used. The BTU per hour heat content can be obtained from literature or suppliers.

2. COMPRESSED, BOTTLED CO2:

This is the second most popular method of CO2 enrichment and provides fairly accurate, controlled results. Compressed CO2 comes in metal containers under high pressure. Small cylinders contain 20 lbs. of compressed CO and large tanks hold 50 lbs. Pressure ranges from 1600 pounds per square inch to 2200 PSI.

To enrich available CO with compressed gas, the following equipment is needed:

1. Tank of compressed CO2

2. Pressure regulator

3. Flow meter

4. Solenoid valve, (plastic or metal)

5. Short-interval 24 hr. timer capable of having an "on time" variable from one to 20 minutes.

6. Connecting tubing, fittings and adapters

PRESSURIZED CO2 ENRICHMENT SYSTEM ARRANGEMENT
This method allows for the injection of a controlled amount of CO2 into the growing area at a given interval of time. The pressure regulator reduces the compressed gas pressure from 2200 lbs./square inch to a more controllable amount (100 to 200 PSI) which the flow meter can handle. The flow meter will deliver so many cubic feet per minute of CO2 to the plants for the duration of time that the solenoid valve is opened. The timer controls the time of day and length of time that the solenoid valve is open.

To operate this CO enrichment system in our standard 8' X 8' X 8' grow room area, we want to add enough CO to increase the near depleted level of 200 PPM to 1500 PPM. We must then add 1300 PPM of CO2 to a volume of 512 cu. ft. We would like to do this in intervals of time relative to the natural air exchange rate (leakage rate) to keep the CO level near the 1500 PPM range.

Let's select an injection time interval (CO2 enrichment time) of every two hours. First, we must determine how many cubic feet of CO2 must be added to 512 cu. ft. of volume to increase our 200 PPM to 1500 PPM. To do this, multiply the room volume of 512 cu. ft. by .0013 (1300 PPM) to obtain 0.66 cu. ft. of CO2 that is needed. Set the regulator at 100 PSI and the flow meter at 20 CFH (Cubic Feet per Hour) or 0.33 cubic feet per minute. If we set our timer to stay on for two minutes every two hours, we will get the 0.66 cubic feet of additional CO we need to bring the CO level to the 1500 PPM optimum level needed.

Each pound of CO compressed gas contains approximately 8.7 cubic feet of CO gas at atmospheric pressure. Compressed CO2 costs around 50 cents/lb. at most supply houses. At that rate of 0.66 cu. ft. every two hours for 18 hours per day, this method will cost around 30 cents per day to operate. The timer should be set to deliver CO2 during the "on time" (daylight time) for which the lights are set. This is the only time the plants can use CO2; they do not use it when it's dark.

The compressed gas method of CO enrichment has the advantages of fairly precise control, readily available equipment ($150.00 to $300.00 average cost for an installation) and it does not add extra heat to the growing area. It also works well for small growing spaces and after initial equipment costs, is not expensive to operate.

3. DRY ICE METROD OF CO2 ENRICHMENT:
This method works well for small areas, especially if some cooling effect is desired. Dry ice, solid carbon dioxide, is very coldóabout 109 degrees F below zeroóso we suggest you handle it with gloves. Dry ice is available through freezer and meat packing outlets and is relatively inexpensive. In our std. 8' X 8' X 8' room, you would need about 0.8 lbs. of dry ice per day to raise the atmospheric CO2 content to 1300 parts per million. If the growing area is quite warm, 0.8 lbs. can melt much faster than 18 hours. Two methods can be used to regulate this. One is to cut just small pieces, about .1 lb., and add a new piece every two hours to the growing area. The second method is to put the required amount in an insulated styrofoam box with a few small holes cut in it. This will slow the rate of melting considerably but must be "tuned in" to get it just right so 0.8 lbs. melts in the 18 hours of light "on" time. Extra dry ice must be kept in a freezer to prevent loss due to evaporation.

Since CO2 is heavier than air, one good method of distributing it to the plants is to attach the container or dry ice to the light reflectors which are normally placed over the plants. The CO2 will then flow down through or over the lights and evenly bathe the plants. If a circulation fan is used, the dry ice or its container should be placed directly in front or behind it for even distribution. Common to all CO2 enrichment methods, try to seal up the room or greenhouse as best you can, especially around the bottoms of doors and walls.

The dry-ice method will cost around 60 cents per day for our standard sized, 512 cu. ft. grow room. A possible benefit of using dry ice is the cooling effect it produces.

4. FERMENTATION METHOD OF CO2 ENRICHMENT:
Sugar is converted into ethyl alcohol and CO2 when it ferments due to the action of yeast. In this method, the following ingredients and equipment are needed:

1. Suitably sized container, plastic or glass

2. Sugar, common or invert

3. Yeast, brewers or bourgelais wine yeast

4. Yeast nutrient

5. Sealant, cellophane, tape or lid

6. 1/4 plastic tubing

7. 1/4 shutoff valve

8. Balloon

9. Starter jar or bottle

A pound of sugar will ferment into approximately half a pound of ethyl alcohol (C2H5OH) and half a pound of CO2. One pound of CO2 makes 8.7 cubic feet of CO2 gas at normal atmospheric conditions. In our standard 8 X 8' X 8' grow room, you will need to generate 512 cu. ft. X .0013 (1300 PPM CO2) = 0.66 cubic feet of CO2 every four hours. It takes time for the yeast to ferment sugar, so the size of container you should use in determined by dividing the cubic feet of growing area (512 Cu. ft.) by 32 = 16 gallons.

A convenient container to use here would be a plastic kitchen garbage can. These are inexpensive and easily obtainable.

To determine how much sugar we need for six weeks of operation or until fermentation ceases, the following calculations are necessary: From the above paragraph, we need 0.66 cu. ft. of CO2 every four hours. If one pound of CO2 makes 8.7 cu. ft. of CO2, we will need 0.08 lbs. of sugar, but because every one pound of sugar only makes 1/2 lb. of CO2, we must double the amount of sugar needed, i.e. 0.08 X 2 = 0.16 lbs. of sugar every four hours. Since there are six four-hour periods in a 24 hour day, the amount of sugar we need is 0.16 x 6 or 0.96 lbs. of sugar per day.

If we round this off to one pound of sugar per day, we will need 42 lbs. of sugar in six weeks. We must consider that only 80 to 90% of the sugar will be completely converted in this length of time, therefore, we should actually use about 48 lbs. of sugar in six weeks.

The sugar solution to start with is 2 1/2 to 3 lbs. per gallon. You can use hot water to start with, as sugar dissolves faster in it than in cold water. You must let it cool to 80-90 degrees F before adding yeast to it or the yeast will be killed. Start with the fermenting container only half-full as you will be adding an extra gallon per week for 6 weeks. Begin with eight gallons per week and 24 lbs. of sugar.

To start the solution fermenting, you will want to make a "starter batch" of sugar water, yeast and yeast nutrient. To do this, use a coke or beer bottle (approx. one pint), dissolve 1/4 lb. of sugar in 10 oz. of warm water (approx. 3/4 full), add a pinch of yeast and two pinches of yeast nutrient to this sugar mixture. Place a balloon on the bottle and set in warm location, 80 to 90 degrees F, for one to two days or until the balloon expands and small bubbles are visible in the solution.

After the starter solution has begun fermenting vigorously, it is added to the main fermentation tank at the same temperature already mentioned. After a day or so, to see that the system is working properly and that CO2 is being generated, close the valve to the supply tube and, if the unit is sealed properly, the balloon should expand in a short period of time. To regulate the amount of CO2 being delivered to the plants, open the valve until the balloon is only half the size of full expansion.

The CO2 supply tube with in-line valve should have a 2" loop in it half full of water to serve as an air-lock. This loop can be held in place with tape on the side of the fermentation tank. The open end of this tube can either be positioned in front of a circulating fan or run through "T" fittings to make additional tubes, the ends of which can be positioned above your plants. Remember, CO2 is heavier than air and it will flow downwards.

Once per week, undo a corner of the Saran Wrap and add an extra gallon of sugar solution and yeast nutrient, then reseal the top with tape. Use three lbs. of sugar and one teaspoon of nutrient per gallon.

After the last gallon is added, after six weeks of operation, let fermentation continue until the balloon goes down and no more bubbles are visible in the "U" tube. When this point has been reached, taste the solution. If is it sweet, fermentation is not complete and a new starter batch should be made and added to the tank. More yeast nutrient should also be used. If the solution is dry (not sweet) like wine, fermentation has stopped and the alcohol content has killed the yeast. At this point, it's time to clean your tank and start a new batch.

The fermentation process is quite good for generating CO2 and relatively inexpensive. Regular or invert (corn) sugar is inexpensive and available. You may have to purchase invert sugar at a wine supply store. This method of generating CO2 will cost approximately 50 to 60 cents per day.

To save money on extra yeast, you can either take out approximately a gallon of fermenting liquid and save for the next batch, or start a second system identical to the first and alternate themóclean and replenish one, then three weeks later, clean and replenish the second.

5. DECOMPOSITION PROCESS OF GENERATING CO2:

When organic matter decomposes due to bacterial action, carbon dioxide is generated. Plants grow lush and vigorously on a tropical jungle floor as a result of this natural decay of dead plant and animal matter. This can increase the available CO2 content from the normal 300 PPM amount to over 1,000 parts per million. This can also be done indoors, for little cost, but is odorous and unsanitary. For these and other reasons, it is not highly recommended. The sterile conditions of a well-set-up hydroponic grow room or greenhouse could be disrupted and adverse bacteria, bugs and disease induced with detrimental effects on your plants.

In conclusion, all these methods will work if done properly and CO2 enrichment is a very beneficial addition to your greenhouse or grow room systems. Some are more practical than others, some less expensive and some require more time and attention. All chemical reactions are temperature dependent and photosynthesis is no exception. With CO2 enrichment, a higher temperature, up to 100 degrees F, can be used, more light may be needed as it is required for the photosynthetic reaction to take place. More water and nutrients will also be required, and a machete may be necessary to control the added, sometimes startling extra growth rates possible on most plants by using CO2 enrichment!

Eco Enterprises sells the following CO2 enrichment equipment:
1.Bottled (compressed gas) CO controller system, comes with regulator and flow meter, timer, solenoid valve, tubing, balloon fittings and instructions. Price - $199.50
2.CO2 fermentation kit, comes with nutrient, yeast, tubing, valve and instructions. Price - $17.50

I found this Active Air Active Air CO2 Enrichment System with Timer at Sears
Bottled (compressed gas) CO controller system, comes with regulator and flow meter, timer, solenoid valve, tubing and instructions. Price - $125.00

11909.jpg


I found that the buds were denser, larger and sweeter when using CO2. As far as yield goes, I felt I was getting between 10 and 15% more weight.

Remember that you can always trim some of the leaves selectively to let more light through. I also, covered the surface of the pots with white visqueen plastic which reflects the light (you could also use mylar). Anything you can do to maximize the illumination is a positive. Side lighting via small LED fixtures or high output fluorescent tubes can be stimulating for the plants.
 
Wow, thanks a bunch for all the info, Dean47. Maybe I'll get some CO2 set up for flowering. I think I'm going to see how well the LEDs I have in there work before I add more lights, but I agree that he plants would probably benefit from side lighting.

Thanks again for all the advice, I'll keep you posted on what I decide to do.
 
Thanks, cooljay.

The plants are now 17-18 days old. I flushed the system for a couple floods today, then filled my res with 30 gal of nutrient solution mixed from 5 mL each of BPN Grow, Micro, and Bloom per gallon. The strength is 456 ppm, at a pH of 5.9 (after the addition of pH down).

Over the course of the past week, I have been lowering the lights. They are now ~20" above the plants, and everything seems to be doing well. I also got some white and black poly cutouts to cover the rockwool cubes, as per Dean47 and Magic Beans' suggestions, to keep algae from growing on them.

IMG_19703.JPG
IMG_19735.JPG
IMG_19722.JPG
 
Thanks, dean47. If you think they looked good before, check them out now.
IMG_19768.JPG
IMG_19743.JPG
IMG_19797.JPG
IMG_19778.JPG


They plants are now 24-25 days old, and they are really starting to take off. I topped off the reservoir to 30 gallons yesterday, and upped the nutrient solution to 10 mL Grow, 7.5 mL Micro and 7.5 mL Bloom each per gallon. Since the initial solution was made of 5 mL of each part, I added 5 mL Grow, 2.5 mL Micro and 2.5 mL Bloom per gallon. After correcting the pH down to 5.7, the solution was 750 ppm. Before I added the nutes, it was at 460 ppm. I am maintaining the lights at ~20".
 
What size veg area does that ds100 REALLY cover! Do u think it would be perfect for a DR80 grow tent? 31"x31"x63"

Technically, maybe but my experience tells me that with artificial lights: more is more. The manufacturer's table of coverage follows. I always like to use (at least) double the requirement. Note that Goldbud has four DS100 for 48" X 48" closet.

Table.png
 
Thanks again for the tip, Beans. And thanks a bunch, BPN. The plants are loving the nutrients.

Cooljay- I agree with dean47 on this one. You can probably get by with a DS100, but I think it would be much better to use a DS200. That way, you saturate your grow area with "full strength" light (the grow area falls within the "core coverage" measurement). That way you will have no doubts as to the quality of the light you are receiving, and you get the proper amounts of each wavelength.
 
The plants are now 33-34 days old, and they had a busy week.

At 28-29 days, I topped the plants. At 30-31 days, I pruned the limbs on the bottom two nodes. At 31-32 days, I emptied my reservoir to refill with fresh juice. I refilled the reservoir with 35 gallons of RO water, and mixed up the tank with 10 mL each of BPN Grow, Micro, and Bloom. After correcting the pH to 5.5, the nutrient strength was 850 ppm. I only kept them at this strength for nine flood cycles, and turned them over to flower last night.

I topped off the res, and added 10 mL each of Grow, Micro, and Bloom to bring the solution back to 850 ppm. Then, I added 5 mL per gallon of Bloom, to bring the nutrient strength to 10, 10, 15 ml/gallon each of Grow, Micro, and Bloom. I also added .5 mL/L of BPN's Liquid Blue Bloom Booster 2-4-10. This worked out to about 65 mL. After correcting the pH to 5.7, the nutrient strength was 968 ppm.

The pics below are from last night, after I turned on the second (flowering) circuit on the LED lamps. There is a lot more red light, so I apologize for the color. I'll try to rig up some white light for the next round of pics so everybody can get a better feel for the color, but right now they are a dark, lush green.

Now the real fun begins...
IMG_19805.JPG

IMG_19824.JPG

IMG_19847.JPG
 
Back
Top Bottom