MVortex's Perpetual Thread For A 4x4 Tent & RDWC

I really hope that I wasnt the one that made you do that bro...Like seriously I'm just trying to help not make it worse or so bad that you want to hold it off for months and months now..You spent all that money and all that hard work don't give up now like for real please do not go to Coco...


I'm just going to be honest here.

a) Yes you were.

b) You then went on to do it again.


I don't doubt your intentions are good, but your tactics/presentation is severely lacking. This is how it sounds, in a nutshell, "You screwed it all up, take it apart and rebuild it like I did or your system will fail miserably. P.S. your nutrients are complete shit."

No, you didn't use those words, but that's how I read the underlying message. Which is where the presentation is lacking.


What I don't think you have grasped yet is that if I take any of this apart, then it's all scrapped. I'm not setting pipes on fire to get them apart.

There's no way around any of it. If I have to take any little piece apart to make a change, then that's it. It's all in the trash. Why? It's all glued together, and really well I might add. That's why I have rubber couplings in places: so I can take it apart when needed.

Now, if you want to try this conversation again, let's start with discussion about each piece and maybe try asking if I have thoughts or a plan for something before just jumping in and saying whatever you think I'm doing is completely wrong.

Could this be better? Yes, it could be. It's not 100% perfect, but neither is anything else.

Will it work? Sure it will.


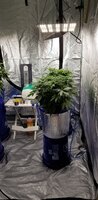
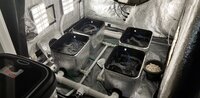
Let me give you a brief, big picture overview of what exactly I have going on here.

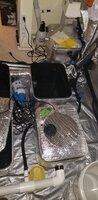
Basic 4-site setup. There are two water loops. A primary water loop, and (if needed) an isolation loop. I will detail those more in a second. Here's most of the main parts.

Basic Parts:
(4) 5gal buckets
(1) 27gal res (primary)
(1) 5gal res (isolation)
(4) 6" net pot bucket lids (pots are 4.5" deep)
(1) 400gph external pump
(1) 600gph air pump (w/ splitter for the buckets)
(2) 125gph air pumps (one for each res)
(1) Blue Guardian monitoring setup with temp, pH, EC/PPM/TDS

Main Water Loop:
Supply line: 3/4" PVC
Return line: 2" PVC

Isolation Water Loop:
Supply line: 3/4" PVC
Return line: 3/4" PVC from bucket, into 1.5" main


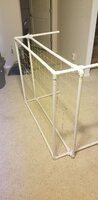
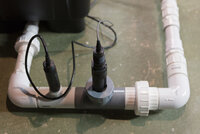
Here is a decent shot of the back, that shows both the main and isolation return lines:

plumb5-jpeg.1970862


You can see that 2" comes out of the bucket into a tee fitting. One side has a 2" valve for the main return, the other side has a 3/4" valve for the isolation return. All return lines operate by gravity and trying to equalize their height with the res. As water is pumped from the res into the buckets, it causes water to be pulled through the return.

This isn't how the plumbing was laid out in my head, but due to space limitations, this was the best overall way to get it done.


Now, what this isolation shit allows me to do is exactly what its name implies. What is one of the biggest issues looming over a multi-site, single res operation? That's right, individual plants. When there is an issue with a single plant (wants more/less nutes, has other issues) it's a pain in the butt to be able to handle the situation and manage it as effectively as you could if it was on it's own.

Enter the isolation loop.

The isolation loop allows me to isolate any combination of buckets. Granted there wouldn't be more than two running on it at any given time because if I were going to isolate 3, I would just isolate the 1 and leave the other 3 on the main loop.

For a bucket I can turn off the main supply, then turn off the main return. Then open the isolation return, and finally the isolation supply. Boom. Now that bucket is running on the isolation loop and I can feed/dose as it needs without causing issues with the other plants.

Got 2 plants that want to run a little cooler on the nutes? Isolate them.

Have 1 plant that starts to get a fungus? Isolate it.

See how that works?

It won't be in use most of the time, but it's like an insurance policy. It's there if/when you need it.


Inside the tent, the tent, the main return has 2 rubber couplings. The isolation return has 2 as well. This lets me separate the front and back buckets into 2 sections, as well as separate them from the outside lines to the res.

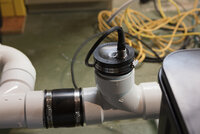
Supply lines are the easy part. Both are 3/4" PVC. There is a tee fitting at each bucket. Left and right sides have a valve which is connected to a supply line. The center coupling has a 4" length of pipe (actually 4.75" to account for the part inside the tee) sticking into the bucket. This creates the waterfall effect.

Each bucket also has a single air stone. Not really needed with the waterfall, but better safe than sorry. Can't have too much air.

For those pesky roots, it is what it is. My initial plan was a very, very fine screen. I was going to make a tube of it, wrap it around the pipe, and let it extend across the bucket. Kind of like a pipe extension, but with screen as the pipe.

It's super fine screen. We're talking super, super fine screen. Roots can find a way, obviously, but it should slow them down at least. Combined with the much lower flow rate as compared to a traditional undercurrent, it should be fine.


What I've considered in the past day or so has been:

a) create an "overflow" type box of sorts, for lack of a better term. Effectively the box kind of goes around the return, and lets water in at the top. Something that's maybe 4x4x4. It fits around the return line, and in theory the majority of flow comes in through the top, although the bottom/sides would allow for a minor percentage of flow.

b) create a partial false bottom. I say "partial" as it would be at an angle instead of completely flat. Options with this would be to drill a bunch of small holes, and line the back with the super fine mesh. Some holes may get a root, but as long as 1/3 of the holes are open, it should be fine.

c) full false bottom. I've seen setups which used this same screen to create a full false bottom, and it worked fine.

d) add a 1/2" drain line to each bucket that is only used for drainage purposes and can be blown out. THEN put an elbow on the internal part of the return pipe, and then add a length of pipe to create an overflow. This would require a little more plumbing, but not much, and the roots wouldn't be getting into that as they are trying to go down. This would also provide a constant water level in the bucket.

e) another option of "d" above would be to go kind of half and half. I could put a tee on the inside, with one side having a bushing to make it a 1/2" opening, and then the other side would be the water-level overflow. My guess is that wouldn't work very well, as the flow most likely wouldn't be enough to get the level up to the overflow.


Why does the screen seem to work pretty well? Because of the pretty low flow per bucket. It will never flow any faster than its input. I aim to turn the buckets over about once every 6-8 minutes. This means about 7-10 times per hour. I may even cut it back to 5x per hour. There is plenty of circulation, even at lower flows, but not too much to where it's creating a massive suck on the roots and pulling them into the return. IMO, this is why roots get into return lines. Not from necessarily "following the water", but because of the suction from the return. Return creates suction, it sucks the roots towards it, there's water there, so off they go.

Slower flow, less "suck" on the roots into the return lines. Hinder their path a bit, and they end up pretty content where they are at.

If I've used the isolation line, I can unhook it at one of the couplings and suck out the leftover water.

In between runs, I can unhook it and clean most of it.

I'll be running z7, which I've had nice results with, and honestly it's reduced the need for a real scrub down. Love that stuff.


Now, if I were to rip all this shit out and do it over, would I do it differently?

Well, yeah, I would.

So what specifically would I do different?

I would do one of several things, knowing how the space has made its limitation.

First, I would run the main return line either around the outside (like I did with the isolation loop) or I would have the left buckets facing the back (as they do now) and the right buckets facing the front. This would let me use a tee instead of a cross. The real goal here is to get the plumbing out of the center, and provide a little easier access without pipes in the way. It's not bad, but it would be an improvement.

Second, I would say screw it and spring for the square/rectangle shaped buckets. The flat sides are better to work with, regardless of whether you use a uniseal or a bulkhead. At $10/bucket for the square or $3/bucket for the round, well, there ya go. I cut a corner where I could, and while not great it's not the end of the world.

Third, I probably wouldn't have glued the return lines. At least not initially. There just won't be much PSI on them at all. Yeah, it's safer with glue, but it's also a pain if you need to change something. At the very least I would have dry fit the whole thing, then checked for leaks and only glued if needed. Would have made changes at this point much easier. But for $12 per 2" valve... um, yeah... In just valves, to replace both return lines it's $60. Plus pipe and fittings. Pipe is cheap, fittings... not so much. I'd be looking at dropping about $120 to redo it all, just for pipe.
Buckets? Add $40. Then add another $35-$40 for the bulkheads/uniseals. Shit adds up. I could do that. However, just because I can doesn't mean I should, which is why I can in the first place.


Fourth, I would definitely explore using the place where the tent doors come together as the duct port. It's a little shorter, but with that my main concern is closure. It's a decent idea, but I'm not sure it could be sealed up as well as the duct ports. Thus you're still on a riser, or having to get creative in managing the water level so that it can take that hump out of the equation.

I think a little taller bucket (like the 13gal ones) combined with using an overflow internally to the bucket would do the job.

What's the real gain on all that shit though?

About 6" in grow height, and maybe a little safer with the bucket sitting on the floor. Right now, that height is kind of balanced out. I moved the carbon filter/fan outside the tent, so gained some height there, but then put the buckets on a riser and took the gain back. It evens out to what I would have had, but could be better. As it stands right now, I have about 54" between the top of the buckets and the bottom of the lights at their highest point. I could potentially get the lights another 3" higher, but would have to get creative with my ratchet hangers. I may do this, but not sure yet. If I needed to do it later, it wouldn't be terrible to do so. However, if I did it now it might make it a little easier to raise the lights overall. I'll have to see how that all goes.


So, this is where I'm at. I wouldn't say stalling (I don't have time to really plumb anything this week anyway, and I dislike doing it in 15 or 20 minutes spurts) but I would say while I wait for the next chance to work on it that I'm taking some things under consideration to make it even better. If I can do that, but keep the cost down, I may consider something. But really, at this point, I've dumped way too much into this bullshit just for a legal, medical hobbyist size grow.
 
Added up the plumbing parts. To rip it out and replumb would be $175 (plus tax) for the pipe, fittings, and valves.

Plus new buckets ($100 @ 4 x $25), and then bulkheads on top of that.

So effectively $300+ to re-plumb, seal, and bucket it all.

I will have to think hard and heavy on that one, and whether the end result is worth it or not. Right now, I'm not convinced.
Tbh bro I would use the current setup you have built so you can at least get a grow out of it and go from there...Also for certain fittings it's cheaper to buy online like bulkheads and some PVC fittings...That price to rebuild it is that with orbit fittings and tees..Instead of elbows...As having complete access is very important on a rdwc setup...As far as the end result on having to build a entire new setup well is being able to harvest crops worth it...
However bro for ur 1st build u have done a great job no doubt about it you pay attention. To detail and u do things to the best of your knowledge at the time...As with anything you will always learn new things...As for your 1st build you did better than me....Check out the current culture grow modules as they maybe something you would like over the ez store buckets..As I'm thinking about getting them as the buckets on The inside are smooth and has a single chamber on the floor the ez store has x3 sections so you cannot drain them all the way like with the new ones..They are a lil expensive but we'll worth it esp with quality wise...
 
I may just use what I have and then start collecting parts to rebuild after a grow or two. I'll have to see. I have 4, soon to be 5, going right now anyway, so maybe I can take a couple weeks to work some things apart and then see where I can go from there.

I haven't been able to find those CC buckets online, other than in a complete system.
 
IMG_20191116_185619.jpg
made my new top off stand today sooo much better than the 1st one I made ...
IMG_20191116_125031.jpg
also bro have u thought about a chiller as depending on how much power u run and what ambient temps are but u might need a chiller now esp with the 13gal buckets...I used hard lines for my chiller instead of 3/4 hose like how they come and everyone else uses however I like PVC much much better and if you need a lil bit of flexibility then fpvc is where it's at like I used from the chiller to my control bucket instead of having another elbow just have a nice lil sweep curve and problem solved..And w the orbit fittings it's very easy to take them off and hook back up the hoses that goes into a 5gal bucket w a pump as I use 1 or 2 cups of h2o2 into about 1-2gal of water to clean the chiller as if you don't do it it's impossible to clean even with how I clean my system...
IMG_20191116_124651.jpg
just to show u the room I have with x2 27gal in a 4x4 pretty much
 
Here's some random stuff that might help anyways And it shows just my veg from my dwc to the cluttered rdwc to the new and improved and believe it or not I still have walking room down the middle if need be it's a tight fit but then again..It's not really for me it's for the plants and more room for them over me I have enough to do what I need to do and that's all what matters ...
 

Attachments

  • 20180731_181331.jpg
    20180731_181331.jpg
    636.9 KB · Views: 57
  • 20180909_163954.jpg
    20180909_163954.jpg
    392.5 KB · Views: 58
  • 20181020_125319.jpg
    20181020_125319.jpg
    450.9 KB · Views: 59
  • 20181115_204332.jpg
    20181115_204332.jpg
    586.7 KB · Views: 50
  • 20190421_200304.jpg
    20190421_200304.jpg
    573.4 KB · Views: 51
  • 99835bc69f81a5430540e7238e5e834b14af69a3_1_690x459.jpg
    99835bc69f81a5430540e7238e5e834b14af69a3_1_690x459.jpg
    215.1 KB · Views: 55
  • 23d8602e64d6298aa0971812a9bbf3721f572285_1_690x459.jpg
    23d8602e64d6298aa0971812a9bbf3721f572285_1_690x459.jpg
    219.1 KB · Views: 48
Here's the changes being implemented. Much more simplified for now.

rdwc-v3.jpg


This isn't 100% accurate in terms of where each and every connection is. It's a general explanation in diagram form to give the idea. The idea is not revolutionary, it's a common setup.

This gives the under current, plus the waterfall effect. Also 1 airstone per bucket, just 'cause you can't have too much air, right?

(4) 13gal, EX Stor buckets
(4) Current Culture white lids, with 5.5" net pot

Return line is all 3". All buckets are connected twice, yes. Why? Roots should clog this much less, and if one side happens to get clogged, there is still another side available. Each bucket will get a root screen added, which is an extremely fine mesh. It won't stop them outright, but should slow them down considerably. No, the screen will not be directly over the pipe, I will be creating a false bottom out of the screen that will cover the entire bottom of the bucket, above the pipes. Again, it won't stop them completely, but should slow them down enough so that what does get through will be less than without.

Unlike the previous implementation, the buckets will not be on a riser. They're already 19" tall on their own, which yields about 8" of wiggle room for the water level when taking the "hump" into account.

While the buckets are light proof, I may go ahead and wrap them in reflective material anyway. Shouldn't need light down that far, but it would help keep the water cooler. Not that the water is going to need it right now, but into the warmer parts of the year, probably so. I may wait until after the first run and then get 4 of the bucket blanket thingies that CC makes. Depends on my mood.

The res gets 2 air discs.
The top off (ATO) gets 1 air disc, just to keep it from stagnating.

Res is 27gal, will hold approximately 25gal as the water level in the res will be ~1.5" below the rim when completely full. It will still be on a riser of about 4".


So now, more on the plumbing.

3" PVC return line, with 3" CC bulkhead fittings. No more uniseals below the waterline. This is probably good, as I have a feeling at least 2 of the old buckets would have leaked.

The supply line is 3/4" PVC. There will be at least 1, if not 2 unions added so that it can be more easily taken apart.

This may sound weird to some, but follow me through this. Anywhere I would use an elbow, I'm going to use a tee. Anywhere I would use a tee, I'm going to use a cross. This means that one side is unused, and that's the point. I will get a plug for that side, and use it as an access point for cleaning. Each plug (2 parts) will run about $1 total, and I'll need about 15 of them, give or take.


The rest of the tent will remain the same.

Big ass Growers Choice ROI-E680 for the main light, a few USB 6" oscillating fans, a 9" USB floor fan, AC Infinity S6 for exhaust, so on and so forth.

I'm waiting for the buckets, lids, and all that to ship. Hoping they will be here before next week Thursday (11/28) because of the holiday. That gives me 4 days (ok, more like 3 1/3) to put it all together. I think that with the significantly less complicated design that it should be possible. Get all the prep done late Thursday (11/28), build build build on that Friday, tidy up Saturday, and then maybe leak test by that Sunday (2 weeks from now.) Then maybe we can drop some damn seeds for this thing! lol
 
Just caught up.

You have my sympathies! :rofl::rofl::rofl:


Seriously though, my overall idea is fine. where I ran into a problem is when I had to redesign on the fly and turn the buckets 90* towards the back so all the valves would fit. There just wasn't enough room (short a few inches) for my original plan. Had I been able to stick to that, it would have been much better.

Second issue would have been with the uniseals. Bulkheads would have been a much better choice. When I originally ordered them, there weren't enough bulkheads available, so I ended up getting uniseals instead. I am guessing I would have had to seal a couple of them. (This is based on when I was tearing out/down the old system.)

Third, because of the first, it also created some maintenance "dead spots." Places it would have been a biznatch to get into a clean.

Fourth, using 2" pipe. The only reason I went that route over 3" was because of the cost difference in a 2" and a 3" ball valve. As in $45 vs $8. $180 for damn valves? Nah. And that's just plain old socket. Union ends? Oh hell naw... not for $100 a pop.

Tell you what, that $180 is looking cheap now. :rofl::rofl::rofl:


When I tackle the original concept again, and I for sure will be, I will be making a few changes to alleviate the above issues. Specifically knowing how my plumbing is going to route, and ensuring there are enough ways to open and clean it between runs. The other thing will be actually using 3", and sucking it up and getting the 3" valves. Maybe not. I guess I could do (2) 2" outlets, with valves, and still be ahead. :laugh:

Oh well, not messing with all that right now. We're on to other things and awaiting the new parts.
 
And we have a partial shipment of parts. :D

The net pots and lids are shipping. That's a start. I'm guessing the rest will ship pretty quickly behind them. Small sliver of hope for being able to put it all together over the long weekend next week.

:thumb:
 
Shipping update:

Everything started arriving yesterday. More stuff today, tomorrow, and the final on Saturday. The big pieces of it all are today and Saturday.


Delivered yesterday:
- Gorilla PVC glue, low VOC (no more high on glue!) (ordered because it was out of stock locally)
- Orbit tool pack to unlock their PVC fittings


Arriving today:
- Lids (the white current culture ones)
- Net pots (fits the above lids)


Tomorrow:
- shelving unit with counter top (see my lab thread for details if you're curious)


Saturday:
- buckets
- bulkheads
- orbit PVC elbows


The minor tidbits were picked up from the parts gettin store Monday evening. :)


So my plan was to work on it over the long weekend coming up next week. Maybe get in on it Wed night for a bit, then back to it late Thursday or early Friday. That would still be ideal, but dunno if I can keep myself out of the boxes until then. Might have to start in on it Saturday afternoon after UPS shows up. :laugh::rofl::laugh:
 
Lids and net pots are now in my possession.

Damn, these current culture lids are some stout mofo's. They're white, but there isn't going to be any light coming though, I can tell ya that.

I also like the net pots. They are the 5.5", current culture ones. They are 5" deep, and there is a 1.5"-2" riser in the middle to sit your stuff on. Also the top 2" or so is solid, and not net. That's a nice design in my book, and the solid top part should help curb against light leaks (although I will still take precautions just to be safe.)
 
Got all the parts. Return line inside the tent is done, w/ bulkheads. Getting ready to drill the lids, just been deciding on the best overall spot(s) for the supply to enter.

For reference:

rdwc-v3-jpg.1982769


Ignore the blue supply line above, it's just a general reference.


Where I think I will be putting the supply for each bucket is the back right corner for the back 2 buckets, and the front right corner for the front 2 buckets. This should keep the runs the same length, the same head height per run, and thus keep the flow to each bucket pretty close. I'm going to think this through a couple more times over a bowl of chili, before I go drilling and cutting.

I was going to go through the top of the lid, but in order to be able to more easily take a lid off if needed, I'm going to go through the side of the bucket in that corner. It's above the water line, so I'm going to use a uniseal since I have those on hand already. An elbow on the inside will direct water flow down towards the water and create the waterfall effect.
 
Got a little bit of work in yesterday. Have the return lines all connected within the buckets, as well as the supply lines to the buckets. Just need to run connections through the duct and to the reservoir now, as well as hook up the pump and such.

Went ahead and made the call to just use another of the 13gal buckets as the res. If my math is right, each bucket should should hold about 9gal +/- with a water level that is 1" below the net pot. Makes for about 45gal plus water in the pipe. Should be just under 50gal, which will be fine since I'm running a top-off res as well.

Going to build a little PVC stand for the top off res, so it can sit right over the main res. The res is 19" tall, so will go for 24" tall on the stand, and will use 1" pvc just to be on the safe side for weight and such.

Also going to use flex pipe to run it to the res, so I can move it when I need to do so.
 
A little more progress today.

So far:

- Top-off res stand is built
- Top-off res is drilled and plumbed
- Main res is drilled and plumbed, including top-off float, water-level, and both return/supply bulkheads
- Return line is completed


To do:

- Hook up line from top-off to res
- Run supply from res to pump, pump into tent
- Run air lines to buckets, res, top-off
- Add elbows on supply ends in buckets


I think that about sums it up. Only real "big" thing left is running the pipe from the res to the pump, into the tent, and connecting up to the supply line inside the tent.


Wish I would have made the call to use the 13gal bucket for the res earlier than I did. I could have added a CC res lid to my other lid order. It is what it is though, and if the last order is an indication, I'm guessing it will be here Friday. Could have used the black lid that would normally go on the bucket for the res, but one of the things I like about the CC lids is they have an access panel in the lid with a spot to run cords. That being the case, that's where my airlines will go in the main buckets, but also where my probe wires will go in the res. Easier than drilling a hole and trying to get it sealed up against light leaks.


AFB557BE-3E73-4111-B423-E3DA4DD5F0DA.jpeg


1DEE2951-689A-4132-AC96-AD33777D51C7.jpeg
 
Back
Top Bottom