

- Thread starter
- #101
Navigation
Install the app
How to install the app on iOS
How To Use Progressive Web App aka PWA On 420 Magazine Forum
Note: This feature may not be available in some browsers.
More options
You are using an out of date browser. It may not display this or other websites correctly.
You should upgrade or use an alternative browser.
You should upgrade or use an alternative browser.
VI's - Subcool Based - 2 Worm - Multi-Strain - Mother Hunt - 2016
- Thread starter Papageno
- Start date
CCOiler
Well-Known Member
Very nice VI, thank you.


- Thread starter
- #103
So
Back to this grow...
Recap notes:
Day 1: Seeds in water for a few hours then placed in most soil
Day 4: most of them surfaced.
Day 6: added a little water to the sprouts
Day 10: After changing the location a second NYPD sprout appeared
Day 14 all plants moved into tent
Day 15: Lightly watered sprouts
I posted a pic on page 5 (here it is again). You can see the beginnings where the top left one and the bottom middle show the first and second set of fan leaves drooping. They didn't get much worse just all but 2 did this the next day.
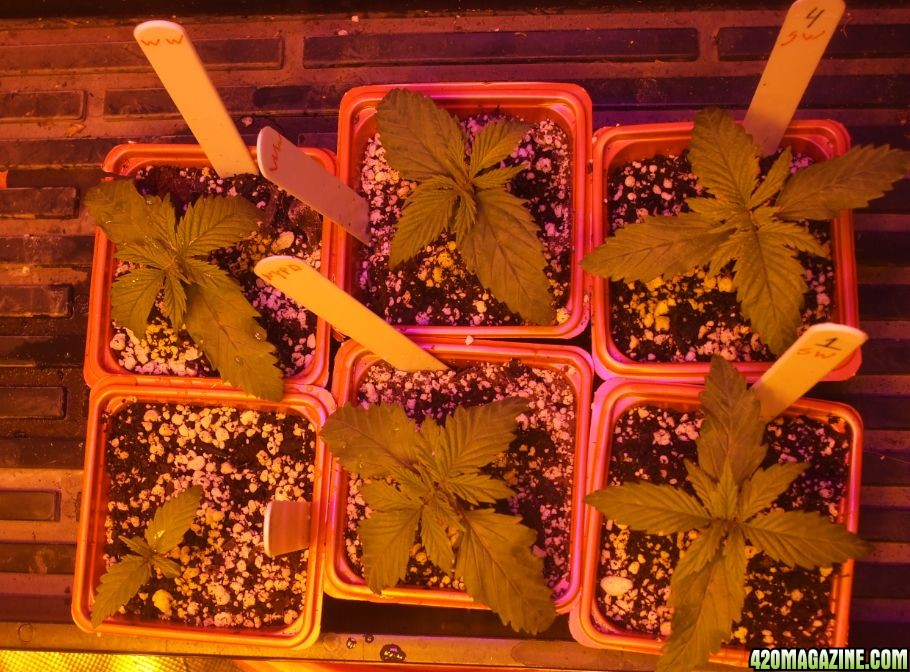
On day 17 I noticed the leaves started to droop. I figured it was becasue they were dry
On day 18 I noticed this again and decided to give then their first real solid watering. Since it is likely in dead soil and I have some Orca laying around I tossed that in to get the soil moving.
On day 19 (shown here) I noticed both serious nodal density but also a light deficiency starting on one plant even though they were still very small which was confusing for a few hours. All but 1 was showing serious drooping. The one that was fine was the NYPD (1.5 weeks behind). (At this point I am sure Emily knows what is wrong..it took me a few more hours, it was a hectic day and I couldn't focus on this). I moved them back out of the tent and back under the Mars LED. I didn't have time to do anything that day until late in the evening and I was in the middle of trimming whenever I had a few moments to spare.
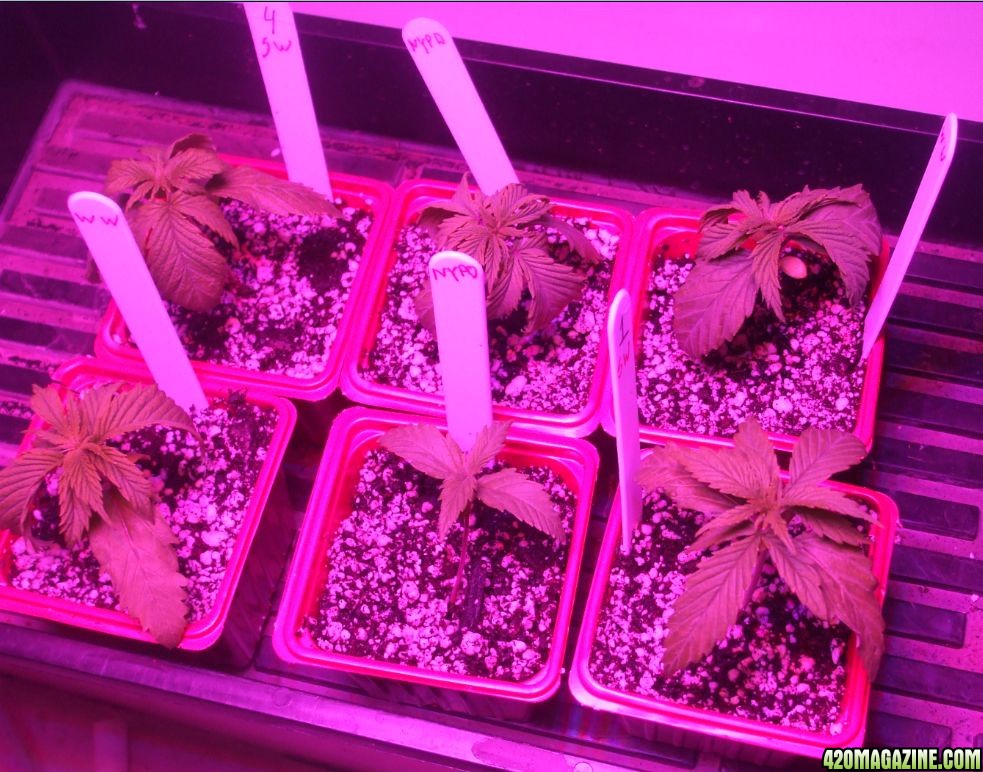
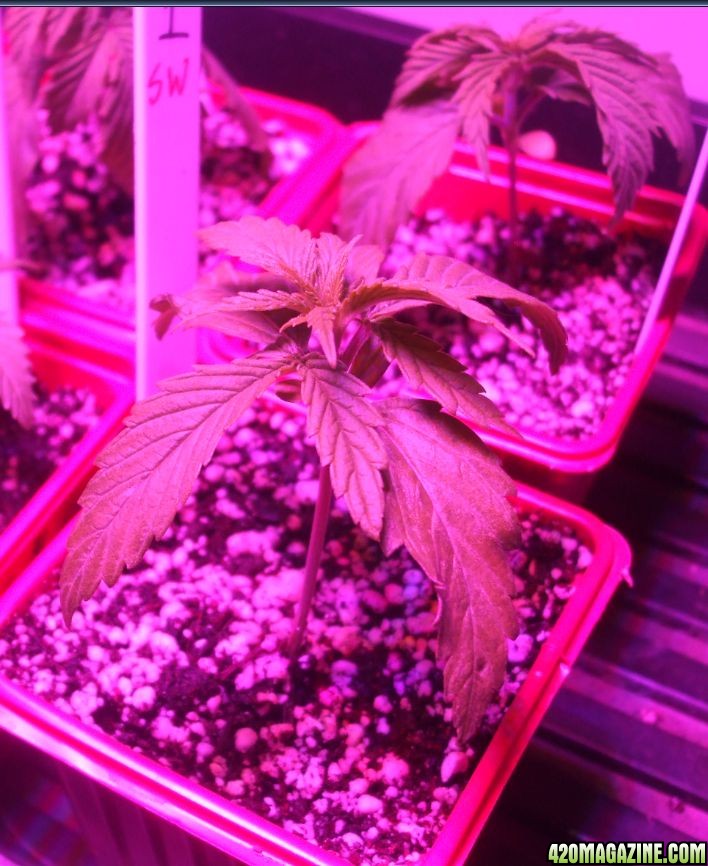
Then it hit me like a ton of bricks. Mass tight nodal spacing and 2 weeks in these supper small pots I have never used and normally wouldn't, defficiancies when it should not be using the soil yet... The tap root didn't get a chance to go anywhere and they may be root bound already. They switched from being sprouts to regular plants and were trying to use the roots and needed more soil to grow into. I usually use solo cups as they are deeper.
So late that evening I rolled up my sleeves and started the transplanting.
So for newbs here is what I did.
Start by filling in 1/3 of the pots with my compost. (I took pics of this whole process and can't find them. )
)
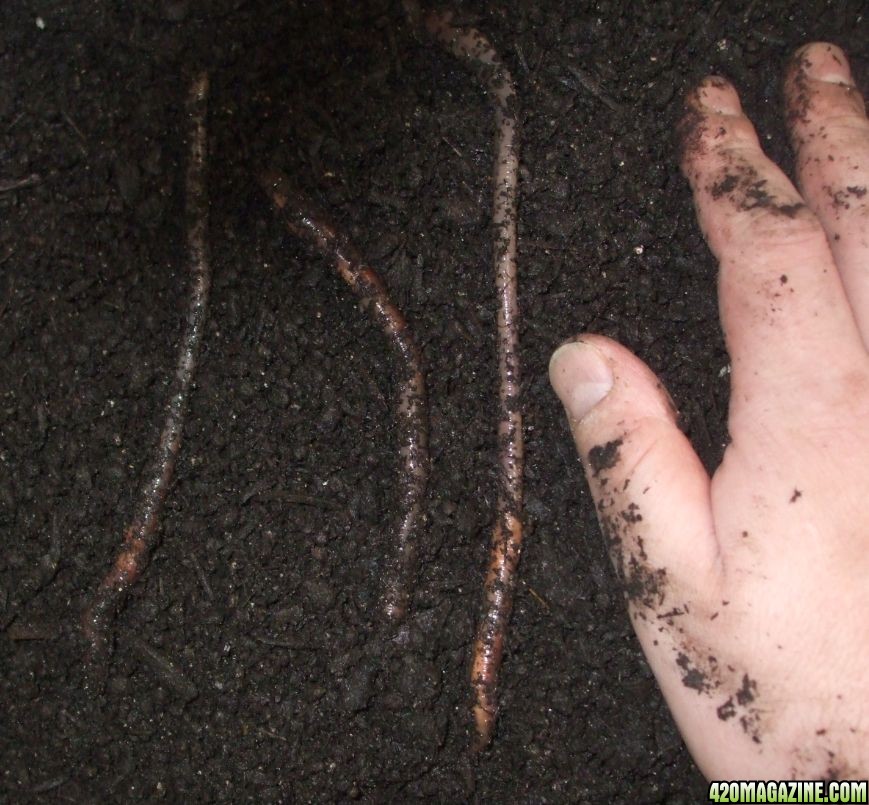
I put 2 worms in each pot from the compost pile. Those things love it in there. They have all gotten huge and fat.
Then filled in the rest with a soil blend of 1/3 perlite, 1/3 Fox Farm Happy Frog, 1/6 steer manure, 1/6 Coco fiber. Fill up and around an empty container to make the proper sized hole.
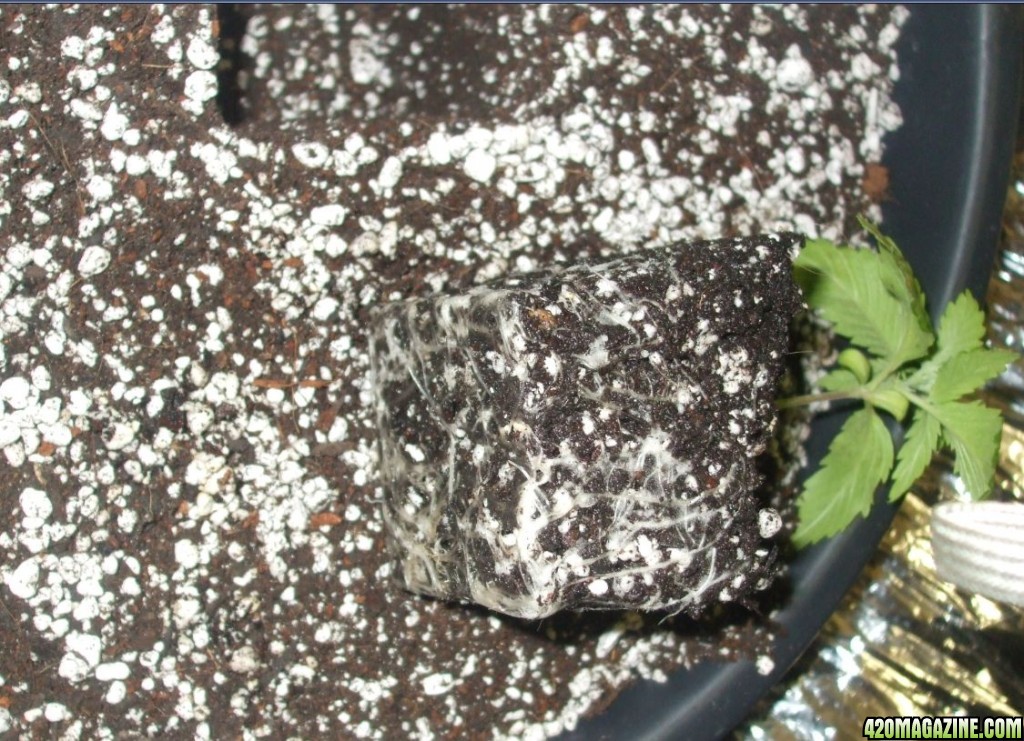
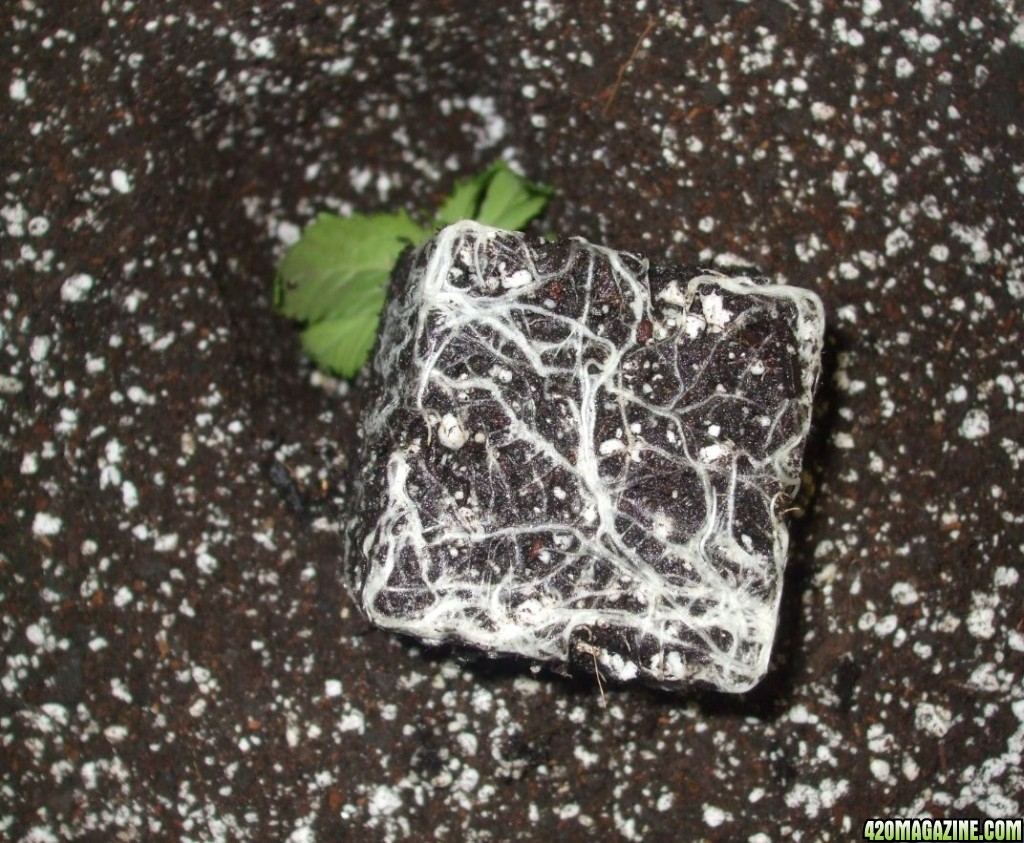
Here you can see the hole and some roots...
Then pulled out the babies and dusted them with some beneficial fungi
Then placed in the hole and packed it in gently.
Since they were over watered I didn't water them immediately.
The following day I gave a solution of water pH'd to 6/3 that included Cal Mag, Silica and some sugaree to help the bacteria get going.
Things are looking better now on all but one plant. It still is looking better just not nearly as good as the rest. It will be fine though.
I trained the clones a bunch the other day. Those have a ton of branches and are taking off. I may have already found the mother ant even though I have no idea what it is. I just sux not being able to say what it is.
Back to this grow...
Recap notes:
Day 1: Seeds in water for a few hours then placed in most soil
Day 4: most of them surfaced.
Day 6: added a little water to the sprouts
Day 10: After changing the location a second NYPD sprout appeared
Day 14 all plants moved into tent
Day 15: Lightly watered sprouts
I posted a pic on page 5 (here it is again). You can see the beginnings where the top left one and the bottom middle show the first and second set of fan leaves drooping. They didn't get much worse just all but 2 did this the next day.
On day 17 I noticed the leaves started to droop. I figured it was becasue they were dry
On day 18 I noticed this again and decided to give then their first real solid watering. Since it is likely in dead soil and I have some Orca laying around I tossed that in to get the soil moving.
On day 19 (shown here) I noticed both serious nodal density but also a light deficiency starting on one plant even though they were still very small which was confusing for a few hours. All but 1 was showing serious drooping. The one that was fine was the NYPD (1.5 weeks behind). (At this point I am sure Emily knows what is wrong..it took me a few more hours, it was a hectic day and I couldn't focus on this). I moved them back out of the tent and back under the Mars LED. I didn't have time to do anything that day until late in the evening and I was in the middle of trimming whenever I had a few moments to spare.
Then it hit me like a ton of bricks. Mass tight nodal spacing and 2 weeks in these supper small pots I have never used and normally wouldn't, defficiancies when it should not be using the soil yet... The tap root didn't get a chance to go anywhere and they may be root bound already. They switched from being sprouts to regular plants and were trying to use the roots and needed more soil to grow into. I usually use solo cups as they are deeper.
So late that evening I rolled up my sleeves and started the transplanting.
So for newbs here is what I did.
Start by filling in 1/3 of the pots with my compost. (I took pics of this whole process and can't find them.
) I put 2 worms in each pot from the compost pile. Those things love it in there. They have all gotten huge and fat.
Then filled in the rest with a soil blend of 1/3 perlite, 1/3 Fox Farm Happy Frog, 1/6 steer manure, 1/6 Coco fiber. Fill up and around an empty container to make the proper sized hole.
Here you can see the hole and some roots...
Then pulled out the babies and dusted them with some beneficial fungi
Then placed in the hole and packed it in gently.
Since they were over watered I didn't water them immediately.
The following day I gave a solution of water pH'd to 6/3 that included Cal Mag, Silica and some sugaree to help the bacteria get going.
Things are looking better now on all but one plant. It still is looking better just not nearly as good as the rest. It will be fine though.
I trained the clones a bunch the other day. Those have a ton of branches and are taking off. I may have already found the mother ant even though I have no idea what it is. I just sux not being able to say what it is.
- Thread starter
- #104
I would add... Back in the day I never started with starter cups. I always just planted my seed in the final pot and grew it unrestrained as fast as possible. Back then a Horticulturalist convinced me to stop using starter cups. I was convinced by someone on these forums (who shall remain nameless) to try re-potting again (which I did in the very beginning) and I probably will go back to the old Johnny Appleseed method. Not because repotting is bad...rather I am a total tool and would like to keep things simple... ")

Wow this is blowing my mind. Ill definitely be coming back to this grow for the next 6 months or longer for recaps lol
- Thread starter
- #106
@ goddi13
THANKS for the uplifting comments!
I plan to do at least 2 harvests in this journal if not 3. I don't think you can fully understand a phenotypes genetic capability in less than 2 grows. So for a longer term clone program you really want to take the time and put a handful of seeds down. If I had my druthers I would do 5 seeds from each strain to get a good couple of females from each strain to choose from. But I just don't have that kind of space.
So this one will go on for a while.
At the next grow I may put down some more AK48's again or some others if all I get are males so this could easily go 3-4 grows before i am done finding the best of the best of the best.
And I already know I want to get some sort of afghan or Kush going. If I can find it some, Blueberry Kush is preferred by my wife (even over OG Kush). The AK48 is based partially off some Afghan and may be the closest I have to that right now.
So it should be a journey...
Daaang then this will be the happening spot for a year or more depending on how long veg and bloom of each strain is. Look up berry bomb or one id love to try soon is THC bomb but I can only find them in fem and im not really into fem seeds guess I just like that option to breed and have seeds for put back as the clones do there thing. Hope you have better luck with ak48 then wilson and I lol there picky plants. The ones I have was having ph problems so they locked out manganese first and then just went down the list of micro nutrition till I ph'ed the little beep beep beeps lol and they like the room a little on the hot side so it would be a good summer plant for ya ") we are having crazy weather here snow one day then 65, 75 degrees the next and its a pain in the back side keeping the room an even 80 for them with little humidity because that was another problem I was having humidity. I had the veg room at around 30 to 40% and they dropped down, started getting rounder leaves and stopped using water and food but that was during the ph/micro nutrient problems so that may or may not of had a big factor in it. Now there in bloom with sweet smelling nickel sized starter buds and sucking down a gallon of water, tea or nutes every 2 days. I think I hate this strain but love it at the same time cause it definitely got my brain flowing and helped with dialing in the room.
we are having crazy weather here snow one day then 65, 75 degrees the next and its a pain in the back side keeping the room an even 80 for them with little humidity because that was another problem I was having humidity. I had the veg room at around 30 to 40% and they dropped down, started getting rounder leaves and stopped using water and food but that was during the ph/micro nutrient problems so that may or may not of had a big factor in it. Now there in bloom with sweet smelling nickel sized starter buds and sucking down a gallon of water, tea or nutes every 2 days. I think I hate this strain but love it at the same time cause it definitely got my brain flowing and helped with dialing in the room.
we are having crazy weather here snow one day then 65, 75 degrees the next and its a pain in the back side keeping the room an even 80 for them with little humidity because that was another problem I was having humidity. I had the veg room at around 30 to 40% and they dropped down, started getting rounder leaves and stopped using water and food but that was during the ph/micro nutrient problems so that may or may not of had a big factor in it. Now there in bloom with sweet smelling nickel sized starter buds and sucking down a gallon of water, tea or nutes every 2 days. I think I hate this strain but love it at the same time cause it definitely got my brain flowing and helped with dialing in the room.- Thread starter
- #108
Of course right after I write that I find out I am gonna have to move within a year. Probably have to shut everything down in a few months so none of this matters. Probably wont be able to setup again where I go to for some time (BUT I may be able to do outdoor).
So I may change this and start cloning like mad and filling it with small pots and turn this into a bloom tent and start running fast grow bloom only in here to build up some weight before I have to stop.
Nothing I can do about it now just need to get these moving but I may have to go through all of this all over again unless I can convince a friend to keep a mother going for me for a while as I move.
 Hell just move to ohio with me ill find us a big ass barn to grow in that way you can work on your grow book.
- Thread starter
- #110
So anyway...Started my tea yesterday. So I took some pics and will explain to the uninitiated.
So it is called a microbial tea becasue a "long" while ago people used to just put composted manure in burlap sacks and steep it in a bucket for a week or more like a tea bag and then they had there solution for the plants. That actually is a different result due to a microbial process that is a bit different but that was the history and the name stuck.
Some time around 1996 I believe was the first time someone documented using "forced air" in the process to speed it up and develop a better ratio of aerobic microbes.
Nowa days there are many "standard" ingredients and there are multiple threads on here talking about this. There are also a lot of cool "machines" and DIY stuff on youtube for really going at this in a much higher scale way. I don't do that I grow a small tent of plants and can make enough in a single bucket for myself. I use a standard Hydro air pump and it works fine. The more air you pump the better but I do just fine with my ecoair 2 pump. I have used it to brew a full 5 gallon bucket a few times and it works great.
I documented in detail all the stuff I use a few times on here. Then about 2 months or so after I did a decent job this guy pulled a lot of info together and posted this thread which has great details about how and why all this stuff works. So I won't explain it an umpteenth time just go read this thread. An older version of the recipe I posted at the end of it and until now I have been pointing people at that. Now I likely will send them here.
Tea Bag your DWC
For the most part everything I use is fairly standard and broadly used by many people on here. I also have gotten many people to use my exact recipe but you can make all sorts of changes so long as you know what the ingredients are for and what the result is when done. In fact I know myself and A few others will spot tune the recipe if for example if I want more Phos in it in bloom I will add some Bat guano. So take this as a rule of thumb but feel free to twist it a bit.
Here is my basic set of ingredients.
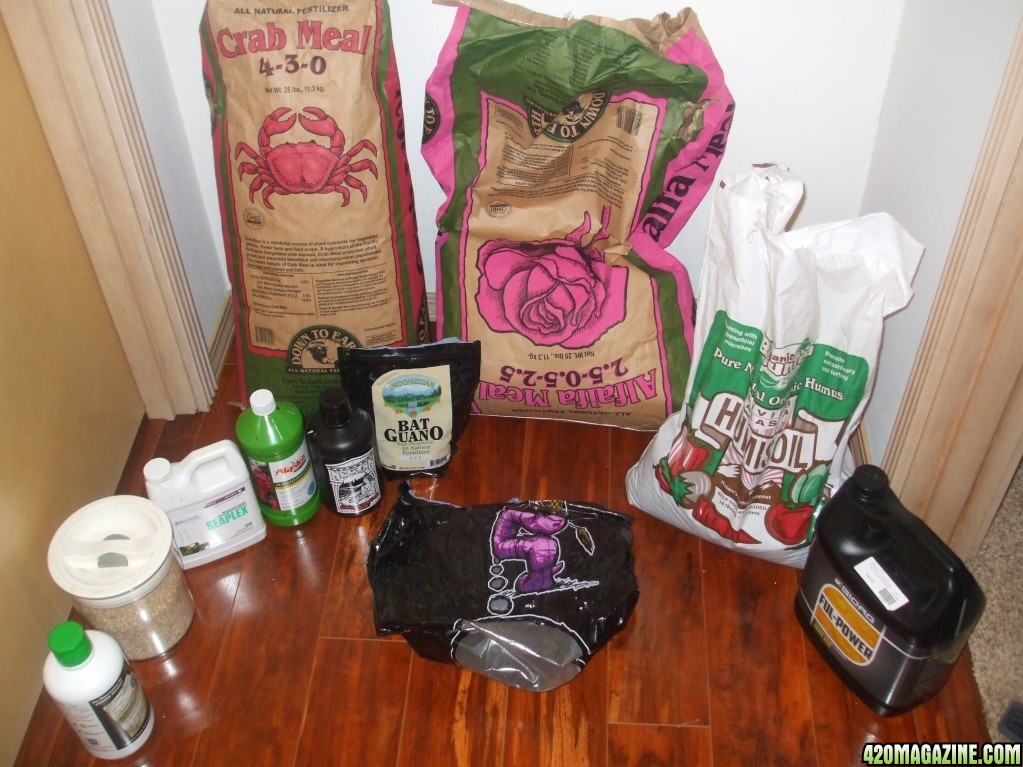
This includes:
Worm casting (found everywhere)
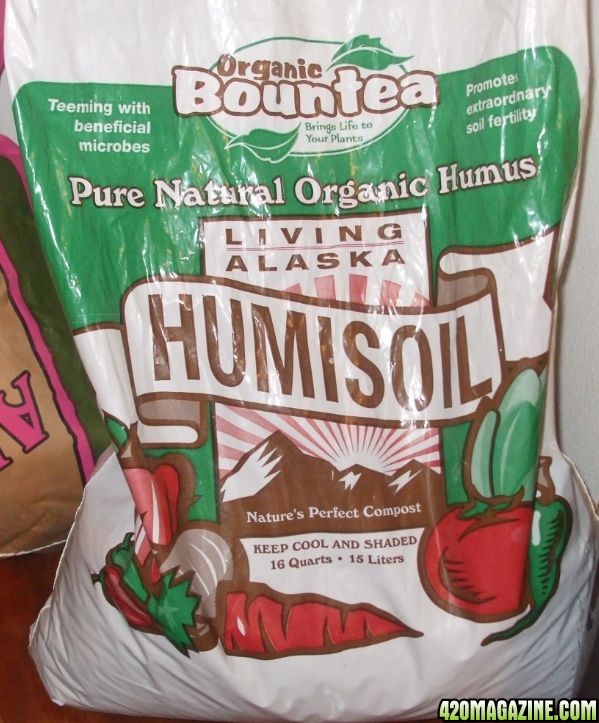
Humis soil
Fulvic acid (most things that say fulvic acid are not and I only trust this brand...I am probably wrong but I did some research)

Alfalfa (By down to earth I can find it easily at most hydro stores)

Crab Meal

Bat Guano (used in bloom for extra Phos. I didn't use it this time)

Some Sort of Atlantic Kelp ( I have 2 kinds I am working through but the cheap home depot stuff is fantastic)
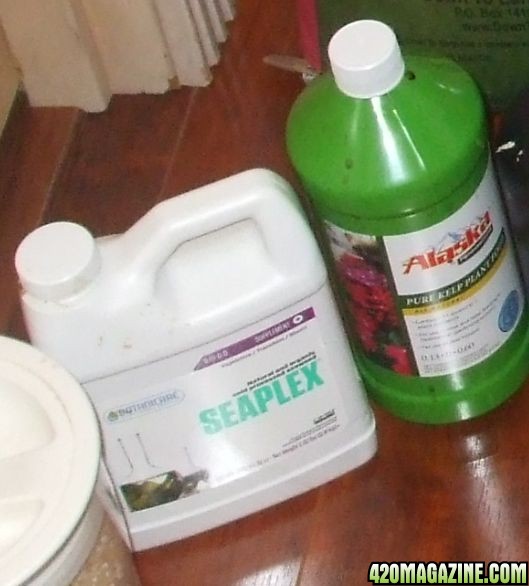
Some sort of broken down molasses product or you can use straight molasses I use this stuff by a local company that makes expensive top quality hydro supplements so I am being ripped off...but it is pre-broken down and aids in getting the microbes breeding fast.
This stuff is Aphrodites extraction

Some sort of Enzyme product. I use Hygrozyme because I am old.
Oatmeal ( I use steal cut but rolled is probably easier I just use what I have in the cupboard)
So all that plus some good clean de-chlorinated water. Mine comes out of the tap at about 12PPM and does not have flouride or chlorimate so I can fill the bucket and drop in my airs tones and pump out the chlorine in a little while and all is fantastic.
So I take about 2 gallons of water at room temp. You want to do this inside in the bathroom or some place that is about 70 degrees. This does not smell all that bad so don't worry just do it on a surface that is easy to clean for when you make a mess.
First I will add the liquid ingredients and stir and then the dry ingredients. When adding the dry ingredients I stir in between each to get it all in before adding the next dry ingredient.
I follow the bottle instruction for 2 gallons for the Kelp supplement
I follow the bottle instruction for 2 gallons for the Hygrozyme
I follow the bottle instruction for 2 gallons for the Fulvic Acid
I add 1 teaspoon of Molasses extract (Aphrodites extraction)
1/4 cup Oatmeal
1/4 cup Humis soil
1/4 cup earth worm castings
1/4 cup Crab Meal
1/4 cup Alfalfa
Note every 12 hours and just after filtering at the end add another dose of molasses! That last one is where using pre-broken down stuff really helps
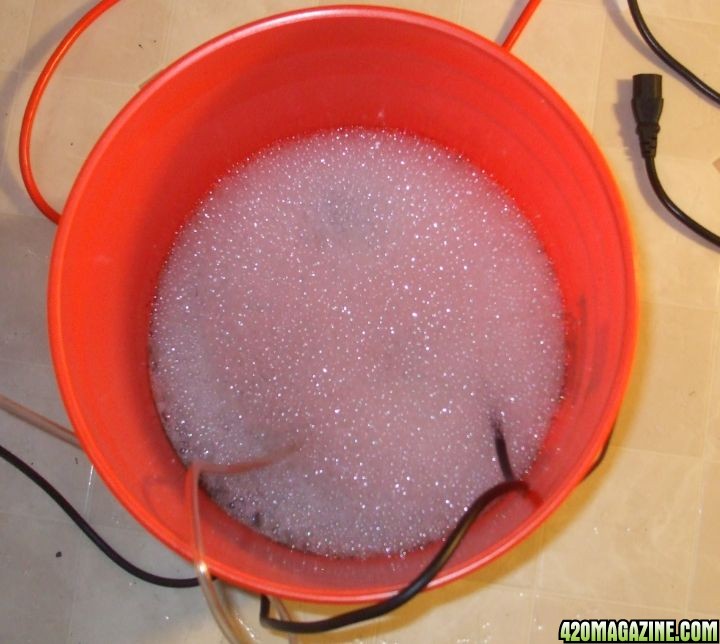
Then stir it and it looks like this
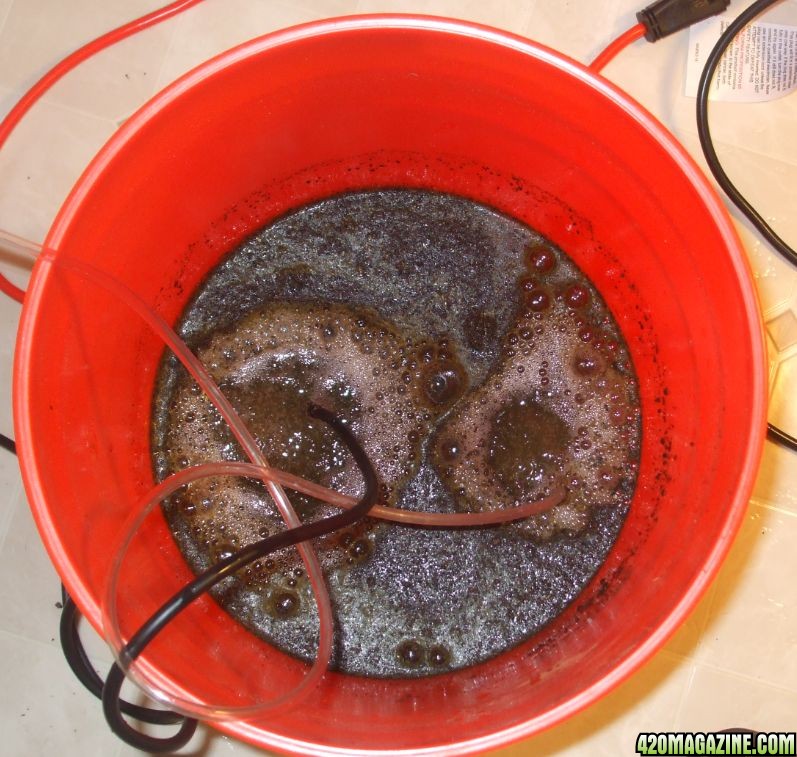
Now as it brews preferably you stir it every 2 hours to stop growth of anerobic bacteria in the sludge at the bottom. If you don't it will win and kill off all the good stuff. So in the morning after sleeping at night it can take a while to get it back on track but it always comes back. And easily. just stir it good and once and it will be right back in minutes.
Then after 1.5 hours it looked like this
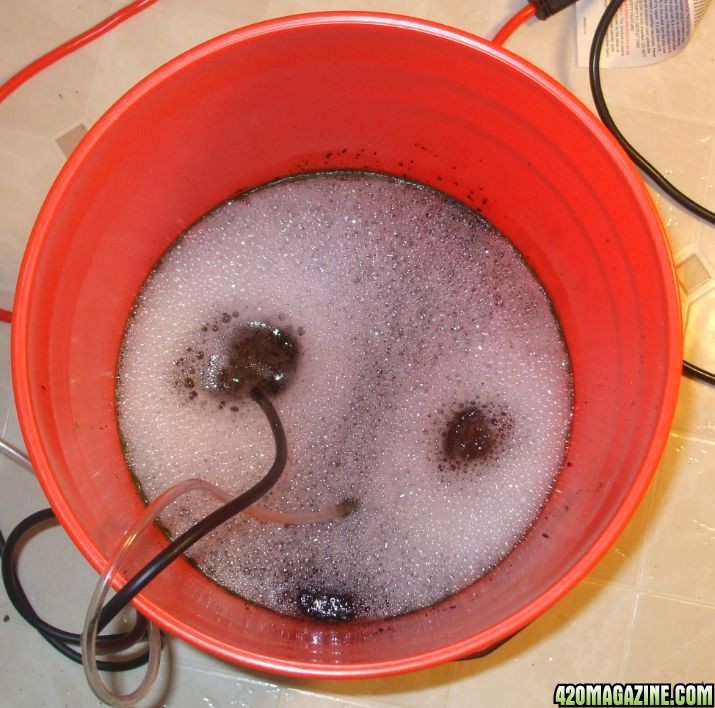
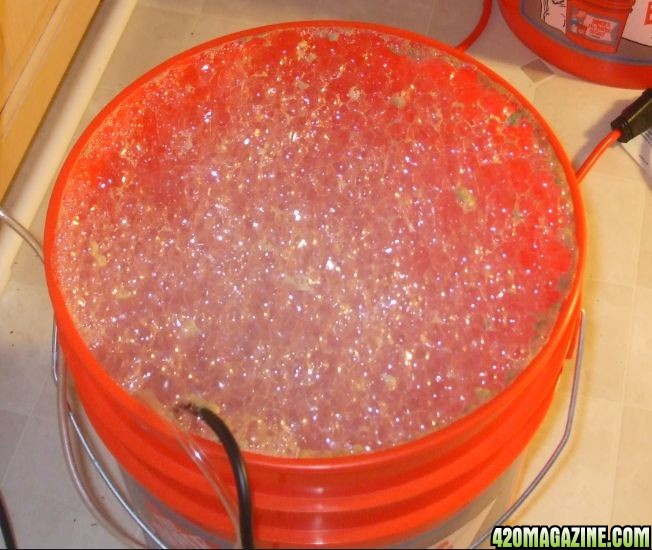
Then at about 14 hours the microbes were just starting to breed...
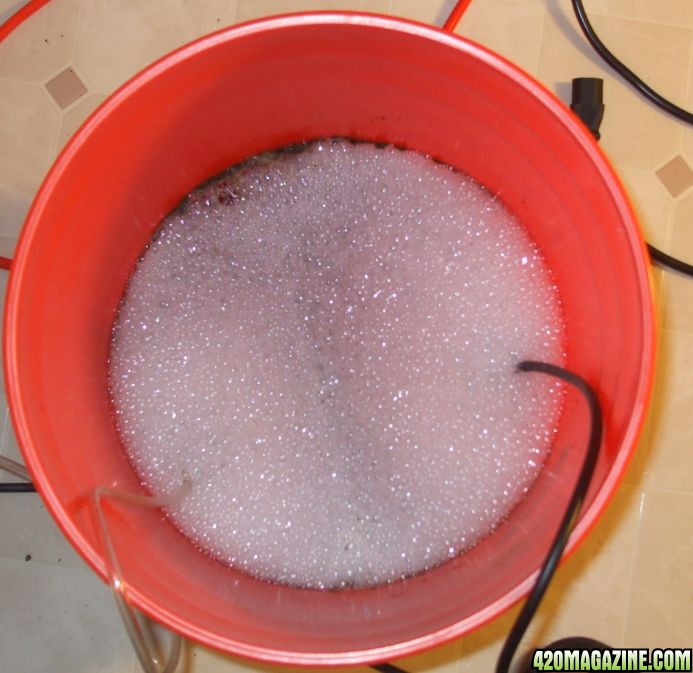
By 18hrs the foam was rising up
(forgot to check at 24)
And clearly I used too much sugar this time ( I did cheat and added some extra at about 18 hours)
Because by 27 hours it was about to go over the top of the bucket.
So then you filter it out. I used to get all aggressive and filter it a few times and now I just don't bother and just get the big stuff out and dump the rest in the pots.
This is a pic of me doing a 5 gallon batch and siphoning it a year ago.
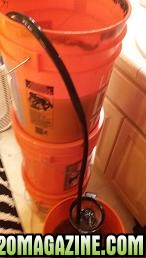
Now that I just do 2 gallons I can easily pick it up and pour it through that sieve.
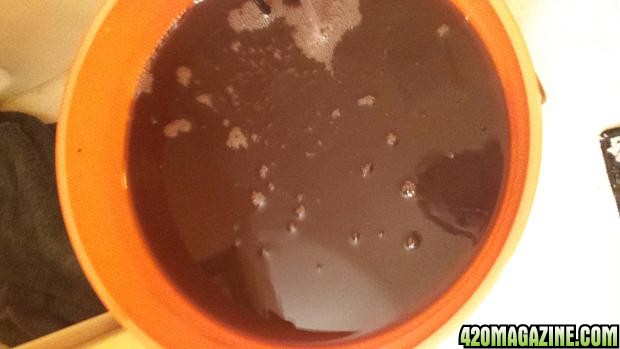
Then you end up with some good stuff like this that is about 7.0 pH and around 800PPM (good and strong)
(again from a year ago...when I finish this post in a few hours I will finish off this round and use it tonight)
Then I usually do 4-6 cups per plant. The I follow with a light watering to drive it into the middle of the pot but not so much that I am creating run off. Just enough to get it into the core of the pot. That is not necessary but I like to do it. I will sometime add Cal / mag or Silica to the drive in water if it is time. I make sure the drive in water is pH'd properly even though it shouldn't matter.
If the tea is brewed properly the the residual sludge is worthless. All the good stuff is in the tea. Toss it in the garden and don't expect much unless you did it short like I do some times. You saw that by 24 hours the tea was grooving along good. Many people will brew up to 3 days. I usually try to go at least 48 hours. I try not to go less than 36 as that gives a good 12 hours of strong microbial growth.
** Important note **
I have ruined a few batches of tea not realizing that the airstones had leftover bad bacteria in them which caused horribly acidic brew where nothing good could grow. Before each brew place them in boiling water for a few minutes to clean them up good and you will be fine.

It really is pretty easy and is a lot of fun I think. If all goes well it should be all I use on this grow. It is pretty much all I used last time.

So it is called a microbial tea becasue a "long" while ago people used to just put composted manure in burlap sacks and steep it in a bucket for a week or more like a tea bag and then they had there solution for the plants. That actually is a different result due to a microbial process that is a bit different but that was the history and the name stuck.
Some time around 1996 I believe was the first time someone documented using "forced air" in the process to speed it up and develop a better ratio of aerobic microbes.
Nowa days there are many "standard" ingredients and there are multiple threads on here talking about this. There are also a lot of cool "machines" and DIY stuff on youtube for really going at this in a much higher scale way. I don't do that I grow a small tent of plants and can make enough in a single bucket for myself. I use a standard Hydro air pump and it works fine. The more air you pump the better but I do just fine with my ecoair 2 pump. I have used it to brew a full 5 gallon bucket a few times and it works great.
I documented in detail all the stuff I use a few times on here. Then about 2 months or so after I did a decent job this guy pulled a lot of info together and posted this thread which has great details about how and why all this stuff works. So I won't explain it an umpteenth time just go read this thread. An older version of the recipe I posted at the end of it and until now I have been pointing people at that. Now I likely will send them here.
Tea Bag your DWC
For the most part everything I use is fairly standard and broadly used by many people on here. I also have gotten many people to use my exact recipe but you can make all sorts of changes so long as you know what the ingredients are for and what the result is when done. In fact I know myself and A few others will spot tune the recipe if for example if I want more Phos in it in bloom I will add some Bat guano. So take this as a rule of thumb but feel free to twist it a bit.
Here is my basic set of ingredients.
This includes:
Worm casting (found everywhere)
Humis soil
Fulvic acid (most things that say fulvic acid are not and I only trust this brand...I am probably wrong but I did some research)
Alfalfa (By down to earth I can find it easily at most hydro stores)
Crab Meal
Bat Guano (used in bloom for extra Phos. I didn't use it this time)
Some Sort of Atlantic Kelp ( I have 2 kinds I am working through but the cheap home depot stuff is fantastic)
Some sort of broken down molasses product or you can use straight molasses I use this stuff by a local company that makes expensive top quality hydro supplements so I am being ripped off...but it is pre-broken down and aids in getting the microbes breeding fast.
This stuff is Aphrodites extraction
Some sort of Enzyme product. I use Hygrozyme because I am old.
Oatmeal ( I use steal cut but rolled is probably easier I just use what I have in the cupboard)
So all that plus some good clean de-chlorinated water. Mine comes out of the tap at about 12PPM and does not have flouride or chlorimate so I can fill the bucket and drop in my airs tones and pump out the chlorine in a little while and all is fantastic.
So I take about 2 gallons of water at room temp. You want to do this inside in the bathroom or some place that is about 70 degrees. This does not smell all that bad so don't worry just do it on a surface that is easy to clean for when you make a mess.
First I will add the liquid ingredients and stir and then the dry ingredients. When adding the dry ingredients I stir in between each to get it all in before adding the next dry ingredient.
I follow the bottle instruction for 2 gallons for the Kelp supplement
I follow the bottle instruction for 2 gallons for the Hygrozyme
I follow the bottle instruction for 2 gallons for the Fulvic Acid
I add 1 teaspoon of Molasses extract (Aphrodites extraction)
1/4 cup Oatmeal
1/4 cup Humis soil
1/4 cup earth worm castings
1/4 cup Crab Meal
1/4 cup Alfalfa
Note every 12 hours and just after filtering at the end add another dose of molasses! That last one is where using pre-broken down stuff really helps
Then stir it and it looks like this
Now as it brews preferably you stir it every 2 hours to stop growth of anerobic bacteria in the sludge at the bottom. If you don't it will win and kill off all the good stuff. So in the morning after sleeping at night it can take a while to get it back on track but it always comes back. And easily. just stir it good and once and it will be right back in minutes.
Then after 1.5 hours it looked like this
Then at about 14 hours the microbes were just starting to breed...
By 18hrs the foam was rising up
(forgot to check at 24)
And clearly I used too much sugar this time ( I did cheat and added some extra at about 18 hours)
Because by 27 hours it was about to go over the top of the bucket.
So then you filter it out. I used to get all aggressive and filter it a few times and now I just don't bother and just get the big stuff out and dump the rest in the pots.
This is a pic of me doing a 5 gallon batch and siphoning it a year ago.
Now that I just do 2 gallons I can easily pick it up and pour it through that sieve.
Then you end up with some good stuff like this that is about 7.0 pH and around 800PPM (good and strong)
(again from a year ago...when I finish this post in a few hours I will finish off this round and use it tonight)
Then I usually do 4-6 cups per plant. The I follow with a light watering to drive it into the middle of the pot but not so much that I am creating run off. Just enough to get it into the core of the pot. That is not necessary but I like to do it. I will sometime add Cal / mag or Silica to the drive in water if it is time. I make sure the drive in water is pH'd properly even though it shouldn't matter.
If the tea is brewed properly the the residual sludge is worthless. All the good stuff is in the tea. Toss it in the garden and don't expect much unless you did it short like I do some times. You saw that by 24 hours the tea was grooving along good. Many people will brew up to 3 days. I usually try to go at least 48 hours. I try not to go less than 36 as that gives a good 12 hours of strong microbial growth.
** Important note **
I have ruined a few batches of tea not realizing that the airstones had leftover bad bacteria in them which caused horribly acidic brew where nothing good could grow. Before each brew place them in boiling water for a few minutes to clean them up good and you will be fine.
It really is pretty easy and is a lot of fun I think. If all goes well it should be all I use on this grow. It is pretty much all I used last time.
- Thread starter
- #111
I will be staying in Oregon so it will still be legal for me to grow. I probably will get some land so I may be able to grow some outdoor trees next summer. I just hope by August I can get enough done before I shut down to make until I can start again.
No worries out here weed is everywhere
No worries out here weed is everywhere
VI I was reading about teas somewhere and it had a cool recommendation. It said most of the oxygen exchange even in a bubble aerated setup is at the surface of the tea. It recommended ditching the airstones as they don't move much tea to the surface. Instead it recommended using an aquarium pump to make a constant surface exchange. Not powerful enough to make a geyser, just powerful enough to make a raised area of constant exchange at the surface. It would also be self stirring at that point and there would be no anaerobic areas as the top and bottom would constantly mix. Dissolved oxygen tests show it can be almost double what the airstones provide at the same wattage.
It's called "flooming"
It's called "flooming"
salchipapa27
New Member
So wait VI is the one you scrog'd with the purple colors the freebie (you think its rasberry cough?) ??
- Thread starter
- #115
So the Flooming is the most modern technique and is definitively better. At the good hydro stores you will see a big vortex mixer doing this and they will sell their own brew. My local store sells a great tea made right there for about 6 bucks a bottle. I talked a lot with the owner about it.
That is all fine and dandy when making a ton like you have 100 pants or so. For my small grows I can get by just fine with a 5 gallon bucket and my old extra hydro pump and a stick. I can easily brew 4 gallons with my extra Hydro pump which is way more than I would need. It is nice not having to stir but it is also not an issue. Plus I like to check up on it. I still think it is a little fun to brew it up and enjoy the monitoring.
That is all fine and dandy when making a ton like you have 100 pants or so. For my small grows I can get by just fine with a 5 gallon bucket and my old extra hydro pump and a stick. I can easily brew 4 gallons with my extra Hydro pump which is way more than I would need. It is nice not having to stir but it is also not an issue. Plus I like to check up on it. I still think it is a little fun to brew it up and enjoy the monitoring.
- Thread starter
- #116
It may be I just have no idea. I was messing around on their website just yesterday and saw another one that is discontinued and they only have a few left that it might be.
But if you look at the feminized version of Rasp. Cough on the Nirvana website it is a dead ringer for what I had.
But if you look at the feminized version of Rasp. Cough on the Nirvana website it is a dead ringer for what I had.
- Thread starter
- #117
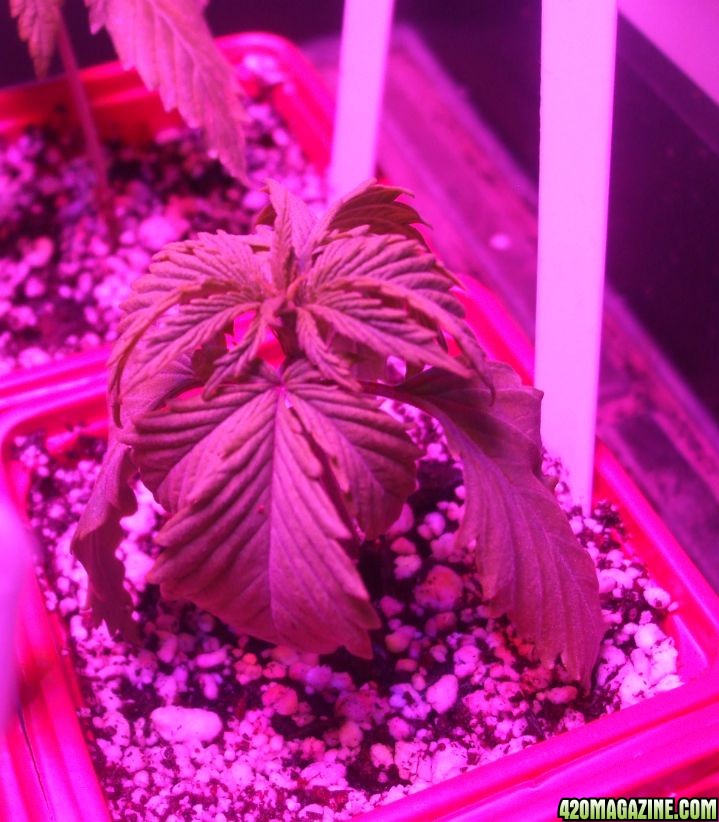
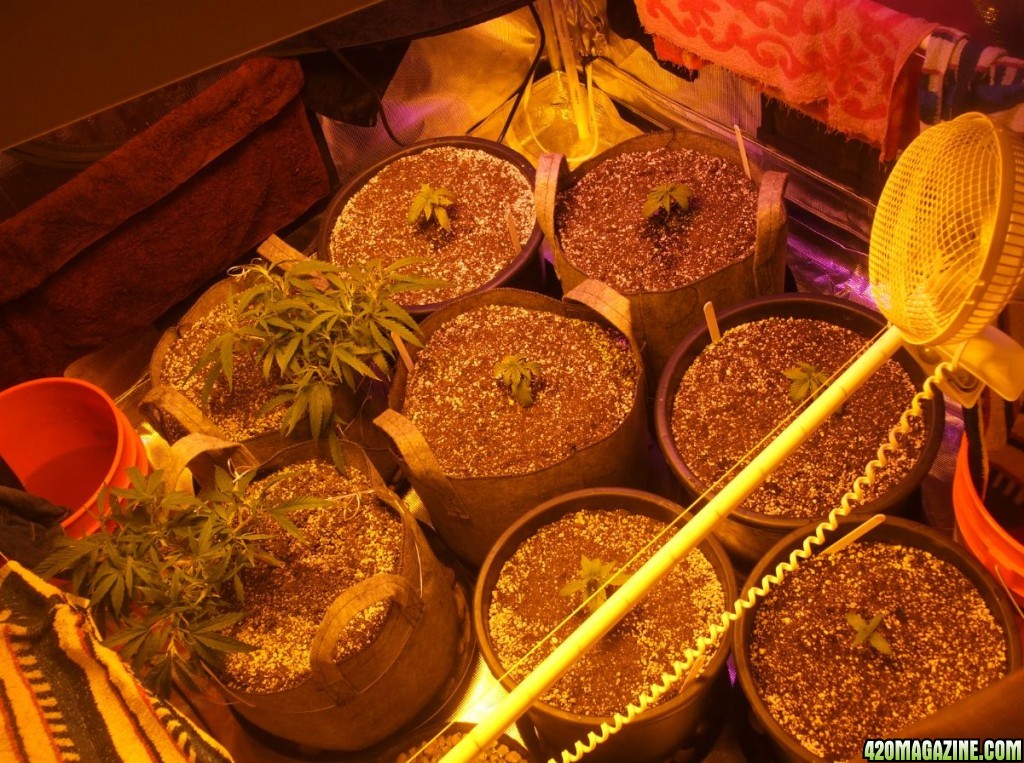
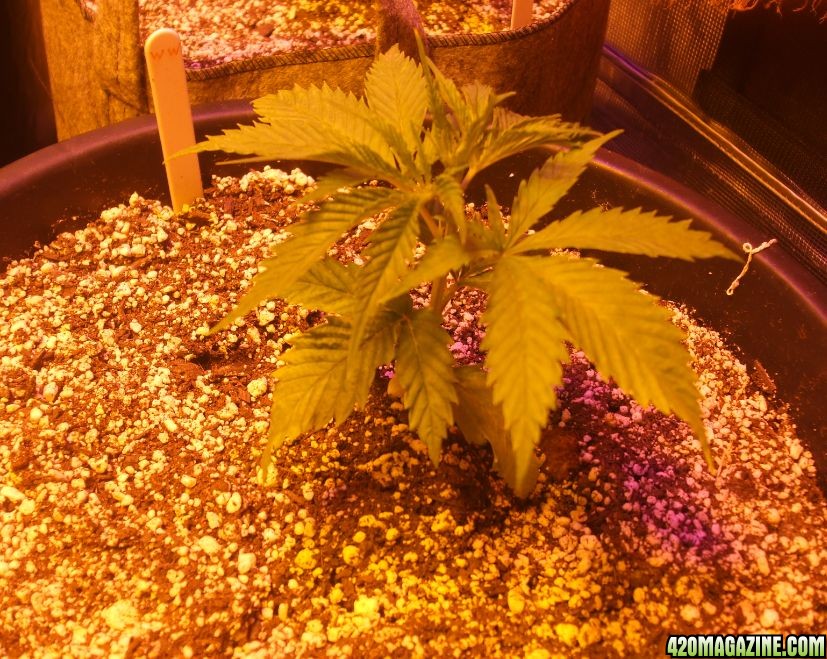
So 18 hours after the tea and all the new growth is standing up at attention. I did have the temps too low and have adjusted the fan way down which also made it nice and humid in there so I expect them to start taking off now.
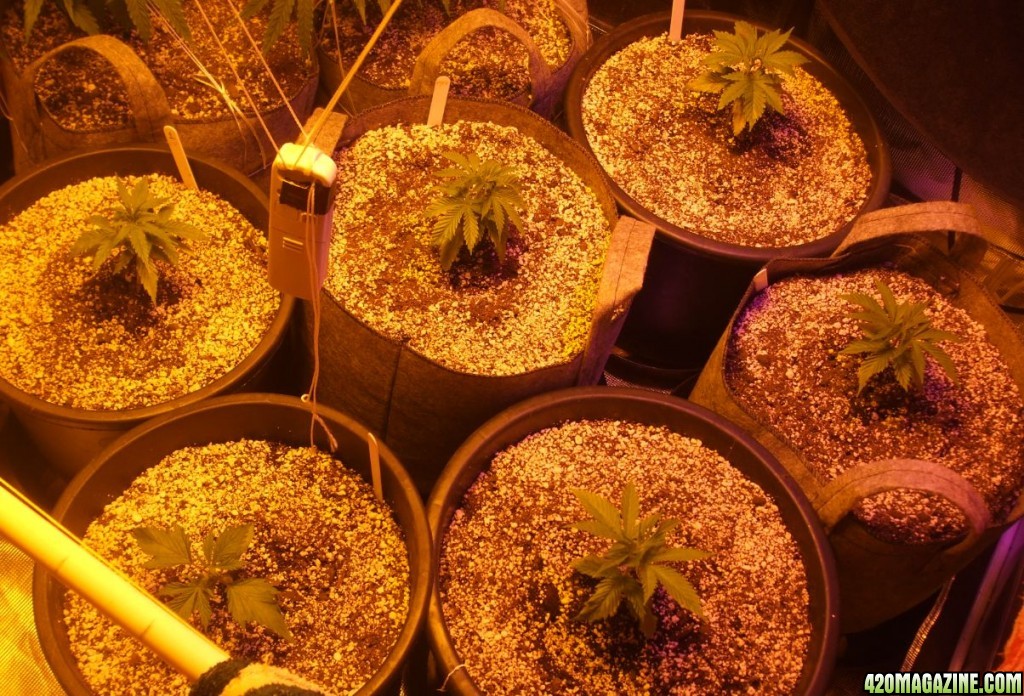
Here is a close up of one.
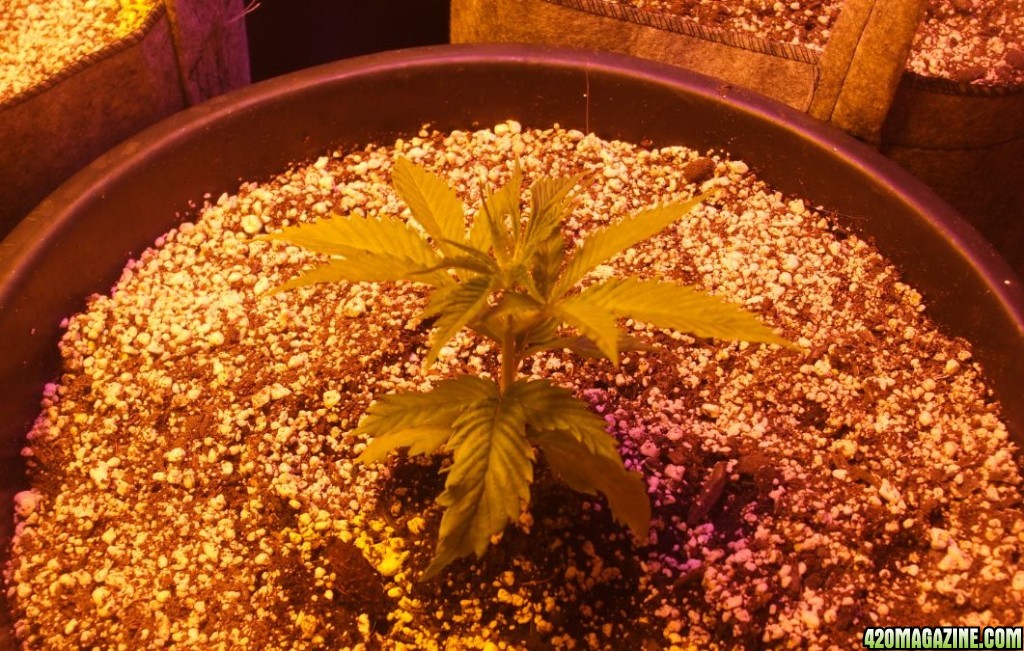
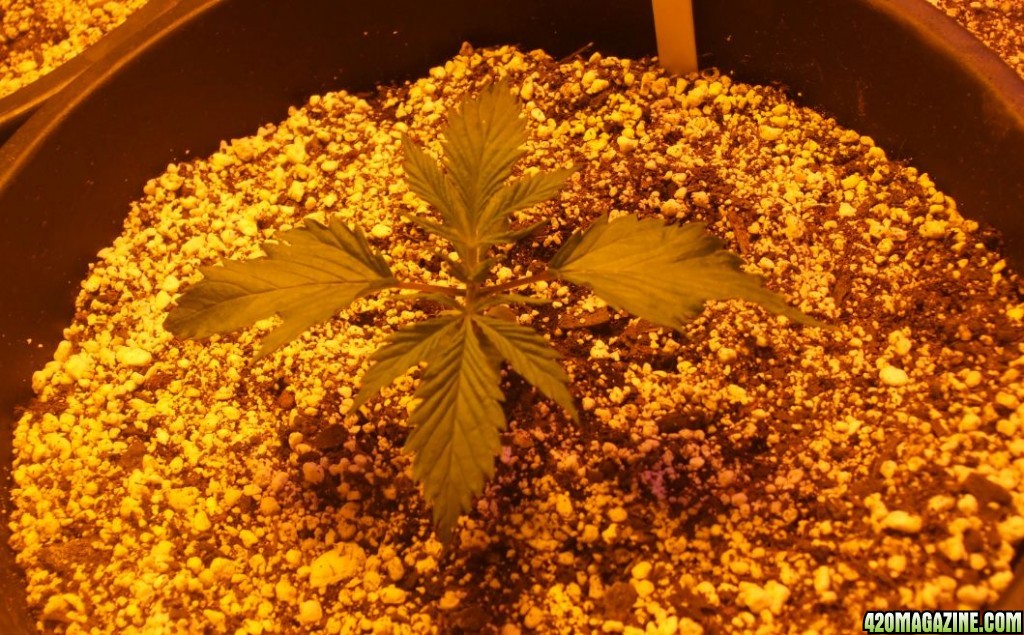
The NYPD that is a week behind for some reason is still a week behind
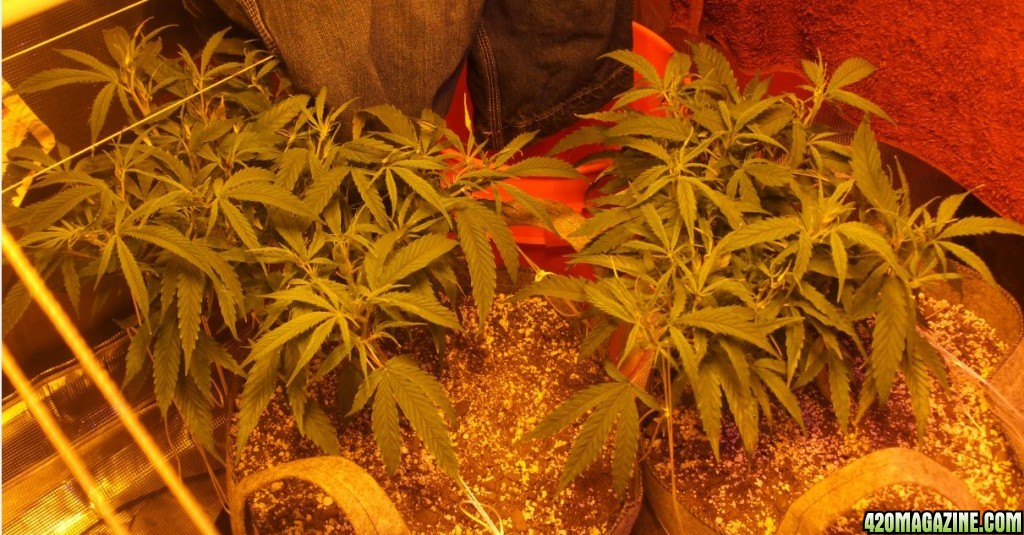
And the clones are about to get cloned as it is hard to see but there are many branches taking off. They are getting dry and showing it. Probably tomorrow or in the morning if they are ready I will water them good. It has been almost 2.5 weeks since they were watered other than a little tea last night and no drive in water. They got about 3.5 cups of tea and that is all the water they have seen in 16 days so they are going to love me tomorrow. So will the worms!!!
Here is a close up of one.
The NYPD that is a week behind for some reason is still a week behind
And the clones are about to get cloned as it is hard to see but there are many branches taking off. They are getting dry and showing it. Probably tomorrow or in the morning if they are ready I will water them good. It has been almost 2.5 weeks since they were watered other than a little tea last night and no drive in water. They got about 3.5 cups of tea and that is all the water they have seen in 16 days so they are going to love me tomorrow. So will the worms!!!
salchipapa27
New Member
Ahh i see and this exciting VI ! Like right before the roller coaster drop im sending good vibes to you that the ride is only upward from here
- Thread starter
- #119
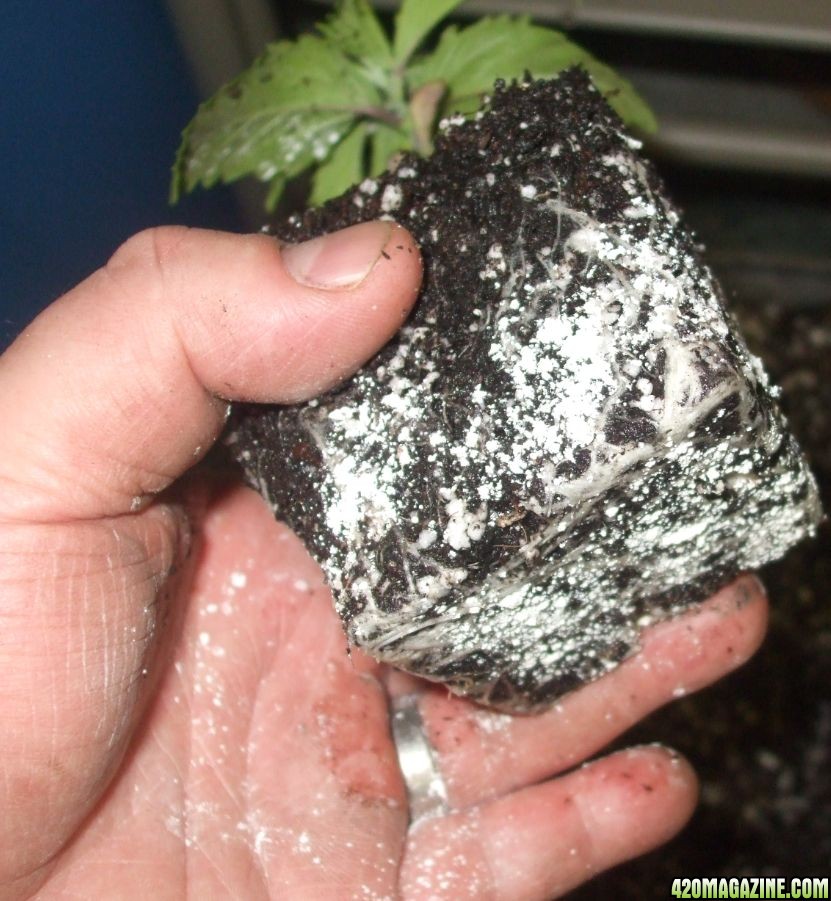
What do you use to sterilize your hose and buckets with after a brew also I had or better yet still have a few gnats flying around so i used sticky tape and top dressed with sand and that busted up there party but I was looking at the clones today and found one pot that had little white bugs running around. I looked them up and im worried there root aphids and it said to do a neem oil drench or use diatomaceous earth. I have neem but if you think d earth is better ill pick that up asap.
Similar threads
- Replies
- 703
- Views
- 35K
- Replies
- 0
- Views
- 991
- Replies
- 63
- Views
- 10K