

that veg area is getting full man,good job
Navigation
Install the app
How to install the app on iOS
How To Use Progressive Web App aka PWA On 420 Magazine Forum
Note: This feature may not be available in some browsers.
More options
You are using an out of date browser. It may not display this or other websites correctly.
You should upgrade or use an alternative browser.
You should upgrade or use an alternative browser.
Multi Strain, Perpetual, Capn Style, Multi Room
- Thread starter Skybound
- Start date
- Thread starter
- #162
Skybound
Well-Known Member
Here's a partial update. We shot a primary, just gotta wait for it to be uploaded and shared as it's on someone else's cam. I'll do a shoot of the newly spacious veg room tomorrow sometime.
[video=youtube;5rNnsXAybSg]
[/video]
It's a cold one up there and I have an uphill battle yet to go, but if I can track down a propane tank tomorrow, it's GAME ON!
[video=youtube;5rNnsXAybSg]
It's a cold one up there and I have an uphill battle yet to go, but if I can track down a propane tank tomorrow, it's GAME ON!
- Thread starter
- #163
Skybound
Well-Known Member
Here's the Veg room update. I noticed that I glazed over the clones in cups/pots and only touched based on the GDPD (as me and AG like to call'em), but also I have a nice OG Kush clone, 2 power flowers 2 GDPD and another monster Cherry Bomb cutting. They are all doing great and we topped all 6 same day that my largest 2 went into flower. I still have a lot of construction to do upstairs, need to get better heat up there, I'd like to also make an RO water buffalo up in the attic so I don't have to carry 5 gal up at a time. So I have some weeks yet to go before I have more free time, and in my rush to get everything operable in the fastest time possible, I expect I will be a little neglectful as I try to stay medicated and sometimes it's hard to keep to one frame of mind. But the more I get done, the better my plants will do as my abilities will then increase.
[video=youtube;Lpv0bGmDaVw]
[/video]
[video=youtube;Lpv0bGmDaVw]
man,every one of us capn style deckhands are killing it,wish the boss man was here to see us.
great work man,I too lose focus staying medicated,and brother I am fighting cold weather like no other,thankfully im at the end of my run and the plants are really bringing out the purple.
great work man,I too lose focus staying medicated,and brother I am fighting cold weather like no other,thankfully im at the end of my run and the plants are really bringing out the purple.
- Thread starter
- #165
Skybound
Well-Known Member
That cold I think is so far much easier to counter than the heat that was up there last summer. I'm happy to report that temps made it to the mid 70's during yesterday's lights on period (9PM - 9AM). I'm trying to dial in a decent time schedule to use the space heater in the dark period. The heater consumes 1500 watts which is just 100 less than all 3 of my HIDs, so it's at least somewhat reassuring what kind of load I can leverage against my power panel.
I swapped out the plastic on my DIY flood table and the new plastic, though laid down much nicer and smoother, leaks at the bulkhead so I have to reline it yet again and hopefully make the water tight seal I need. Tomorrow I will plug in a heat gun and see if I can't alter one of my junk totes. I want to see if I can heat the plastic so it forms into something else, like a drilled hole in wood. If this works, I will be able to put a couple different totes on the table over a larger drilled hole (roughly 3" dia) and sink the plastic into it before allowing it to cool. This would enable me to have the table that feeds from and to a few different reservoirs which would then accommodate my veg cycles at different age groups. You already know I want to make my life as easy as possible, and this would work towards that. I'll keep yas informed of my findings.
I swapped out the plastic on my DIY flood table and the new plastic, though laid down much nicer and smoother, leaks at the bulkhead so I have to reline it yet again and hopefully make the water tight seal I need. Tomorrow I will plug in a heat gun and see if I can't alter one of my junk totes. I want to see if I can heat the plastic so it forms into something else, like a drilled hole in wood. If this works, I will be able to put a couple different totes on the table over a larger drilled hole (roughly 3" dia) and sink the plastic into it before allowing it to cool. This would enable me to have the table that feeds from and to a few different reservoirs which would then accommodate my veg cycles at different age groups. You already know I want to make my life as easy as possible, and this would work towards that. I'll keep yas informed of my findings.
AfricanGrower
Well-Known Member
That cold I think is so far much easier to counter than the heat that was up there last summer. I'm happy to report that temps made it to the mid 70's during yesterday's lights on period (9PM - 9AM). I'm trying to dial in a decent time schedule to use the space heater in the dark period. The heater consumes 1500 watts which is just 100 less than all 3 of my HIDs, so it's at least somewhat reassuring what kind of load I can leverage against my power panel.
I swapped out the plastic on my DIY flood table and the new plastic, though laid down much nicer and smoother, leaks at the bulkhead so I have to reline it yet again and hopefully make the water tight seal I need. Tomorrow I will plug in a heat gun and see if I can't alter one of my junk totes. I want to see if I can heat the plastic so it forms into something else, like a drilled hole in wood. If this works, I will be able to put a couple different totes on the table over a larger drilled hole (roughly 3" dia) and sink the plastic into it before allowing it to cool. This would enable me to have the table that feeds from and to a few different reservoirs which would then accommodate my veg cycles at different age groups. You already know I want to make my life as easy as possible, and this would work towards that. I'll keep yas informed of my findings.
In regards to creating a table that feeds and recirculates from a few different reservoirs independently, I am doing something similar with the 3x2" panels you gifted me. I intend to connect the two panels (not permanently ) to create a larger flood table, but on each far ends I will have drain holes. When all plants are the same age I will use the table as one unit with one overall nutrient solution. Once a second set of younger plants cycle in, I will create a high point in the middle of the two panels so I can feed plants on each panel independently while recirculating to its own res on either side. It's a little confusing I know, but I will try and get my update up as soon as possible for a visual. I'm going back to the hospital due to some complications so if we could chat tomorrow, that would be great!
- Thread starter
- #167
Skybound
Well-Known Member
I am building something similar with the remaining scraps. I built something of a V, but much more obtuse. It's just going to be a frame to elevate and pitch 2 tough tote lids so my flowering plants can be fed from the same res, I also fixed my veg table leak problem and built 3 functional doors for the rooms. I still have a bunch to do, but it's all coming together slowly.
Better late than never!
[video=youtube;EckIhmRltMw]
[/video]
Better late than never!
[video=youtube;EckIhmRltMw]
GodAm4twizzle
New Member
Daaaaamn!!! Those plants are fucking huge!!! Wicked full and bushy!!! I love how the set-up has evolved, too!!! I listened to a bunch of the "Dude Grows" and I listened to the Recharge one, and it sounds like an awesome product.. It has a lot of positive reviews across the internet, so I'm thinking you're going to be seeing some killer results!!
CCOiler
Well-Known Member
Very nice Skybound, sharp looking setup.
Whats up Reg. Yeah those cups are handy, kinda like some flip flops! Only draw back is that they're crazy top heavy and topple easily. I like the foam cups better tho, less media and easier to handle.
What do you guys think about sawing a flowering pot right in half to assist when transplanting? I am thinking to leave just the side wall attached and sawing right through the opposing side wall and through the bottom. Then fold it shut when needed and secure with duct tape or a long zip tie. I'm coming to find that transplanting is more difficult than it needs to be. I figure if I can just open a pot like a book, the root mass can be easily inspected and possibly be another way to inoculate roots, but definitely with intent to make more workable for transplanting. Is there any liabilities to this I can't yet see?
mrrobert, I am eager to try this cherry bomb also. I've been trying to grow out some bomb seeds with no luck until now. Maybe another order of THC Bomb and barney's Pineapple Chunk again, see if I don't f%^& it up again?
Hey Skybound. I was thinking last night about this idea of yours of opening up the pots. Great idea. I came up with something simple and easy today that I think should work and made up a few pots. Alas I don't have any plants at the right stage to transplant into them atm but I guess will have to make up a post of this invention (?) when I have some nice roots in there and can open up the pots to spy on them. Took some pics and would put up some thumbnails here to see what you think but can't seem to figure out that option at the moment and anyway don't want to just drop pictures on your journal -which I'm really loving by the way.
- Thread starter
- #172
Skybound
Well-Known Member
Thanks for climbing aboard Weaselcracker, and please, feel free to share your pics when you figure it out.


- Thread starter
- #173
Skybound
Well-Known Member
Apologies for poor video quality. The output format was clearly the wrong choice when merging the videos. Also, b/c I was baked and developing a cold, my voice is low and monotone. Still mentally working on aiming my camera when speaking, but that's a work in progress I guess.
[video=youtube;OsrbEtrOXDc]
[/video]
[video=youtube;OsrbEtrOXDc]
Thanks for climbing aboard Weaselcracker, and please, feel free to share your pics when you figure it out.
Thanks, glad to be here Skybound. It wasn't loading pics- just thumbnails specifically, an option that I've seen but now I don't. Just because somehow that seemed a little more polite if I was to drop them on someones thread out of the blue like this. Anyway nevermind, here's the photos.
I just cut the pot down each side, with scissors..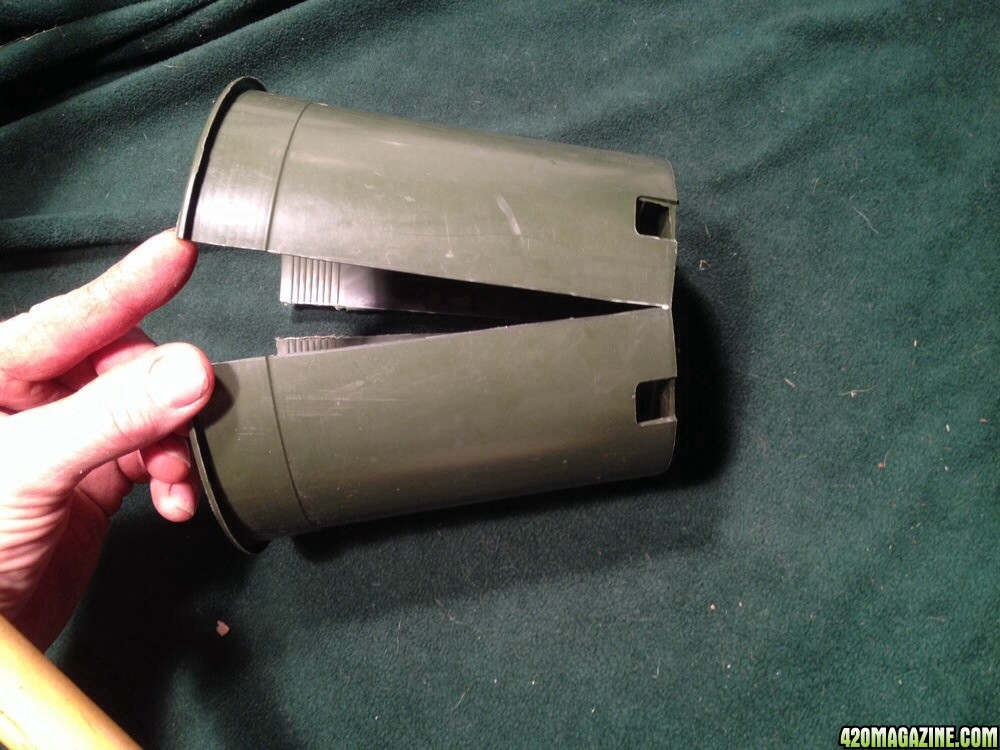 Originally was going to keep on going and cut the whole thing in half but I think this will work much better.
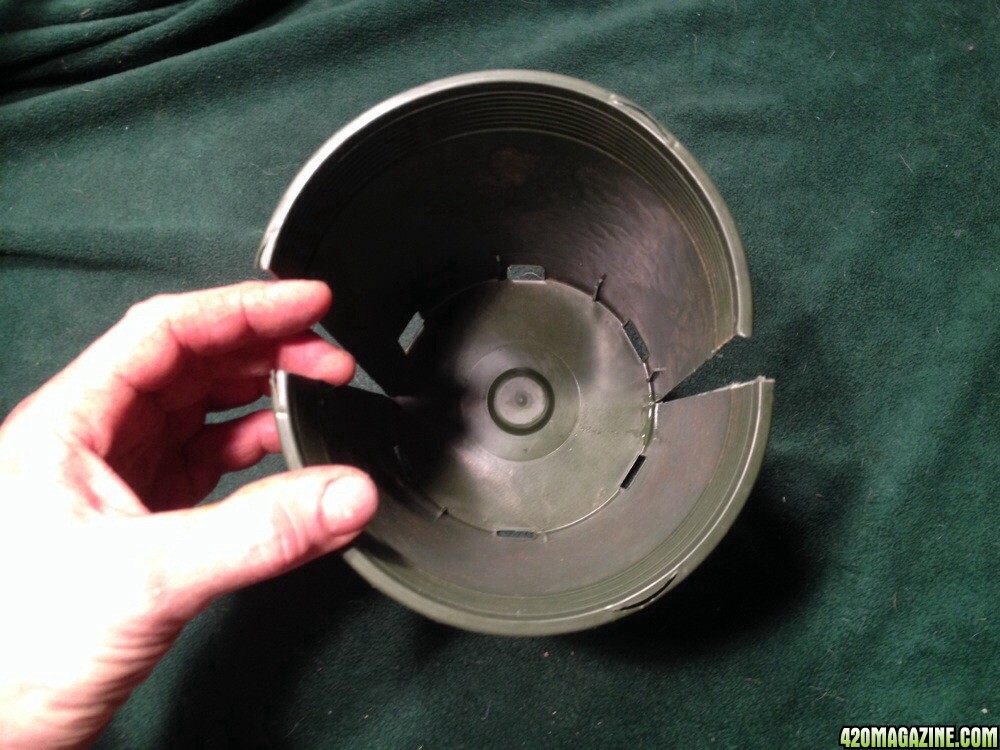 Does need 2 containers to work. Or could be held shut in another way but this seems easiest.
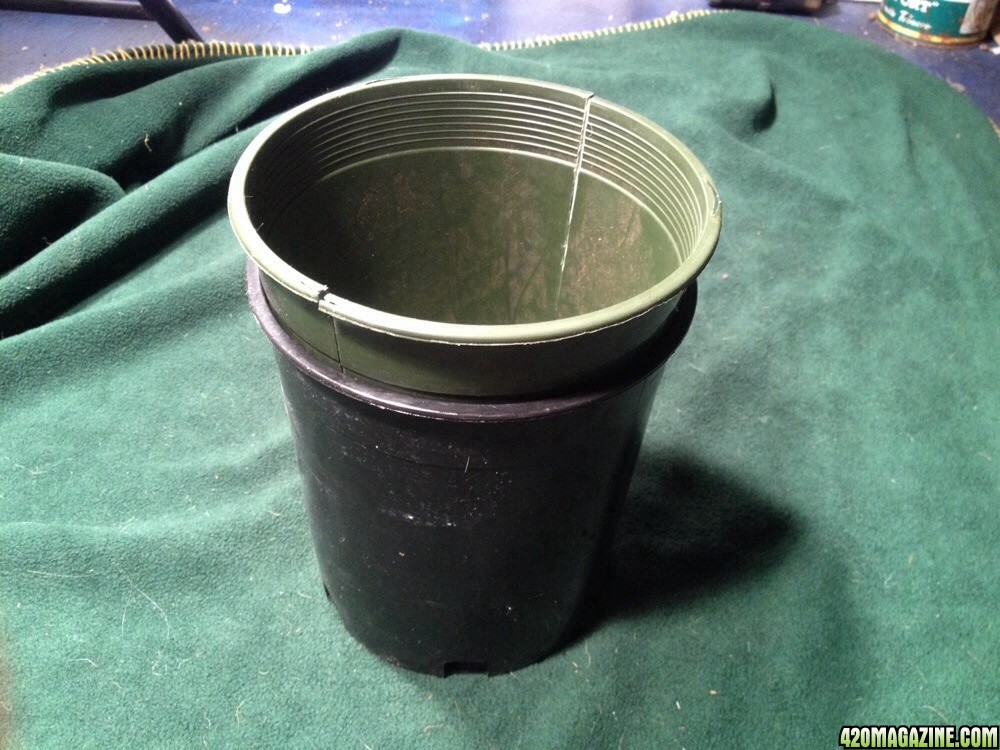
- Thread starter
- #175
Skybound
Well-Known Member
Truth be told, I wish they made clear bags the same size as the pots. That would allow me to do a quick lift, but I expect you'll find good results by cutting, just be watchful of roots poking through the slits as some may get pinched which would be stressful. Good deal though! Did you fill it with media yet?
I might stick a few in those pots tonight just to see what happen in a week or two. I expected the crack might get some roots in it, though it's not as much of a crack as it looks in the picture- squeezes together pretty good on the scissor line- might chop them as I close it up again, yeah. I'll experiment around with it. For a while now I've been keeping an eye out for nesting clear containers that might work for plants. Seems like they should be easy enough to find for those who live near civilization... lol. Clear Tupperware type plastic buckets and some black paint?
- Thread starter
- #177
Skybound
Well-Known Member
2 tupperware tubs, the outer painted? I think you found us a winner! Also, to protect roots from the slit down the side, maybe slice open a length of air hose and feed it down each side like new a squeegy leaving the soft tube surfaces to be what's used to make the seal?
2 tupperware tubs, the outer painted? I think you found us a winner! Also, to protect roots from the slit down the side, maybe slice open a length of air hose and feed it down each side like new a squeegy leaving the soft tube surfaces to be what's used to make the seal?[/
Cool. I hope to see somebody try it. I'll run/hobble with this contraption for awhile and see what happens. Peace
- Thread starter
- #179
Skybound
Well-Known Member
I put my 3rd large plant (Cherry Bomb.B/runt) into flower today which is the end of the 14th day for the other 2 in flower. In 2 weeks, I plan to send the last one (CB.A) into flower. 2 weeks after that, I will begin ushering the 6 cuttings through the flowering rooms and by the time I chop either the CB.C or Power Flower, I expect to still have plants to send into flower which I hope will position me into a perpetual harvest cycle.
In flower, I also finished wiring in my outlets and moved the ballasts into the flower room. In the coming weeks (tax season) I hope to afford two more 600w cool tubes, and whatever else I need to finalize the other flowering room and have them completely light proof from one another. I am still very confident that the lights will provide constant heat for all 20 linear feet. Also, I plan to look into doing an air exchange from my veg and flower rooms. They are roughly 20' apart, but the space in between can be considered grow space as I am the only one that will ever see it. This would be a great way of gaining RH in veg and help to lessen the RH in flower.
As far as I can tell, my Arduino studies are trucking along. I hope to get my new 8 channel relay in the mail and I will begin that circuit immediately. In due time, I hope to have complete control over the AC outlets in the flower rooms, as well as also have temp and RH sensors installed. If I can get these 2 major components into play, I could gain SO much control as I would then be able to monitor and turn on or off via the internet and have no need of physically being at the grow.
More to come with advances as they occur.
- Thread starter
- #180
Skybound
Well-Known Member
I walked into flower to discover some frightening and intimidating bad news, RH was up over 70%. To most growers this isn't the biggest of concerns as a dehumidifier would get that under control, but for me in an old house with old electrical service (60 amps), I am getting ever closer to exceeding that 60 amp max point. If I should hit that 60 amps, everything in the house goes black and I also run the risk of fire which is BAAAAAD! So it seems I cannot put off updating this power situation if I intend to harvest so much as one semi successful harvest. As an immediate counter measure I intend to nix using silica in the res and resort to using silica in a foliar spray which would effect the same (or very similar) results, but it would greatly increase the PH on the leaf surfaces which I understand will prevent mold from starting. This is only a short term remedy as foliar sprays shouldn't be used when nearing the end of flowering as the wetness will permeate into the colas and likely cause other issues. These kinds of happenings are normal in my life. Just when ya think it couldn't get worse, it gets 3 times worse. My intent was to get 2 more HIDs with my tax return, but I am now thinking I just need to upgrade my electric service so I can protect myself, pet, room mate and the building itself.
Other than that, the grows are going somewhat smooth. Of course there are some bumps along the way as I am still developing a technique and how I operate within my space, but now that I have the white boards, I can plot out schedules which makes it so much easier to stay on top of my game.
[video=youtube;vMSLAL_6EI4]
[/video]
Other than that, the grows are going somewhat smooth. Of course there are some bumps along the way as I am still developing a technique and how I operate within my space, but now that I have the white boards, I can plot out schedules which makes it so much easier to stay on top of my game.
[video=youtube;vMSLAL_6EI4]
Similar threads
- Replies
- 29
- Views
- 5K
- Replies
- 53
- Views
- 7K
- Replies
- 110
- Views
- 14K
- Replies
- 237
- Views
- 29K
- Replies
- 170
- Views
- 22K