JBoozer's 1st Grow - Nirvava AK48 - Top Feed Capn Style - 600 Watt HID

Re: JBoozer's 1st Grow - Nirvava AK48 - Top Feed "Capn" Style - 600watt HID

Boozer, your stuff is looking so good. You are going to be very successful here. I have a few comments.

1. Your clones look like they got wilty before you got the dome on. I would take a few more. Get everything ready. Cut the clone, put it in water, then put your cloning gel on it.. then stick it in the rockwool a good 2" deep. The immediately into the dome (Mist the inside of the dome). If it gets wilty, you took too long. Also, If it doesn't go in the rockwool well, and you crush the stem a little, throw it away and get another one.

2. Don't worry about the clear tubing for now. Just keep an eye out for some 1/2" flexible black tubing.

3. If you're going to flower next Sunday, be sure NOT to top it this week.
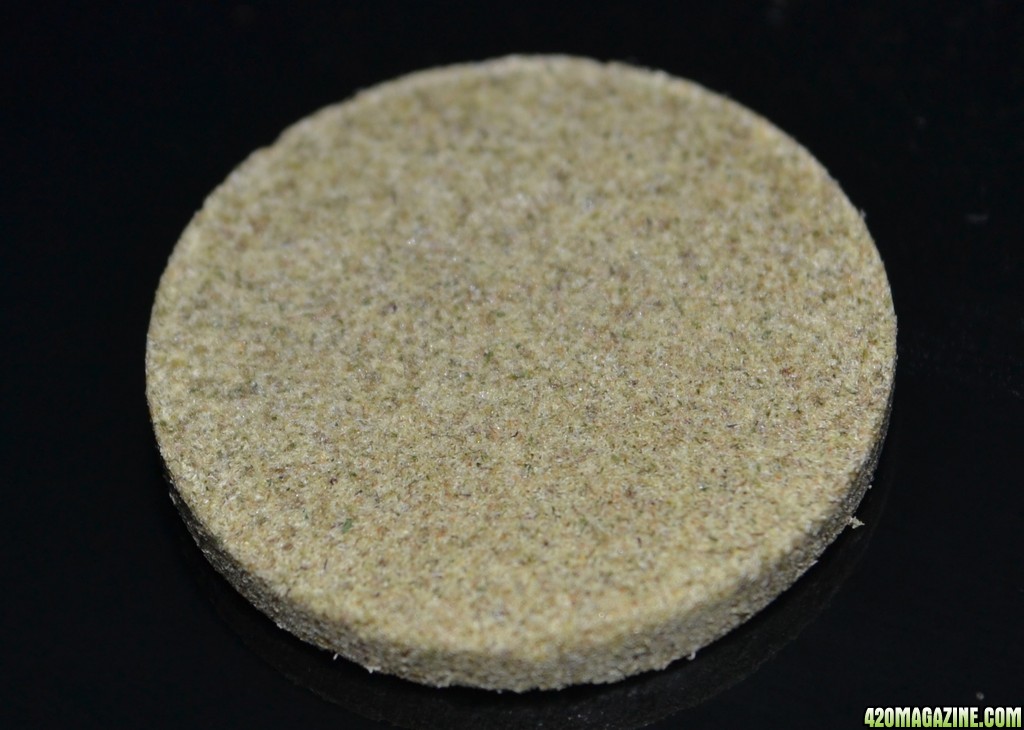
 
Re: JBoozer's 1st Grow - Nirvava AK48 - Top Feed "Capn" Style - 600watt HID

Boozer, I absolutely love the stealth vent exhaust design you came up with.

As for your reduced batch tea methods, I'm planning on using a 120g x 0.001g digital scale for the dry measures, for liquids I have an assortment of pipettes that'll do the trick nicely.

DRM Ranch
 
Re: JBoozer's 1st Grow - Nirvava AK48 - Top Feed "Capn" Style - 600watt HID

Hey guys,

Thanks for all the help and kind words!

DRM -- The vent has been awesome...I highly recommend building one if you're going to be exhausting out a window. Also, i've brewed up about a half dozen batches of tea using just the 1qt container....its worked beautifully!

Capn -- Thanks for the suggestions! Just took a couple more clones to be safe. Last time I topped was last week and I won't be topping again.


So I'll give a picture update in a few days with the clones etc.

Thanks!
-JBooze
 
Re: JBoozer's 1st Grow - Nirvava AK48 - Top Feed "Capn" Style - 600watt HID

As for light proofing, roll or spray on adhesive and aluminum foil are light proof. Maybe not the best looking alternative but it should serve the purpose.

Just a thought in any case, certainly to tried and put through the wringer.

DRM Ranch
 
Re: JBoozer's 1st Grow - Nirvava AK48 - Top Feed "Capn" Style - 600watt HID

As for light proofing, roll or spray on adhesive and aluminum foil are light proof. Maybe not the best looking alternative but it should serve the purpose.

Just a thought in any case, certainly to tried and put through the wringer.

DRM Ranch

Thanks man. I actually picked up some of the black gorilla tape that Cap recommended. I should be good. This is a really exciting time...cant wait to see some buds forming!

-JBooze
 
Re: JBoozer's 1st Grow - Nirvava AK48 - Top Feed "Capn" Style - 600watt HID

Your plant is really looking nice save for the slight oops moment. I'm sure you'll get a whopper of a harvest. Have you put any thought into the dry and cure yet.

DRM Ranch
 
Re: JBoozer's 1st Grow - Nirvava AK48 - Top Feed "Capn" Style - 600watt HID

Your plant is really looking nice save for the slight oops moment. I'm sure you'll get a whopper of a harvest. Have you put any thought into the dry and cure yet.

DRM Ranch

Definitely hoping for a nice harvest! I pretty much plan on doing the dry and cure by the books. Ill hang em up in a cool, dry place for about a week, then jar em up for a month for the cure. Once I get closer to harvest Ill do some more reading.

-JBooze
 
Re: JBoozer's 1st Grow - Nirvava AK48 - Top Feed "Capn" Style - 600watt HID

I found this;

Drying and curing cannabis properly will yield the most THC-potent smoke. When dried and cured improperly, potency can diminish substantially. The level of THC in a plant is determined by its genetics. Proper drying and curing will keep the THC level as high as genetically possible. It does not increase potency.

A little background on what happens inside and outside the harvested drying plant will help you understand why proper drying and curing are so important to good quality dope. Drying evaporates most of the 70-75 percent water content in fresh marijuana. Drying also converts THC from its non-psychoactive crude acidic form to its psychoactive pH-neutral form. Once dry, THC-potent marijuana can be smoked and you will get high. Every THC molecule must shed their moisture content before they are fully psychoactive.
In other words fresh green marijuana will not be very potent.
When you cut a plant or plant part and hang it to dry, the transport of fluids within the plant continues, but at a slower rate. Stomata, small openings on leaf undersides, close soon after harvest and drying is slowed since little water vapor escapes. The natural plant processes slowly come to an end as the plant dries. The outer cells are the first to dry, but fluid still moves from internal cells to supply moisture to the dry outer cells. When this process occurs properly, the plant dries evenly throughout. Removing leaves and large stems upon harvest speeds drying, however, moisture content within the “dried” buds, leaves and stems is most often uneven.
Quick drying also traps chlorophylls and other pigments, starch and nitrates within plant tissue, making it taste “green” burn unevenly and taste bad.
Taste and aroma improve when these pigments break down.
Slow even drying – where the humidity is similar inside and outside the foliage – allows enough time for the pigments to degrade. Hanging entire plants to dry allows this process to occur over time, about 3-4 weeks at 50-60 percent relative humidity and a temperature range of 60-70 degrees F. (15-21 degrees C.) The large outer leaves also form a protective sheath around buds. This protective foliage shields resin glands on buds from rupture and bruising. Removing large leaves and stems upon harvest saves time. This is what most growers do, because fresh supple leaves are easier to work with than dry leaves. When you are looking a manicuring 5 kilos, you make it as easy as possible! However, this process often causes uneven drying and keeps moisture inside the foliage.
This is why it is important to “cure” the “dry” marijuana.Curing lets the plants continue to dry slowly. The first week of curing affects potency in that it removes moisture within the bud evenly, so that virtually all the THC is psychoactive. Curing also allows buds to dry enough so that mold does not grow when it is stored. A well-cured bud will also burn with an even glow.Note: Rough handling and friction from fondling hands will bruise and knock off resin glands. Even with proper drying and curing, brutal handling of harvested marijuana will diminish THC content.


Here is one of the best ways to dry plants to retain the maximum amount of psychoactive THC. Cut the entire ripe plant at the base and hang it upside down on a line to dry. Try to keep plants from touching each other to avoid uneven drying and mold. Keep the humidity between 50-60 percent. Keep the temperature at about 60-70 degrees F. (15-21 degrees C.). The room should be relatively dark as light, especially direct sunlight, degrades THC.A circulation and ventilation fan may be necessary to control heat and humidity. You can also use a dehumidifier to control humidity or an air conditioner to lower ambient relative humidity and control room temperature.
Do not train fans directly on drying plants it causes them to dry unevenly.Depending upon atmospheric conditions and the size and density of plants and buds, plants should be dry enough to smoke in about a week. Plants with outer “fan” leaves intact take longer to dry than if leaves have been removed.Check for dryness by bending a stem. It should snap. The bud should be dry to Cervantestouch, but not brittle. The bud should burn well enough to smoke now.Once dry, carefully manicure buds by cutting large leaves where they attach to the stem.
Leaving the petiole (leaf stem) can cause mold to grow. Snip off smaller leaves that show little resin so that buds a beautiful bud remains. Freeze DryingDry ice is frozen carbon dioxide. CO” changes from its frozen solid to a gas without turning into a liquid, a dry (ice) process that is called sublimation. The atmosphere contains little CO2. Dry ice sublimes (converts) completely into a gas leaving virtually no liquid. It is dry.When moist marijuana is enclosed with dry ice at virtually zero relative humidity, water molecules migrate from the cannabis to the dry ice. The relative humidity of the CO2 increases and the moisture content of the marijuana decreases. This process occurs below 0 degrees C (32 degrees F), preserving the cannabis.Place equal amounts of dry ice and bud into a container. Dry ice on the bottom and bud on top. Seal with a lid. Make a few small holes in the lid of the container for excess gas to exit. Place in the freezer. Check the dry ice every 24 hours. When the ice is gone, the buds will be completely dry. If not dry, add more dry ice until cannabis is dry. Conserve dry ice by partially drying buds for a few days before enclosing with dry ice.This method retains potency, freshness and causes very little degradation of resin glands by the bad guys – heat, light, air and fondling hands. The marijuana tastes ‘minty’ because the chlorophyll does not break down.CuringEven though the plants appear to be dry, they still contain moisture inside. This moisture affects taste and potency.
To remove this excess moisture, curing is necessary. Curing makes the bud uniformly dry and converts virtually all THC into its psychoactive form.
Cut stems into manageable lengths – less than 12 inches (30 centimeters) – and place them in an airtight container. Glass containers with a rubber or similar seal on top are the best. Avoid Ziploc plastic bags, which are not airtight. Many growers also avoid plastic containers such as Tupperware, sighting the plastic imparts an undesirable flavor in the buds. Enclose buds in a container. This creates a microclimate that allows moisture to “even out” within the buds. Internal moisture will migrate to the dry portions of the bud. Gently pack as many buds in the glass container as possible without damaging them. Leave the jar(s) in a cool dry dark place. Check the jar in 2-4 hours to see if buds “sweated” moisture. Check buds by gently squeezing to feel if they are moister than they were a few hours before. Be careful when squeezing buds, they bruise easily. Most often they will be completely dry. If not, leave them in the sealed jar overnight and check the next day.The buds will be a bit moist. Remove them from the jar and gently lay in the bottom of a paper bag. They can be stacked in the paper bag as high as 10 centimeters (3 inches). Close the top of the bag by folding once. Check the buds 2-3 times during the day to see if they are dry. Carefully turn them in the bag so that different sides are exposed. Remove when they are dry and place back into the sealed glass jar. Check them the next day to see if they are evenly dry and not moist again. If moist, remove and place back in the paper bag until dry. When dry place back in the glass container. Repeat process until buds are evenly dry.If buds appear to have fairly low moisture content, you may be able to leave them in the jar and let excess moisture escape out the top. Simply open the jar for a few minutes every few hours to let the excess moisture escape before closing the lid again.
Check the container daily, leaving the top open for 5-10 minutes so moisture evacuates. After a week or two, it should be totally dry and ready to seal airtight. Vacuum seal the jar and place it in the refrigerator for storage. Leave it in the refrigerator or a cool dark dry place for a month or longer. The taste and potency will be tops! Refrigeration slows decomposition but remember, refrigerators have a high humidity level, so the container must be sealed airtight. I just checked the relative humidity in temperature in my refrigerator – 65 percent relative humidity and 5 degrees C. (40 degrees F). Do not place it in the freezer. Freezing draws moisture to the surface of buds, which can harm resin glands on the surface.
I do not recommend fast drying however here is a brief rundown on several methods for those of you who can’t wait.

Method One: Manicure fresh buds. Spread them out evenly and wrap in paper or enclose in an envelope. Place the paper or envelope on top of a warm object – refrigerator, radiator, television, etc. Depending upon heat level, buds will be dry in a few hours to overnight. Buds should be a bit crispy when dry. Place buds in an airtight container until they sweat. Follow curing instructions above.

Method Two: Cut up fresh buds and foliage. Place on a 6-inch (15 centimeter) square of tinfoil. Hold or place it over a 60-80-watt light bulb. Stir every 30 seconds. The weed takes 1-3 minutes to dry.

Method Three: Place cut up buds and foliage on a cookie sheet in an oven at 65 degrees C. (150 degrees F.) for 10- 15 minutes. Check regularly until dry. Follow curing instructions above.

Method Four: Place cut up buds and foliage in a microwave oven. Power the oven to 40-50 percent and give short 5-10 second bursts. Check regularly until dry.

Method Five: Cut fresh buds and foliage into small pieces and place them in a glass jar with an airtight lid. Place several silica gel desiccant packs (the kind that come with electronic devices and cameras) into the glass jar and seal the jar. Moisture will migrate to the silica gel in a few hours. Remove the packets and dry in the sun. Replace silica packs until marijuana is dry enough to smoke. Find silica gel packs at auto parts or electronic stores.

Method Six: Peel stems so they plants dry faster. First remove large leaves. Peel off the outer layer of the stem with a knife. This exposes the inside of the stem and cuts drying time by about 20 percent.Patient growers smoke no bud before its time!
__________________

I particularly thought the dry ice thing was interesting.

The whole dry over time is what I understand is the initial and so very important part in the process of creating superior quality smoke.

DRM Ranch
 
Re: JBoozer's 1st Grow - Nirvava AK48 - Top Feed "Capn" Style - 600watt HID

Hey DRM,

That was a great read! A lot of good info in there. Yes, it is ny understanding as well that it is best to have the buds dry evenly from outside in over time in order to get the best quality smoke. This is what I plan on doing...I'll have waited close to 5 months for a harvest and I wouldnt want to degrade it in any way simply because I couldnt wait one more month or so for a proper cure!

-JBooze
 
Re: JBoozer's 1st Grow - Nirvava AK48 - Top Feed "Capn" Style - 600watt HID

To be quite honest I fear the dry and cure process way more than the grow aspect. I've quite a bit of experience growing my own tobacco and never quite nailed the dry and cure process as well as I would have liked. The process is not exactly the same but similar enough to make me very cautious about the researching the process in an effort to get the very best possible results.

There are it seems to me very many grow threads but so very few threats that focus on the drying and curing processes and variety of methods. Kind of a shame I think.

The Boveda 62% humidity control packs seem to be a good option for the finish cure, user name TheCapn has a blog post that mentions them and is a good place to start your research if you so desire to go that route. I do believe I will if for nothing more than to maintain a level of consistency I doubt I could by other means.

Wish I had more to offer on the subject, but that's about all I have.

DRM Ranch
 
Re: JBoozer's 1st Grow - Nirvava AK48 - Top Feed "Capn" Style - 600watt HID

To be quite honest I fear the dry and cure process way more than the grow aspect. I've quite a bit of experience growing my own tobacco and never quite nailed the dry and cure process as well as I would have liked. The process is not exactly the same but similar enough to make me very cautious about the researching the process in an effort to get the very best possible results.

There are it seems to me very many grow threads but so very few threats that focus on the drying and curing processes and variety of methods. Kind of a shame I think.

The Boveda 62% humidity control packs seem to be a good option for the finish cure, user name TheCapn has a blog post that mentions them and is a good place to start your research if you so desire to go that route. I do believe I will if for nothing more than to maintain a level of consistency I doubt I could by other means.

Wish I had more to offer on the subject, but that's about all I have.

DRM Ranch

You've given me quite a bit of info to work with as is, thanks! I have read his blog and read about those humidity packs...it is something I will consider when the time comes. Being me first grow, I tend to focus a bit more on the short term so I have the oppurtunity to really learn the process. When events such as trimming and drying my harvest get within the two week mark, I make sure I get everything ordered that I need, do my research, and hammer down the process/schedule.
 
Re: JBoozer's 1st Grow - Nirvava AK48 - Top Feed "Capn" Style - 600watt HID

Good post there DRM - I used that first technique (without dry ice) -
cut plant - hang in a cool dry dark closet 1 week - note:use air scrubber for this very stinky in a good way
cut buds to manageable size to fit in large paper bags -
layer buds in paper bag with wax paper in between layers for 7-10 days rotating every so often (not every day) close up bag
after 7-10 days in paper bag, trim & manicure all buds then into glass jars for a month (glass jar important)

That worked perfectly - smooth even tasty smoke - very SMOOTH and very POTENT wow!

There's a trick I'm going to try this time around... adding un-sweetened organic fruit juice (thinking Trader Joe's organic un-sweetened Blueberry or something similar) mixed with water 50/50 water a few hours before harvest. Not going to do all my plants but I'm going to try it on a few and see if I can get a very slight (not sweet) flavor to the smoke.

Cheers,
BB
 
Re: JBoozer's 1st Grow - Nirvava AK48 - Top Feed "Capn" Style - 600watt HID

For the best looking bud, trim everything off the buds as SOON as you take it down. Don't allow leaves to get wilty before trimming. Don't wait until it's dry before trimming.

After trimming, hang branches for 4-5 days, cut buds off branches, then sweat them for 4 more days, then jar em and burp them for a week. More here: How to: Harvesting, trimming, drying, curing, and storing your cannabis - Blogs - 420 Magazine ®

Thanks Cap! I've read your harvesting blog before and just read it again. I'll be following it closely when the time comes.

-JBooze
 
Re: JBoozer's 1st Grow - Nirvava AK48 - Top Feed "Capn" Style - 600watt HID

I agree that trimming close from the outset results in the best looking buds. Sugared trim is useful for other endeavors, and in my opinion should be kept apart from other trim.

Have you tried a slower dry?

DRM Ranch
 
Re: JBoozer's 1st Grow - Nirvava AK48 - Top Feed "Capn" Style - 600watt HID

When I harvest I use disposable vinyl gloves and when I harvest a plant I start by cutting the branches off 1 by 1. I take the branch and first strip off all the fan leaves. I then use a pair of Fiskars Micro Tip Pruning scissors and trim all the sugar leaves flush with the bud. I then take the trimmed branches and place them in my drying rack to dry for 5-7 days or until the buds just break off the stems. I then trim off the buds from the stems and place the buds into storage containers. I take the buds out of the storage containers and place into a large bowl for 10 minutes per day for 10 days.

My drying rack

dry_fast_cactus.jpg


For trimming I use Fiskars Softouch Micro-Tip Pruning Snip recommended by the arthritis society, they come with a lifetime replacement warranty. One of the handles broke on my last pair, I used the warranty claim on the website and Fiskars replaced them at no cost.

https://www2.fiskars.com Titanium Micro Tip Easy Action Scissors No.5


drying racks

2' Dry Rack w/ Zipper Openings - perfectgardens


I have a portable washing machine similar to the Bubble Magic 5 Gallon Mini Washing Machine that I put the trimmings in a mesh bag and place inside the washing machine, I then fill the washing machine with cold water and ice cubes and set it for 2 cycles. I then place my 5 Gallon All Mesh five Bubble bags inside of a 5 gallon pail then drain the washing machine through its discharge hose into the bucket. I then remove each bag one at a time as I drain the liquid from the bag. The trichomes are gathered in the bottom of the bags and are removed in different grades and pressed in a pressing screen to remove excess water. I then take my Large Piranha Aluminum Pollen T-Press and press the hashish into convenient sized disks.


Bubble Magic 5 Gallon Mini Washing Machine

Bubble Magic 5 Gallon Mini Washing Machine


5 Gallon All Mesh five Bubble Bag Kit

https://www.customhydroponic.com 5 Gallon All Mesh five Bubble Bag Kit

Large Piranha Aluminum Pollen T-Press

https://www.theothersidevapes.com large piranha aluminum pollen t-press
 
Re: JBoozer's 1st Grow - Nirvava AK48 - Top Feed "Capn" Style - 600watt HID

^^^^^
Commercial.

>>>Have you tried a slower dry?

I've found that the more you mess with your buds (taking them in and out of bags, moving them here and there) the worse they will look. In addition, if you dry too slow, you risk getting mold.

>>>I then take the trimmed branches and place them in my drying rack

Once you've trimmed up the branch, there is no reason to lay it in a drying rack. The weight of the bud kind of makes a flat spot on one side, and then I see some people turning them over and messing with them, making it worse.

If you want the absolute best looking product, hang the branches on a hanger, (or a string) and DON'T touch them for 4-5 days. The less you handle them, the better your end product will look.

See how these look perfect? Nothing crushed, and no trichomes left on a drying rack:


Again, for the best looking buds, start trimming right when you chop it off the plant. Before:


And just a few hours later they are hanging:


>>>to dry for 5-7 days or until the buds just break off the stems.

Be careful here. If the buds are breaking off the stem, that means the stem is so dry it is breaking when you bend it. That might be little too dry. If the outsides of your buds are getting crispy, it's too dry, and it's difficult to re-hydrate it, and that could make the bud snap crackle and pop when you smoke it... kind of like smoking dead leaves. After 4-5 days the stem should sort of "fracture" when you bend it, but not break. Buds should feel dry but not crispy. Use your own judgement, don't stress too much, and whatever you do, don't jar it up too soon!

After I cut the buds off the branches, I put them into a big tote to sweat them. Taking the lid off for a few hours, then back on for a few hours. By this time, the buds are firm enough that they won't crush under their own weight. I still try to be gentle with them.


Speaking of hash: :) You can also make disks using the stoner method. Some 3/4" PVC pipe, two quarters, a little parchment paper, and a C clamp!
 
Re: JBoozer's 1st Grow - Nirvava AK48 - Top Feed "Capn" Style - 600watt HID

I have tried different techniques to dry and cure buds. At 49%-60% humidity it take me between 5-7 days for the buds just to snap from the stems of the branches, at this point I cut the buds from the stems and place the buds into storage containers to begin curing.
 
Back
Top Bottom