

- Thread starter
- #301
DrCannaCanadian
Well-Known Member
MY Growing Experiences

By DrCannaCanadian
You Gotta Know When To Fold Them - With MY Notes
By DrCannaCanadian
You Gotta Know When To Fold Them - With MY Notes
Hey 420!
In life, when you are dealt a bad hand - You gotta know when to fold them!
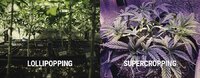
Note: Remember we want a MY Grow - a Maximum Yield Grow - plants tall & wide!

A while back, our soil was too "hot" and we almost lost Chewbacca & Han Solo - our two Chemdawgs.
We worked for days and we managed to save them - which is a great experience for any grower.
However, the trauma they suffered essentially stunted their growth rate to the point that they would never really be strong growers.
And here's the lesson:
We never keep a slow growing plant that is going to take up valuable resources like space and nutrients because the slow growing plant will ultimately give you a low yield and a low quality harvest!
We are much better off to cull the stunted runts, and to allow our stronger plants to use the valuable space to provide a high yield and high quality bud!


")