Sweetsue's First Grow - Stealthy Trio of Autos Under CFLs

This is my dream watering schedule.

Water seedlings with coconut water or rainwater only.

The watering schedule is done consistently, regardless of where the plant is in its life cycle.

Two to three waterings a week (basically every other day)
- one enzyme tea watering (measurements for one gallon)
* 1 TBS sprouts, puréed
* 10 ml Fulpower fulvic acid
* 5 ml Agsil
- one rainwater watering
- one coconut/aloe watering
* 1/4 c fresh, young coconut water
* 1/4 tsp 200x aloe vera powder
* 5 ml Agsil
Repeat indefinitely.

Every three weeks add 1/4 tsp TM7 to 2-1/2 gallons water.

Beginning when there are four nodes, add bio accumulator teas.

With new soil do weekly application of two alternating teas
- 2-3 tsp neem meal + 1-2 tsp kelp bubbled in a half gal water for 24 hrs.
* dilute to make 2.5 gal water
* add 1/4 tsp aloe + 10 ml fulpower per gallon
- same measurements using alfalfa instead of neem


The estimated minimal cost of beginning this regime:
- $ 15 Malted barley (2.5 pounds; 4 oz/cup)
- $ 22 Coconut Water Powder (1/2 # = 75 gal @ 1/4 c. per gal.)
- $ 22 200x aloe powder
- $ 26 Fulpower (quart)
- $ 14.20 Agsil (pound)
- $ 13 TM7 (100 gm bag)
- $ 13 Neem/karanja (2.5 # = 5-6 cups)
- $ 14.06 Kelp meal (3# = 6 cups)

You see why this is a dream scenario. I will be picking items up bit by bit, but until then I will be using as many plant-based amendments as possible to fill the voids.

Notes on the list:
- Priority should be given to coconut, aloe and malted barley
- Secondary priority to fulpower, TM7 and Agsil
- Third would be kelp, neem/karanja meal
- Sprouted corn can be substituted for coconut water to supply cytokinins

Things I still haven't figured out:

Can purchased aloe gel be used to create aloe water? Any ideas on this?

Is it possible to substitute corn meal, molasses, kelp, equisetum, or camomile for plant immunity in place of neem/karanja? Camomile in particular is legendary for its immunity properties.


I didn't make it crystal clear that the coconut/aloe watering measurements were also for a gallon of rainwater. Most of you realize that because of your experience. This clarification was for those I may have confused.

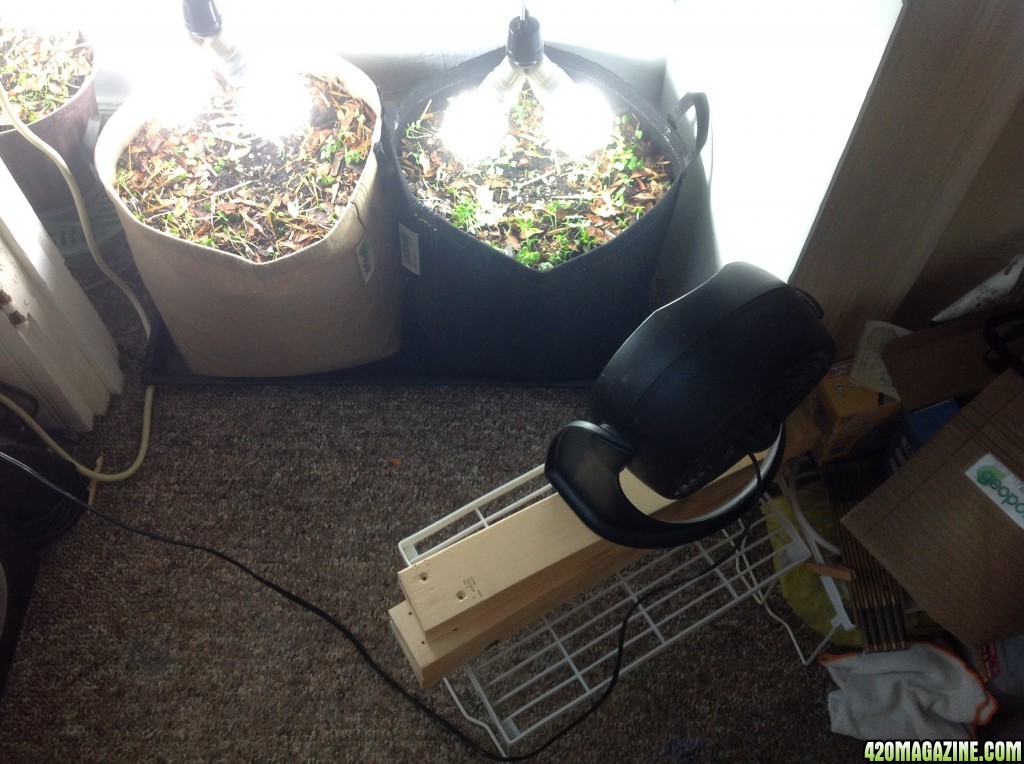
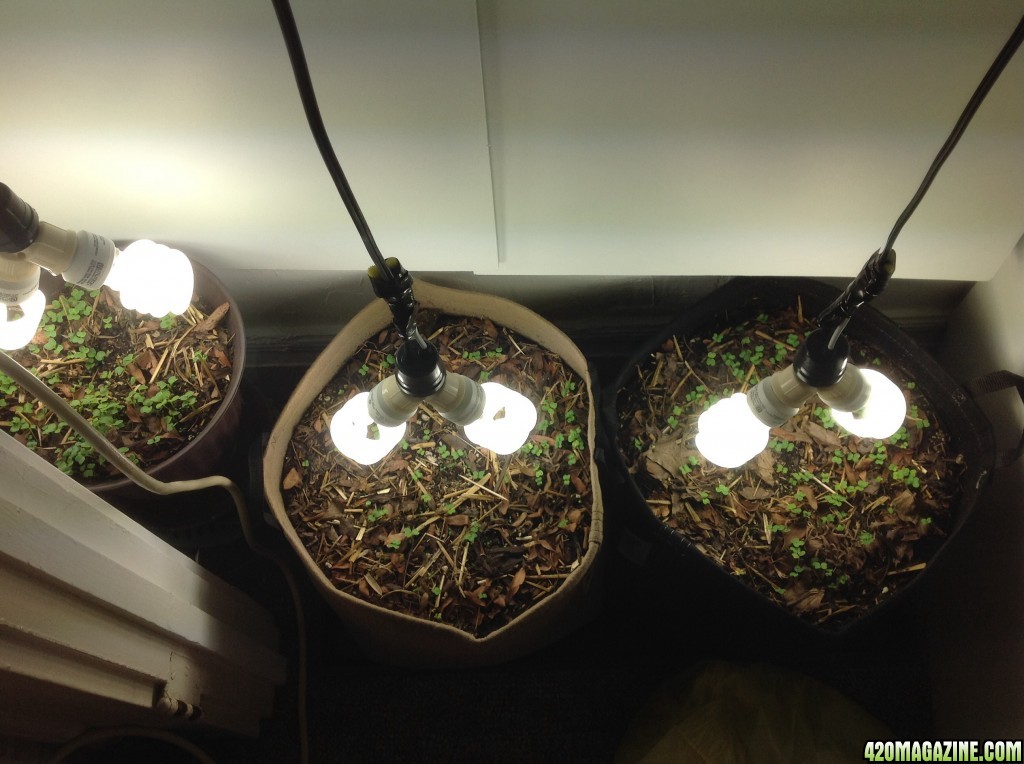
I also wanted to point out that a no-till is watered more frequently than most cannabis growers are familiar with. The "lift the pot" mentality doesn't apply here. The micro community you are cultivating in a no-till can never go dry, or the micro beasties that are growing your plant for you will die. You need to learn to read the soil, the plant, the pot itself (if using fabrics - and you should be using fabrics if you have the option) to determine the moisture balance. These soils hold water in a way that reminds me of the forest floor.

I learned after the initial watering that it didn't need that whole 2 1/2 gallons between the three. The Buddha and the Bomb dropped almost a half gallon back into the tray. It reminded me to buy a turkey baster to easily pull out excess run off. I had to use an eye dropper to keep it from overflowing onto the floor. That was an interesting experience. I almost missed it, just catching it at the rim of the shoe tray after glancing over as I went by. It would have been a terrible mess to have all that tannin-filled water run into the carpet.
 
Nothing much going on at this point. Just waiting for seeds to sprout forth. Watered today with plain rainwater. About a quart between the three pots. Everything's still nicely moist from Saturday's watering. I like the control the garden sprayer gives. Because the lights are hanging from cords it's a simple matter to lift them out of the way as you gently spray

This has to be the hardest part of the growing cycle. I have a cross stitch I did for my mother years ago that became mine when she died that's very appropriate to this.

image16203.jpg
 
What brand sprayer did you get and what did it cost and where did ya pick it up at?
If ya don't mind me asking. I'm in the market to pick one up. My reading tells me I should get a chapin sprayer, idk. I've never been much of a foliar feeder, but I can see the point of doing some FF from time to time.
 
Mine was just a simple plastic garden sprayer made by Chapin, purchased from my local Lowe's. It cost me $15 plus tax. I understand why they recommend the Chapin. It's really a top quality product and will hold up to years of use. They're also easier to keep clean and you can get a wonderful fogging tip for the better models that takes foliar feeding to new heights. It would be worth it if you did any foliar feeding since you do sizable grows, and foliar feedings offer legendary benefits. The prices for metal ones are out of my reach, so I went with this one. We used one of these for many years and it held up well for me. I won't ever be growing more than three plants - in fact from now on I will probably only grow two at once - so this one fits the bill for functionality.

I'm so excited about your life changes CO. This is a big moment for you and your wife. Bringing in the New Year in your own home and celebrating with the fruits of your gardening labors. Life doesn't get sweeter than this until the first child comes along (providing you are planning children). I'm looking forward to your next grow. With your bountiful harvest you can afford to take the time to set it up right. Good times ahead.
 
We've been discussing watering a no-till on SoilGirl's journal and COorganics inspired me to change the setup and put the pots right down onto the tray. This way I can begin my routine by watering from the bottom until soak slows down and then finish with a top drench.

image16215.jpg


Since I barely used the drain covers (two days doesn't really count) I can return them to Lowe's and use the refund for groceries. Win-win.

Thanks CO. You've been a great teacher.
 
Looking really good from my point of view. Never had any luck with soil but for my next endeavor I will be trying it once again with everything I've learned on 420 mag and I've been following your steps closely. Really amazing looking soil you have.

I don't have much to add in terms of information to help you but if you wish to increase the efficiency of your 23w CFL bulbs you can make a pretty darn good reflector out of clean soda cans that you can find in the recycling if you're not a soda drinker... i'm not.

You just cut out one side big enough to fit the base of the bulb through and cut the can lengthwise in half with two cuts near the top and bottom allowing you to create that reflector shape. This stops lights from going in the opposite direction of where you want it and also reflects some of that wasted light to where you do want it.

Thanks for this great journal
 
Thanks for stopping by Nine44. I'm glad you enjoyed the preparation for the big show.

I thought about making reflectors, but the reality is that CFLs don't reflect quality light the way other bulbs do. You really have to get that long edge aimed right at what you're growing for the light quality you are seeking. You have to keep them within that 3"-4" max distance. Any further away and it may look bright but the plants don't get the necessary value. I'm not sure the reflected light would be worth the effort. If you work within those confines and make sure each plant gets access to 100w, 23w CFLs can be amazing - not to mention affordable.

The way I place the lights later, suspended between the plants, you get the benefit from both sides of the bulb. Buds are rock solid, with nice, full resin sacs. I'm looking forward to seeing how much better they grow with quality soil and larger pots. Can't wait to add my tillers, the worms. :laughtwo:
 
I wanted to share the link to Tulip's tutorial on CFLs from Jan. 2010.

https://https://www.420magazine.com/community/threads/cfl-light-tutorial.111680/

The information on the first page is gold.

This was some of the most insightful information I was able to find on the Internet concerning CFLs and was the reason I ended up on this site. I found it indispensable in learning how to set up my tiny, tiny space. The lack of heat build-up was a primary attraction for me. Living in a Victorian rental means no cutting through walls for ventilation.
 
We've been discussing watering a no-till on SoilGirl's journal and COorganics inspired me to change the setup and put the pots right down onto the tray. This way I can begin my routine by watering from the bottom until soak slows down and then finish with a top drench.

image16215.jpg


Since I barely used the drain covers (two days doesn't really count) I can return them to Lowe's and use the refund for groceries. Win-win.

Thanks CO. You've been a great teacher.

Sue,
You're a buddy.

I hope watering like that works well for you. It works wonderfully for me, but there are 2 major differences I see. Plastic pots, and saucers that aren't much wider than the pot size.

I guess I'm concerned with your set up getting standing water in it, and then you may have to try to move heavy pots around.
That's something you can dial in later though, and see how it works for ya as is now.

If you had the drip tray, 2 plastic saucers, then your pots... And you watered into the saucers (this forces you to not overwater them) that would likely work better than watering into the big tray and hoping the pots would suck up all the water. Just an thought.
 
CO, my thought is to water slowly from the bottom the same way I do on the top. The drip tray is a snug fit as is, so finding a saucer to accommodate the pots that will also fit the tray is a long shot at best. I'm going to purchase an inexpensive turkey baster today to remove any standing water. That should solve the entire problem.

Because Dale's health is so fragile I stick close to home, so I have lots of time to devote to a slow watering method, if that's the way it needs to be done.

Last night I peeked in to find some supporting players making an appearance in the White Widow pot.

image16227.jpg


There weren't any coming up in either of the other pots so I stepped back, took a wide look at the scene and lowered their lights about 1 1/2" to 2". By this morning little seedling heads were beginning to emerge under the mulch of one. By day's end we should have a regular party of living mulch going.

Part of the game with CFLs is to find that sweet spot. That's why my design tends towards flexibility.

The living mulch serves two major purposes. First off, it helps to shade the upper soil layer, keeping it from drying out too quickly under the bright lights. Secondly, it provides a continuous supply of living roots for the mycorrhizal fungi to attach to. The myco need living roots to survive. If you only have the cannabis growing in the pot and you harvest, those roots die off and the myco can die with them if there's a stage when the pot is barren. The general idea is to never let the pot go barren. As the living mulch completes it's own life cycle it also nourishes the soil through leaf droppings. Choosing a living mulch that works with the soil, as in the clovers which assist the nitrogen balance in soil, just increases the benefit. Then there's the idea that plants like to talk to each other and greatly benefit from mixed community settings, kind of like people. I'm still new to the whole idea and have much to learn.

Still waiting for the stars of the show to make their appearance.
 
Let's start the day with a group shot of the pots as we await germination. Note the abundance of living mulch establishing itself. After careful consideration I have decided not to pull up excess, but rather cut them off at the soil level and let the roots die off below the surface. Just an experiment.

image16286.jpg


First to the dance - the THC Bomb. Isn't she beautiful? Just a tiny seedling, but she looks hearty and strong. I watched her struggle to be free yesterday. After the living mulch began to come in I had a moment when I thought "how will I recognize them when they come up?" :laughtwo:

image16285.jpg


Obviously, I knew where they were planted, but as soon as the stem became noticeable you could tell this was cannabis. The stem has a characteristic hearty purple tint to it that sets it dramatically apart from the clovers. There's no denying those first true leaves already in development.

Now we continue the wait for the other two. I think they're waiting for the full moon. :laughtwo: It's not until Saturday, and I fully expect them up some time today or with that full moon tomorrow. They're some of the most resilient plants on the planet, so I know they will sprout. I stop to check throughout the day, watching for their struggle to break through the soil barrier into the light, trying to coax them out with loving thoughts and gentle words of encouragement, using my Mother Earth persona.

It's a nice feeling that even if the others don't sprout I still have a grow that has officially begun to run the race of time. Woo Hoo!!!

Today I'll drip in a bit of coconut water on the seeds and seedling (I have a seedling!) and tomorrow I'll add just a touch more mulch to her pot, now that everyone has sprouted there. Worms are in transit. All's well with the world. :green_heart:
 
The Buddha arises! How exciting. Only the White Widow remains beneath the soil line.

image16287.jpg


This is the strain I most wanted to grow for potency. The thought of a happy high drew me in. I'm happier now that it's broken the soil. The THC Bomb I chose for the beauty of the advertising photo (a bit like choosing a book by its cover, don't you think?), although it's reputed to be a high potency as well.

I'm giddy now. I've so missed having a plant in growth cycle. I enjoy the nurturing.
 
Woohoo!! :yahoo::slide::slide: Looks awesome Sue!! Time to get to the best part :)
 
I know SoilGirl. I'm ridiculously excited right now. Feeling very contented to have another grow going. I didn't realize how much I missed growing. It feels so natural to be raising the girls again.
 
This morning I decided to do some additional top dressing before I watered. To begin, I gently moved the mulch to one side of the pot.

image16304.jpg


Next, add a layer of Worm Power vermicompost.

image16305.jpg


I used a toothpick to work the little seedlings of living mulch into the light again before moving the mulch layer back on. Then I went on to repeat the process on the other side of the pot...

image16307.jpg


.... and added some more mulch to the mix to balance it all out.

image16308.jpg


I did the same for the Buddha Magnum, except I didn't bother with moving the mulch. This time I simply sprinkled the vermicompost over the top and them sifted the mulch up to the top with my fingers, and topped the whole thing off with more mulch.

Here's the THC Bomb, day two.

image16309.jpg


The happy Buddha Magnum joining the dance.

image16312.jpg


I watered everything well. It took about a quart of plain rainwater in the tray, added slowly, to get the pots to stop wicking. Then I mixed up a half gallon of rainwater and a bit less than a quarter cup of coconut water to the Chapin and drenched everything from the top. Instinctively, I sense this is the right amount of water for these three.

Then it was time to add a temporary fan for some air circulation. The plants like a gentle breeze running pretty constantly. I plan to add a ventilation system with a scrubber next month. This will suffice until then.

image16313.jpg


The Merry White Widow is keeping us waiting. I'm not going to panic yet about her. My brother-in-law had longer germination times with his, so I'll give her a while longer. Seeds are resilient things. I took the time to begin thinning the living mulch. More will be thinned out later to create more balance.

image16314.jpg


Next watering I think I'll use a diluted comfrey drench. Until I can afford some Fulpower, Agsil and malted barley grain I will make due with my fertilizers made from comfrey, dandelion, thistle and burdock. I'm not too concerned with the additives this run because it's richly balanced soil and I could probably have great success with just rainwater. As I acquire them one at a time and add them into the watering cycle things will begin to get more solid, but until then I feel pretty confident that these pots have all the necessary ingredients to accommodate an explosive growth in micro communities.

Again, it's not about feeding the plant. It's about feeding the soil. Most of that work will be done by worms - their tilling nature in the pots themselves and the benefit of the vermicompost used as top dressing and tea additives.

It's going to be interesting to document the evolution of my technique. For the most part it should run itself. I just need to be attentive to keeping the moisture levels consistent with regular watering and keep adding biomass. Today I want to work up a study on what it should cost in additives for a year's worth of gardening. Just to get a feel for what's ahead.

Life is sweet indeed. :Namaste:
 
Back
Top Bottom