

Ha! I admit, I'm grudgingly at that point too. Dude seems to generally know what he's talking about. Lmao!!!!LMAO!
I sorta' believe in you Shed, for what it's worth.
Navigation
Install the app
How to install the app on iOS
How To Use Progressive Web App aka PWA On 420 Magazine Forum
Note: This feature may not be available in some browsers.
More options
You are using an out of date browser. It may not display this or other websites correctly.
You should upgrade or use an alternative browser.
You should upgrade or use an alternative browser.
InTheShed Grows Inside & Out: Jump In Any Time

smokesbetter
Well-Known Member
Well your right i don't know how large or small your chairs are , so yes on the dimensions 
- Thread starter
- #29,023
Thursday update on the Summer grow babies!
Here they are this morning on day 9:
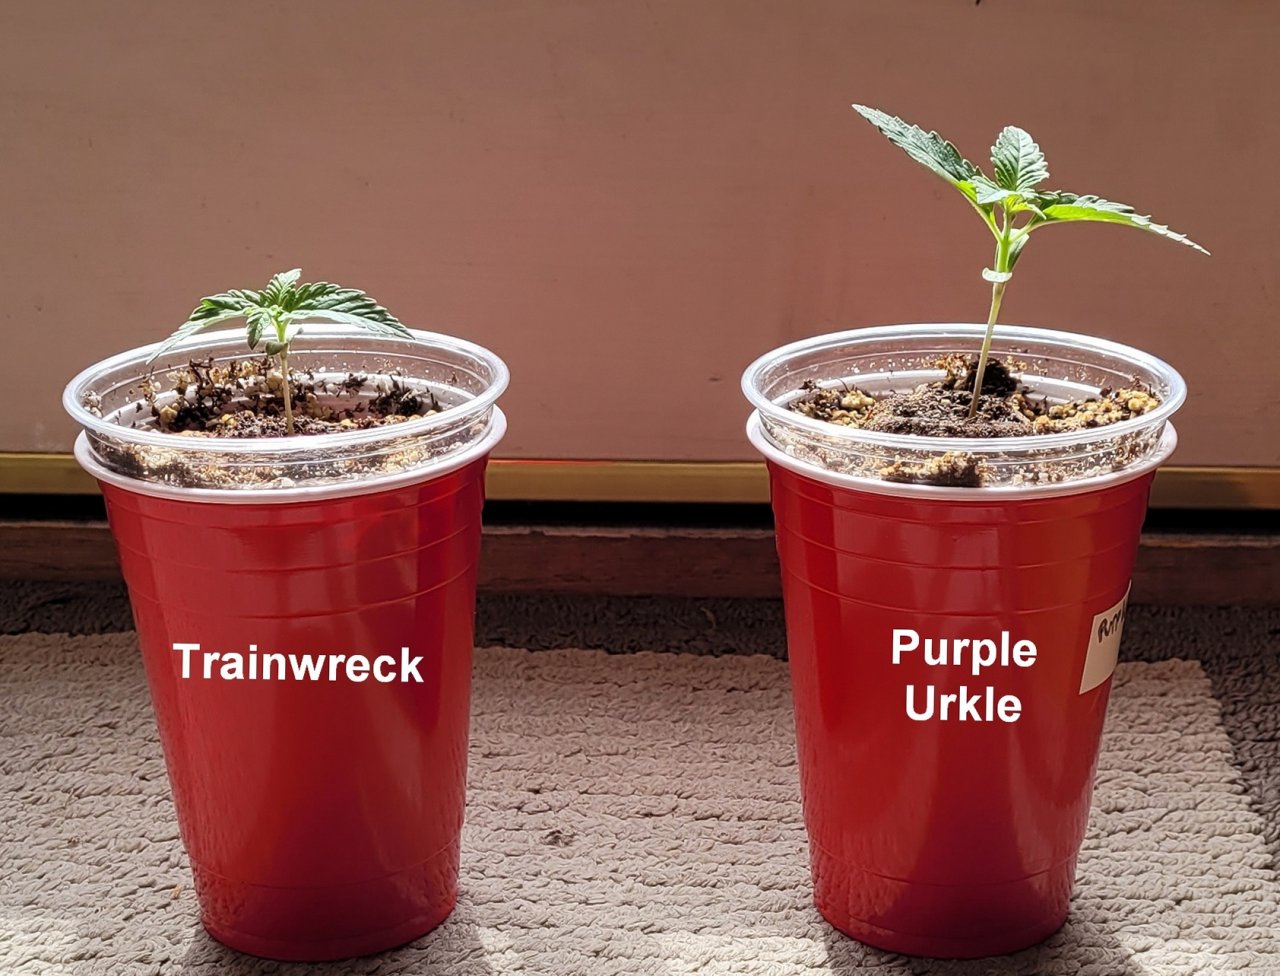
SaugaView®:
Next watering for the Purple Urkle will be quarter strength nutes since that second set of true leaves is in...probably tomorrow.
I was going to leave them inside but the mostly cloudy became partly cloudy just before I left for work so I moved them out with everything else. Except the STS Sour G...that's in the tent.
Also, I put the oil-filled heater back in the shed with the flipped Jack Herer 1.1 because the nights are still a bit chilly. I had it on the lowest setting and it didn't even come on last night. Low was 61º in there so I may bump the dial a tiny bit tonight.
That's it from me! Hope your week is going as well as can be expected, better even.
Quotes:


")

Here they are this morning on day 9:
SaugaView®:
Next watering for the Purple Urkle will be quarter strength nutes since that second set of true leaves is in...probably tomorrow.
I was going to leave them inside but the mostly cloudy became partly cloudy just before I left for work so I moved them out with everything else. Except the STS Sour G...that's in the tent.
Also, I put the oil-filled heater back in the shed with the flipped Jack Herer 1.1 because the nights are still a bit chilly. I had it on the lowest setting and it didn't even come on last night. Low was 61º in there so I may bump the dial a tiny bit tonight.
That's it from me! Hope your week is going as well as can be expected, better even.
Quotes:
Yeah, if incest counts!Shed, the matchmaker
I never considered breaking open those silica packs except when I want a snack.just put the pollen in there with a few silica gel crystals (loose), and keep it in a cool, dark place- (sock drawers work well
Good idea! I actually saved the plastic tube my at-home Covid test came with...I knew it would come in handy, just not so soon.When you need to use the pollen, shake the tube up, and, thanks to static electricity, the pollen sticks to the sides and you can just rub a q-tip or brush on the side to load it up with pollen..
That LRX plant a few years ago was from pollen collected in 2014, so it was about 5 years old, and still viable.
This is what worked for me, might be something to think about...
He's many things to many people!Carcass, the pollinator...
I'll take "generally" all day.Ha! I admit, I'm grudgingly at that point too. Dude seems to generally know what he's talking about. Lmao!!!!
Will do sb...for the sake of clarity!Well your right i don't know how large or small your chairs are , so yes on the dimensions
They're clones, so wouldn't it be masturbation?Yeah, if incest counts!
- Thread starter
- #29,025
Har. Not if you end up with seeds!They're clones, so wouldn't it be masturbation?
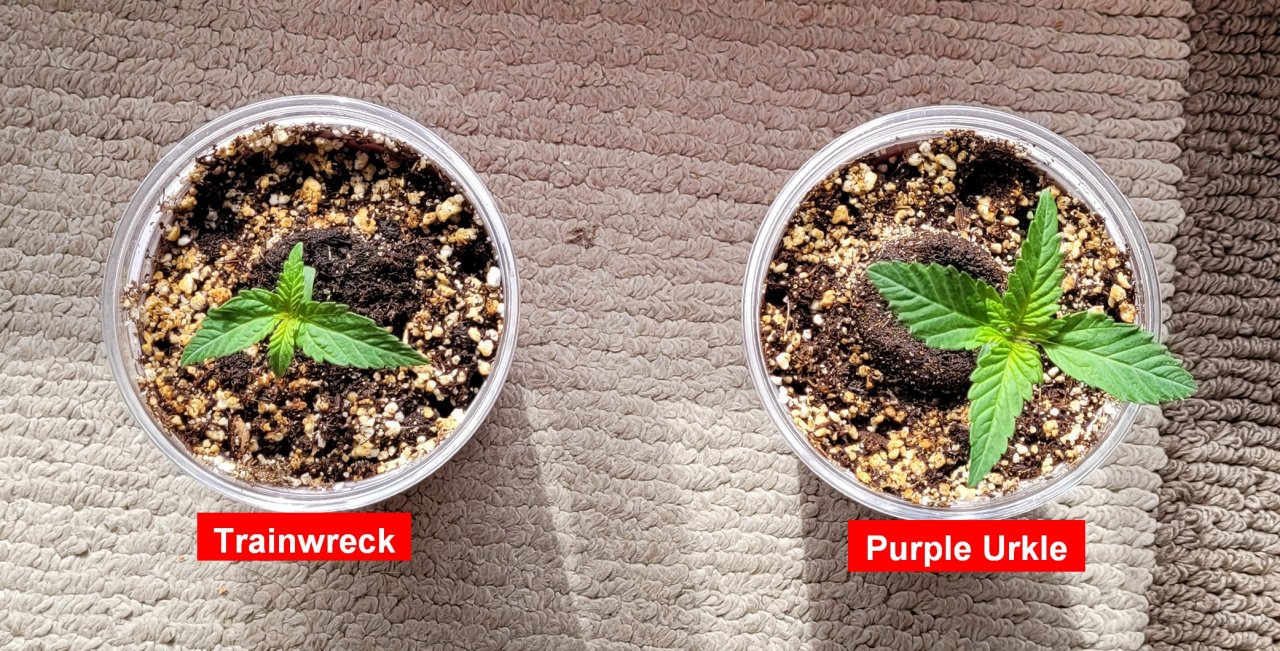
They are looking good, Shed. Why do you have them in the red cups if you already have them in the clear? Are roots adversely affected by the light?
- Thread starter
- #29,027
Thanks Carmen...so far so good!They are looking good, Shed.
They absolutely are.Are roots adversely affected by the light?
smokesbetter
Well-Known Member
Will do sb...for the sake of clarity! Thanks Shed, I think LOL The Babies are coming right along . I f you stick around Carmen Ray shed will pull that clear cup out and show off his roots .
Thanks Shed, I think LOL The Babies are coming right along . I f you stick around Carmen Ray shed will pull that clear cup out and show off his roots .- Thread starter
- #29,029
I'll do a regular update later today, but I wanted to talk about something that I do that I'm not sure I've mentioned before, and someone might find it helpful.
After I transplanted the Candida into the 7 gallon pot on Monday I gave it a gallon of water. In the 1 gallon pot it would get about 1/3 of a gallon, but I wanted the water to soak down to the bottom where the new soil was, as well as watering in a ring about 2" beyond the circumference of the original pot.
A gallon of water is a lot for a 1 gallon rootball, but less than I would give a full grown plant in 7 gallon pots. I didn't want to saturate the entire 7 gallons because there are no roots to use it yet, and it could lead to a sad plant.
When I came home last night (3 days after the watering), the plant looked like this:
Why? Because it's still a 1 gallon plant drinking only the water that was in the original 1 gallon mass. The roots haven't grown to where the rest of the water sits and waits, so it's completely dry in 3 days as if it had never been transplanted.
So I watered it! But I didn't water the whole pot or even a 2" ring beyond the original edge. I watered just the middle as if I was watering the 1 gallon pot (with ~1/3rd gallon). That's the only part of the soil that was dry, so that's the only part I watered. All the rest of the water that I poured in on Monday is still sitting there waiting for roots.
Had I watered more than that I would be adding to the moisture in the soil that still has no roots in it, increasing the possibility of wet feet, low oxygen, and root rot.
Here it is this morning:
I do the same thing when I go from solo cups to 1 gallon pots!
I hope that made sense and might help someone with their watering after transplant. Carry on with what you were doing.
That's an extremely good explanation Shed, and it's 100% on point. I do the same thing or something very similar. It's the idea that there are two areas in the pot at that point, and it is good to see them that way for a bit. So you do the outside and then the inside. I repeat that cycle for maybe a week after up potting usually. It also draws a bunch of oxygen down into the tap root area when you do it this way since you're watering dry soil and roots in that space, and they respond very well in my experience. Superior post, thanks.I'll do a regular update later today, but I wanted to talk about something that I do that I'm not sure I've mentioned before, and someone might find it helpful.
After I transplanted the Candida into the 7 gallon pot on Monday I gave it a gallon of water. In the 1 gallon pot it would get about 1/3 of a gallon, but I wanted the water to soak down to the bottom where the new soil was, as well as watering in a ring about 2" beyond the circumference of the original pot.
A gallon of water is a lot for a 1 gallon rootball, but less than I would give a full grown plant in 7 gallon pots. I didn't want to saturate the entire 7 gallons because there are no roots to use it yet, and it could lead to a sad plant.
When I came home last night (3 days after the watering), the plant looked like this:
Why? Because it's still a 1 gallon plant drinking only the water that was in the original 1 gallon mass. The roots haven't grown to where the rest of the water sits and waits, so it's completely dry in 3 days as if it had never been transplanted.
So I watered it! But I didn't water the whole pot or even a 2" ring beyond the original edge. I watered just the middle as if I was watering the 1 gallon pot (with ~1/3rd gallon). That's the only part of the soil that was dry, so that's the only part I watered. All the rest of the water that I poured in on Monday is still sitting there waiting for roots.
Had I watered more than that I would be adding to the moisture in the soil that still has no roots in it, increasing the possibility of wet feet, low oxygen, and root rot.
Here it is this morning:
I do the same thing when I go from solo cups to 1 gallon pots!
I hope that made sense and might help someone with their watering after transplant. Carry on with what you were doing.
Thank you Shed.watering after transplant.
Let me see if I understand you correctly. You don't pre-wet the soil? On the first watering you wet the soil 5 cm (2") from the outside of the root ball, right down to the bottom and avoiding contact with the root ball, then leave it to rest for 2 days, deliberately depriving the roots of water, and on the following day (day 3) on the second watering, you water directly into the root ball?
If I have that right, how much water would you suggest I use for my 20 litre grow bags in first, and then in second watering?
- Thread starter
- #29,032
Thanks Jon!That's an extremely good explanation Shed, and it's 100% on point. I do the same thing or something very similar. It's the idea that there are two areas in the pot at that point, and it is good to see them that way for a bit. So you do the outside and then the inside. I repeat that cycle for maybe a week after up potting usually. It also draws a bunch of oxygen down into the tap root area when you do it this way since you're watering dry soil and roots in that space, and they respond very well in my experience. Superior post, thanks.
I don't pre-wet the soil ever. I want to control the amount of water since there aren't roots to fill the pot. Excess water leads to negative consequences.Thank you Shed.
Let me see if I understand you correctly. You don't pre-wet the soil? On the first watering you wet the soil 5 cm (2") from the outside of the root ball, right down to the bottom and avoiding contact with the root ball, then leave it to rest for 2 days, deliberately depriving the roots of water, and on the following day (day 3) on the second watering, you water directly into the root ball?
If I have that right, how much water would you suggest I use for my 20 litre grow bags in first, and then in second watering?
My watering after transplant was 1 gallon, which I poured where the plant's roots were and then an additional 2" outside that. I want the water to go through the roots and down the new soil under them, as well as to wet the first area the roots will grow into. It was only a gallon because I don't want to soak all the soil yet. My rooted plants in 7 gallon pots get between 1.5 and 2 gallons.
There was no intentional droughting for x days. I just left it alone until it told me it had drunk all the water the roots could get to. Happened to be 3 days. Inside it might have been a week!
Are you planting seeds directly into your 20L bags? If so, you will need to water as if they're in solo cups for the first week or so, then as if they were in 4L pots, and so on. If you put seeds in 20L of wet soil they are liable to drown.
Back after a nap! :zzzzz:
Thanks. No I am not. I have prepared solo cups and I have peat pucks for their first few days (is this a wrong thing?). I see that you and other experienced growers are up-potting to 4 litre pots before going bigger, so I will follow that process I think.Are you planting seeds directly into your 20L bags?
Have a good nap!
Hi @Carmen Ray - Shed's got you on the right track, you're in good hands. Nice eye on observing the up potting steps that many of us take. The reason it is done like that is because every time you fill a small container with roots and up pot it, that entire root ball is nice and solid and bristling with roots. So when you up pot from a Dixie cup to say a 1 gallon pot and then to like a five or seven or whatever, you are up potting an awesome, full mass of roots into nice fresh soil that they immediately want to expand into each time. The entire plant will grow more vigorously and the supposed "transplant shock" (largely hype if you do it correctly imho) will be almost nonexistent. By gradually up potting it is easier to control your watering and establish solid roots in each container versus trying to estimate where the roots are and water to that point "blindly" like in the example Shed explained. As he said, when you up pot it is easy to see the line between the established root ball you just put in and the new soil, which makes it way easier to water effectively. If I was really good and really patient (which I'm not, lol) I would do something like four or five up pottings for each plant. (this never happens, lol, it's just a fantasy perfect world for me...)Thanks. No I am not. I have prepared solo cups and I have peat pucks for their first few days (is this a wrong thing?). I see that you and other experienced growers are up-potting to 4 litre pots before going bigger, so I will follow that process I think.
Have a good nap!
Just my two cents in support of what you're already being told.
It's pretty easy to kill a plant with too much water.
In my experience, it's really hard to kill a plant with too little water. Amazingly hard. They'll almost always snap back from a dead wilted disaster-looking state, even if they lose some fans and look a little skinny. But the ones that got accidently drowned almost never come back well. It can take weeks to get them happy and vibrant again.
Dry soil is far better than soggy soil.
In my experience, it's really hard to kill a plant with too little water. Amazingly hard.
They'll almost always snap back from a dead wilted disaster-looking state, even if they lose some fans and look a little skinny. But the ones that got accidently drowned almost never come back well. It can take weeks to get them happy and vibrant again.Dry soil is far better than soggy soil.
That makes good sense.It's pretty easy to kill a plant with too much water.
In my experience, it's really hard to kill a plant with too little water. Amazingly hard.
Dry soil is far better than soggy soil.
- Thread starter
- #29,037
This will be a bit of a long update so please bear with me!
To summarize what's growing:
•Jack Herer 1.1 has been flipped and lives in the shed at night.
•The Candida I transplanted into 7 gallons will get thinned later today.
•The Candida cutting in perlite has been put into ProMix (see below).
•The Sour G STS spray/seed-making project is underway in the tent (see below).
•The Sour G mother will stay around until any seeds harvested have been test-sprouted.
•The Summer grow is in solo cups.
•The DV clones have been upcanned (see below).
•The DV harvest has been jarred for curing (see below).
Okay here we go...
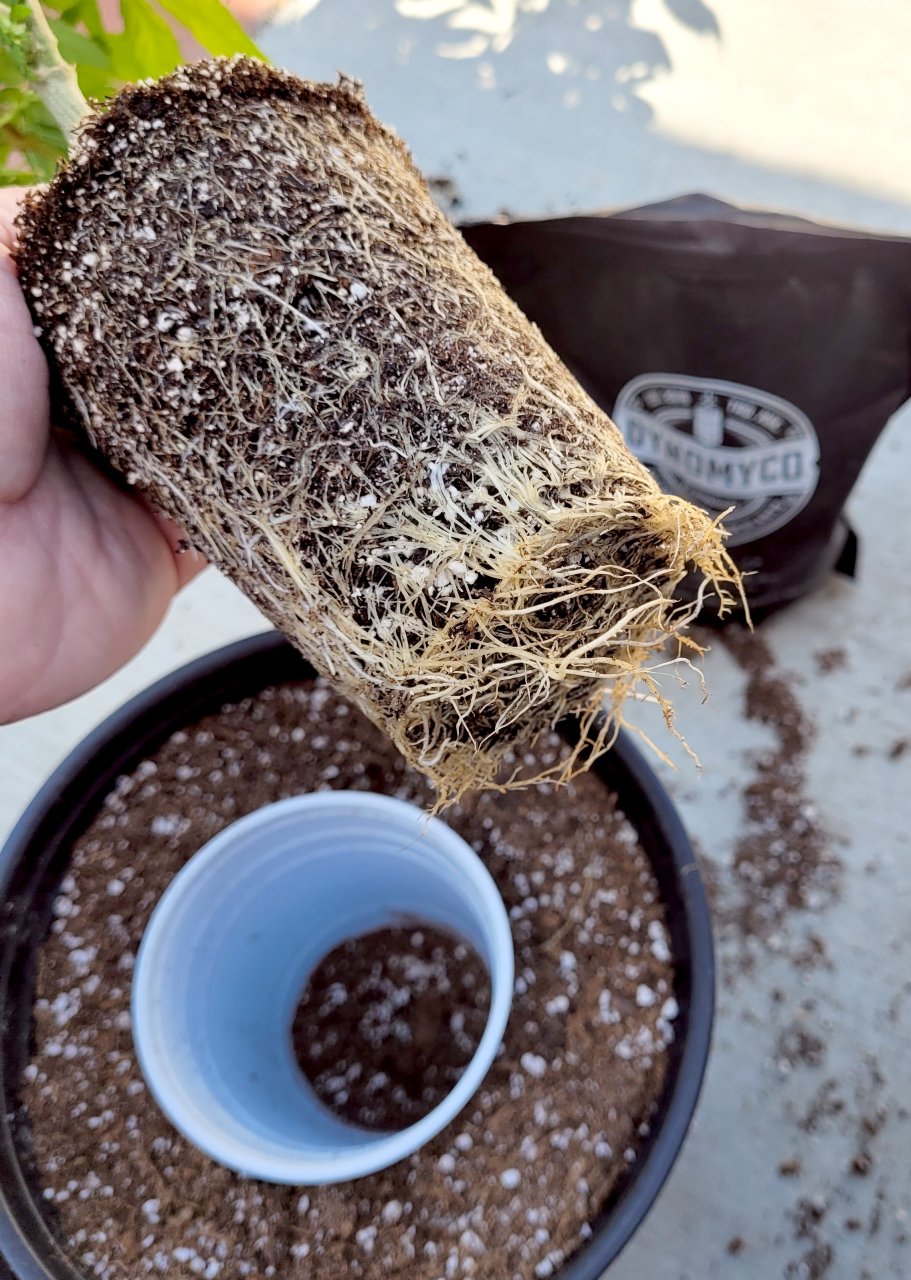
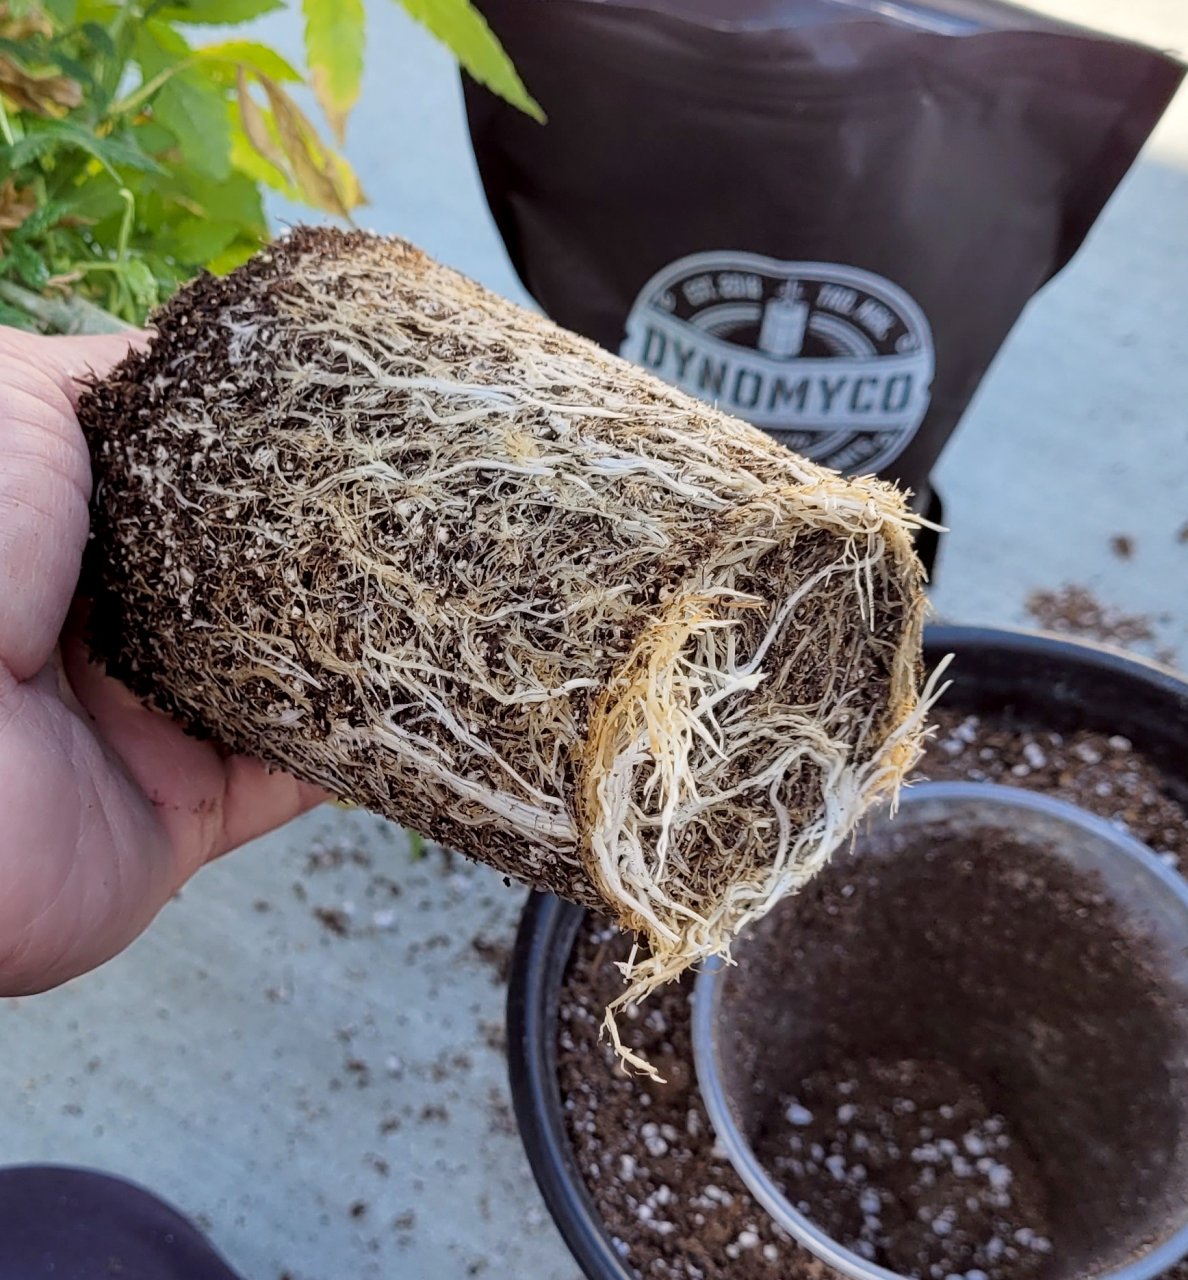
Floating perlite is easy and the only way to get the cuttings out without tearing roots. Here's how I did the Candida.
Cover the hole:
Add water so the perlite floats:

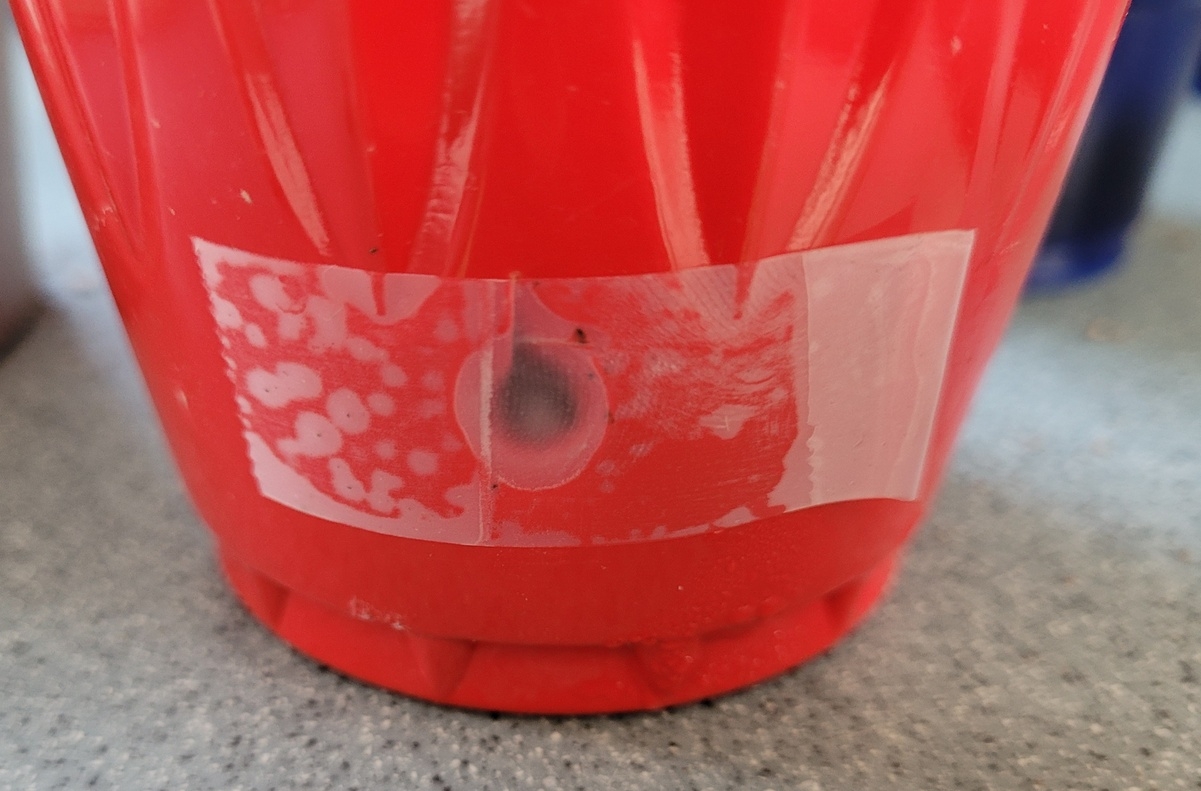
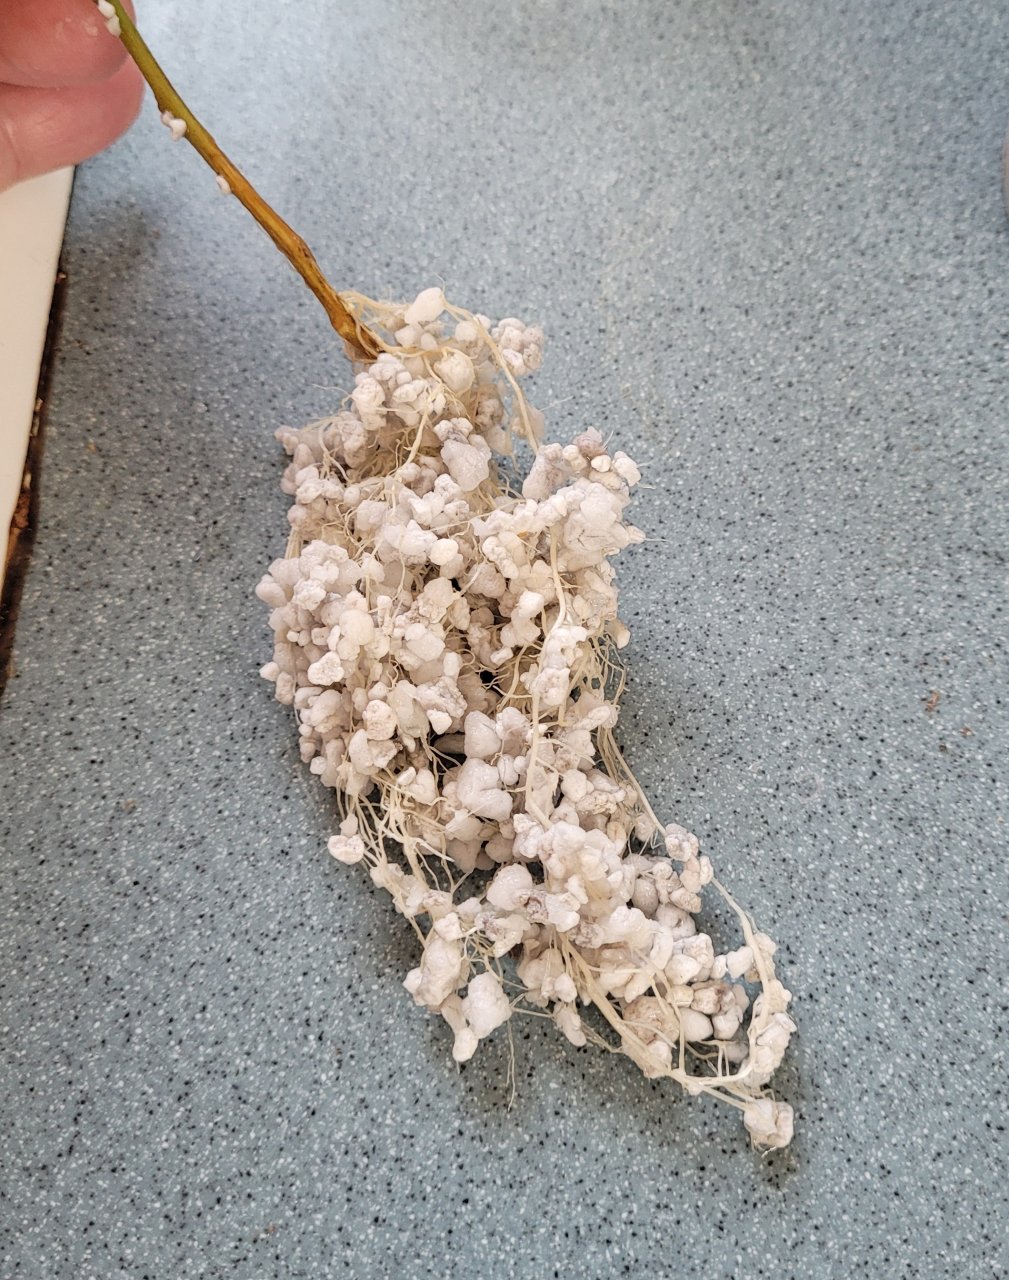
Squish the sides of the cup in various places while slowly pulling the stem out. Stop if you meet any resistance and do more squishing (or add more water). If you've left it a long time, this is what comes out (cut Feb 26):
Sprinkle @DYNOMYCO on the roots:
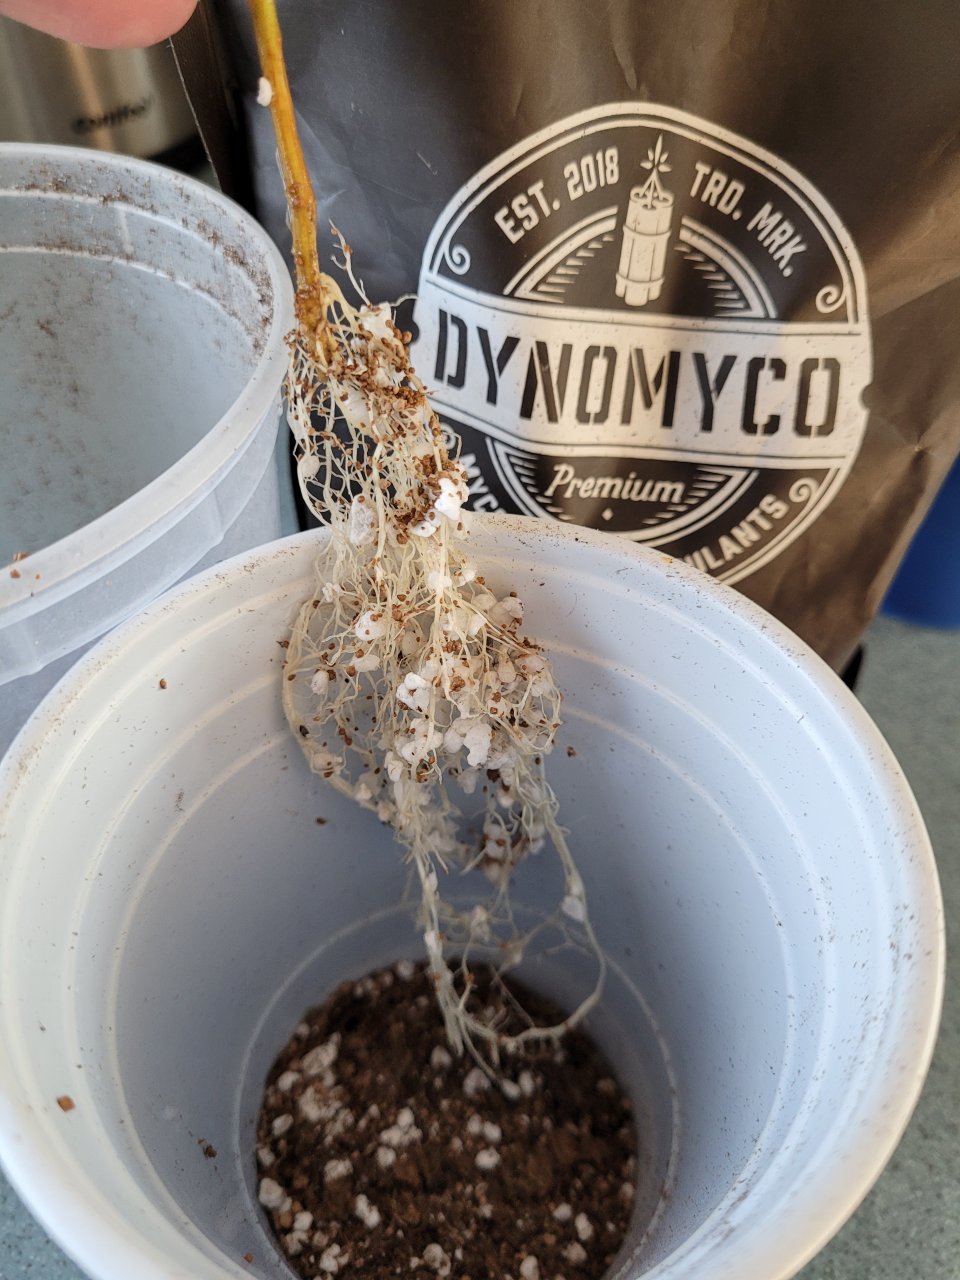
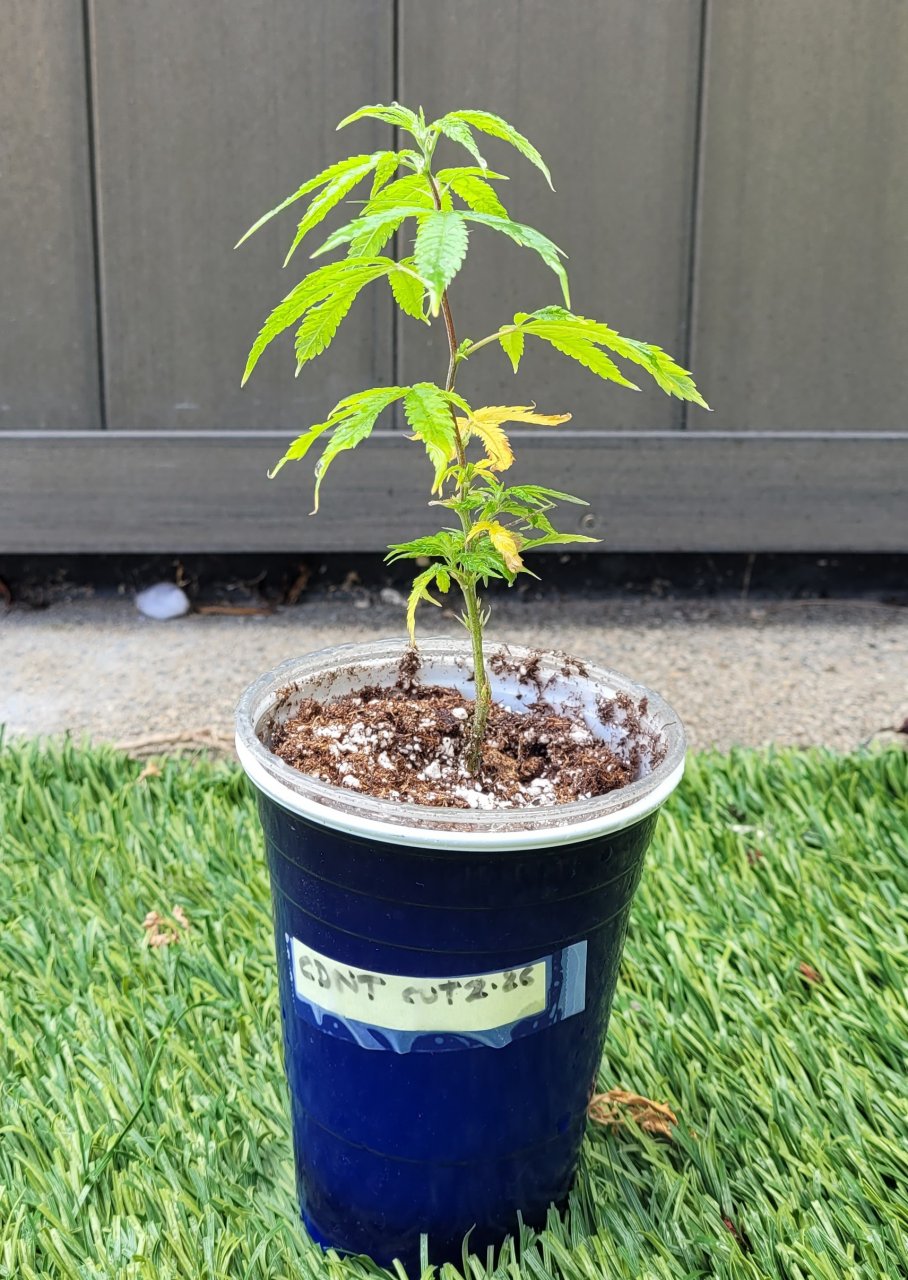
Plant!
Okay, moving on to the jarred Doug's Varin:
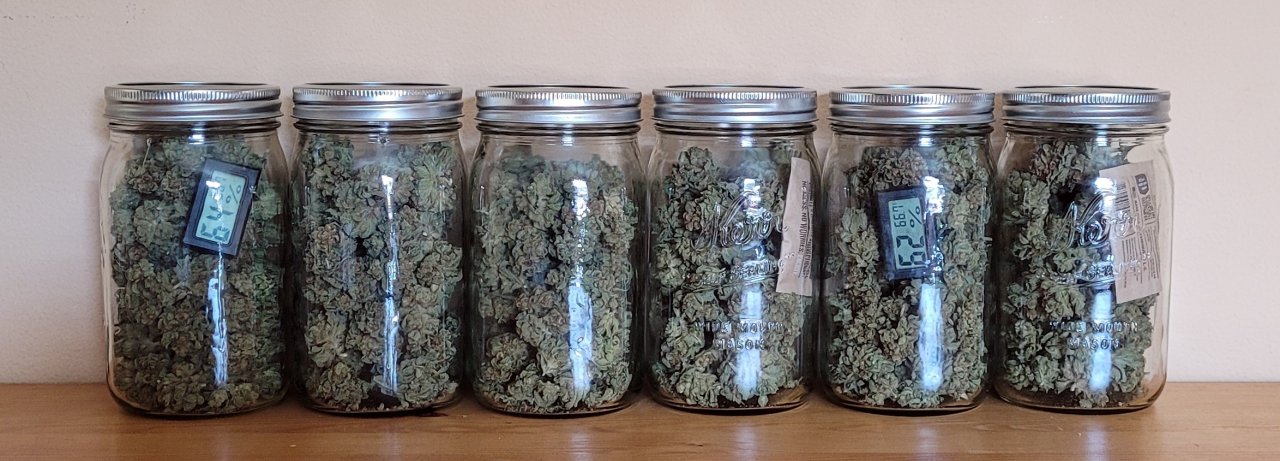
Yes sir, yes sir, six jars full.
It was time to upcan the DV clones, which have been in solo cups way too long...even the one I root pruned back on the 10th. Here they were this morning:

This is the root-pruned one:
And the untouched one, much more root-bound:
I didn't grab a razor blade but I scraped them well with my nails and broke up the clumps with my hand.
Here they are in their new homes:
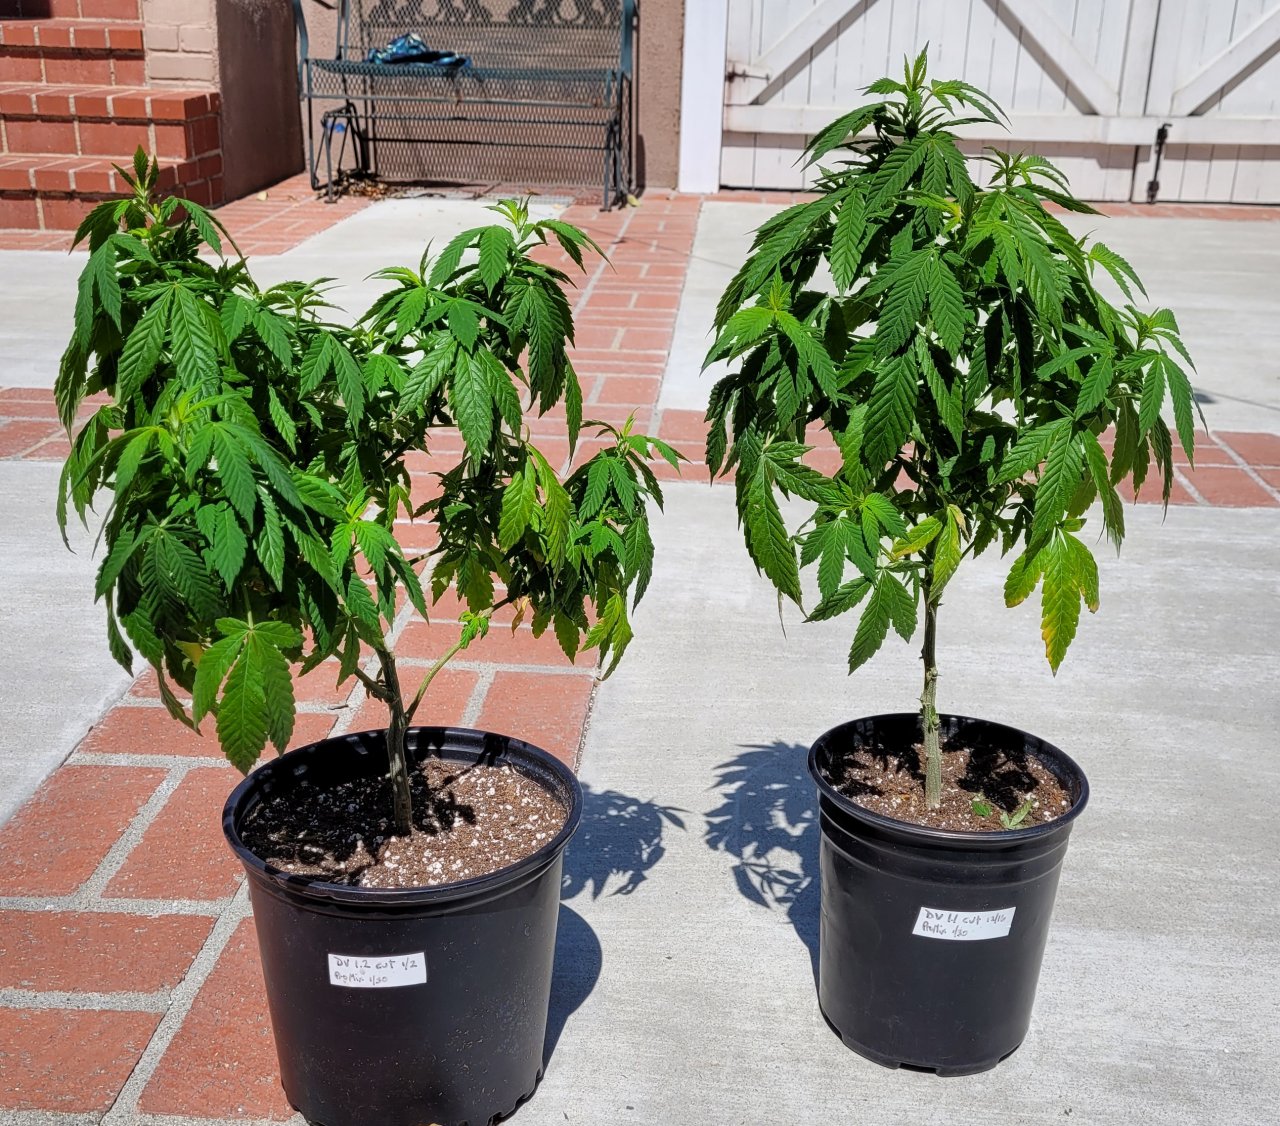
The one that I didn't root prune is in the smaller pot and will be gifted in a few weeks after it settles in. It wasn't topped. The other one (root-pruned and topped) I will keep for a while as a mother.
Let's see...what's left? Oh yes, the Sour G seed-making project! I tipped the sprayed one over and tapped it onto some foil:

It got very excited all over my hand:
I used that pollen and the pollen on the foil to pollinate some of the tops of the other one furthest into flower. Here are some just after I brushed it on:
I waited about 3 hours and then moved it outside into the sun. We'll see!
I also pulled off a few sacs and put them in the pollen-drying box I made last year:
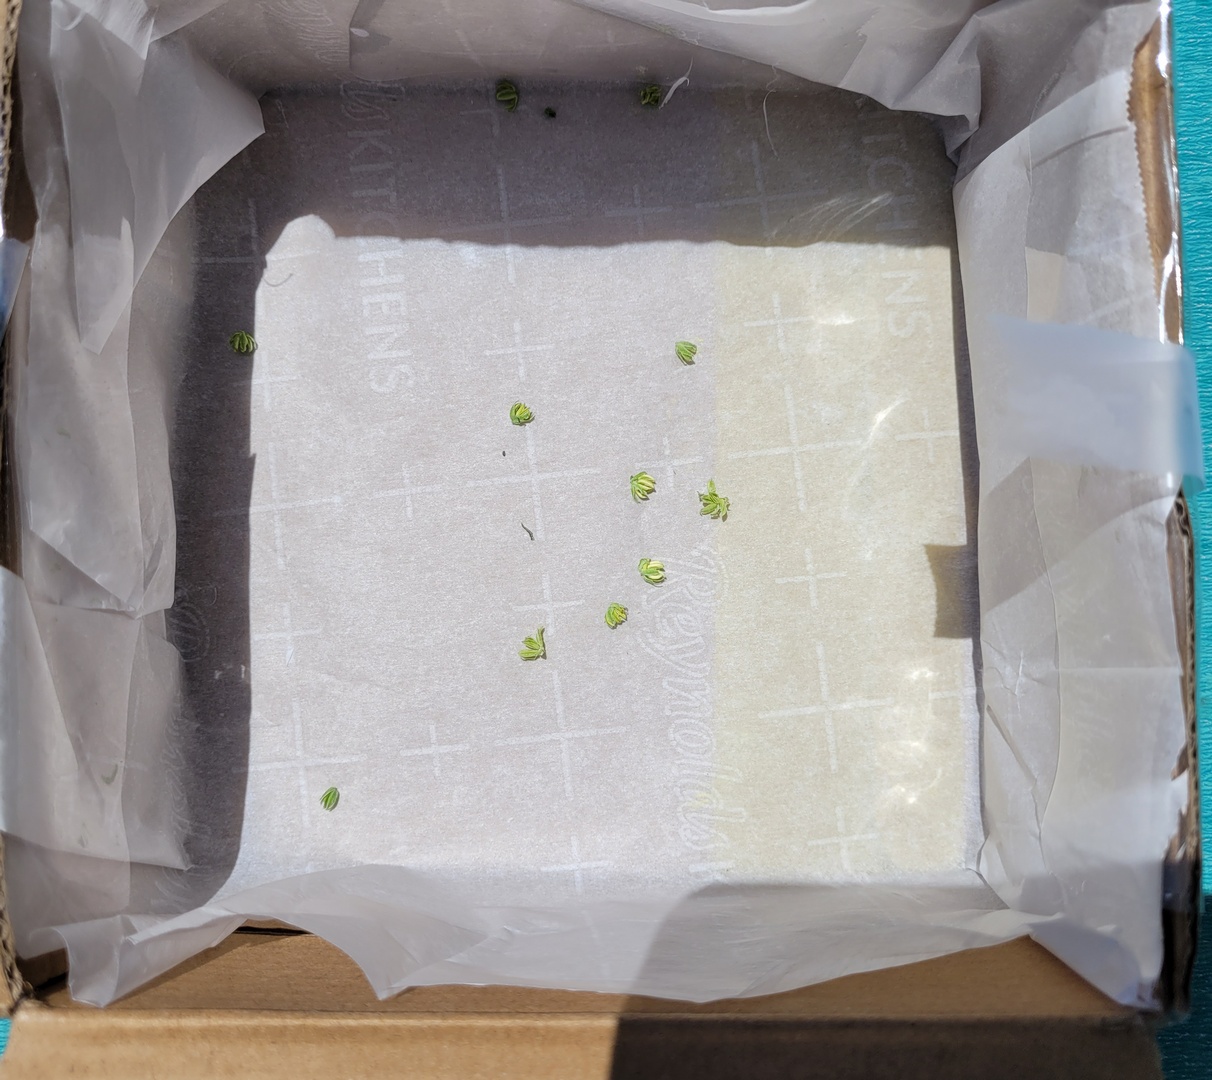
It's also in the sun and tonight I'll see what comes out of them.
I think that wraps it up here. Thanks for following along and have a great weekend!
Quotes:


To summarize what's growing:
•Jack Herer 1.1 has been flipped and lives in the shed at night.
•The Candida I transplanted into 7 gallons will get thinned later today.
•The Candida cutting in perlite has been put into ProMix (see below).
•The Sour G STS spray/seed-making project is underway in the tent (see below).
•The Sour G mother will stay around until any seeds harvested have been test-sprouted.
•The Summer grow is in solo cups.
•The DV clones have been upcanned (see below).
•The DV harvest has been jarred for curing (see below).
Okay here we go...
Floating perlite is easy and the only way to get the cuttings out without tearing roots. Here's how I did the Candida.
Cover the hole:
Add water so the perlite floats:
Squish the sides of the cup in various places while slowly pulling the stem out. Stop if you meet any resistance and do more squishing (or add more water). If you've left it a long time, this is what comes out (cut Feb 26):
Sprinkle @DYNOMYCO on the roots:
Plant!
Okay, moving on to the jarred Doug's Varin:
Yes sir, yes sir, six jars full.
It was time to upcan the DV clones, which have been in solo cups way too long...even the one I root pruned back on the 10th. Here they were this morning:
This is the root-pruned one:
And the untouched one, much more root-bound:
I didn't grab a razor blade but I scraped them well with my nails and broke up the clumps with my hand.
Here they are in their new homes:
The one that I didn't root prune is in the smaller pot and will be gifted in a few weeks after it settles in. It wasn't topped. The other one (root-pruned and topped) I will keep for a while as a mother.
Let's see...what's left? Oh yes, the Sour G seed-making project! I tipped the sprayed one over and tapped it onto some foil:
It got very excited all over my hand:
I used that pollen and the pollen on the foil to pollinate some of the tops of the other one furthest into flower. Here are some just after I brushed it on:
I waited about 3 hours and then moved it outside into the sun. We'll see!
I also pulled off a few sacs and put them in the pollen-drying box I made last year:
It's also in the sun and tonight I'll see what comes out of them.
I think that wraps it up here. Thanks for following along and have a great weekend!
Quotes:
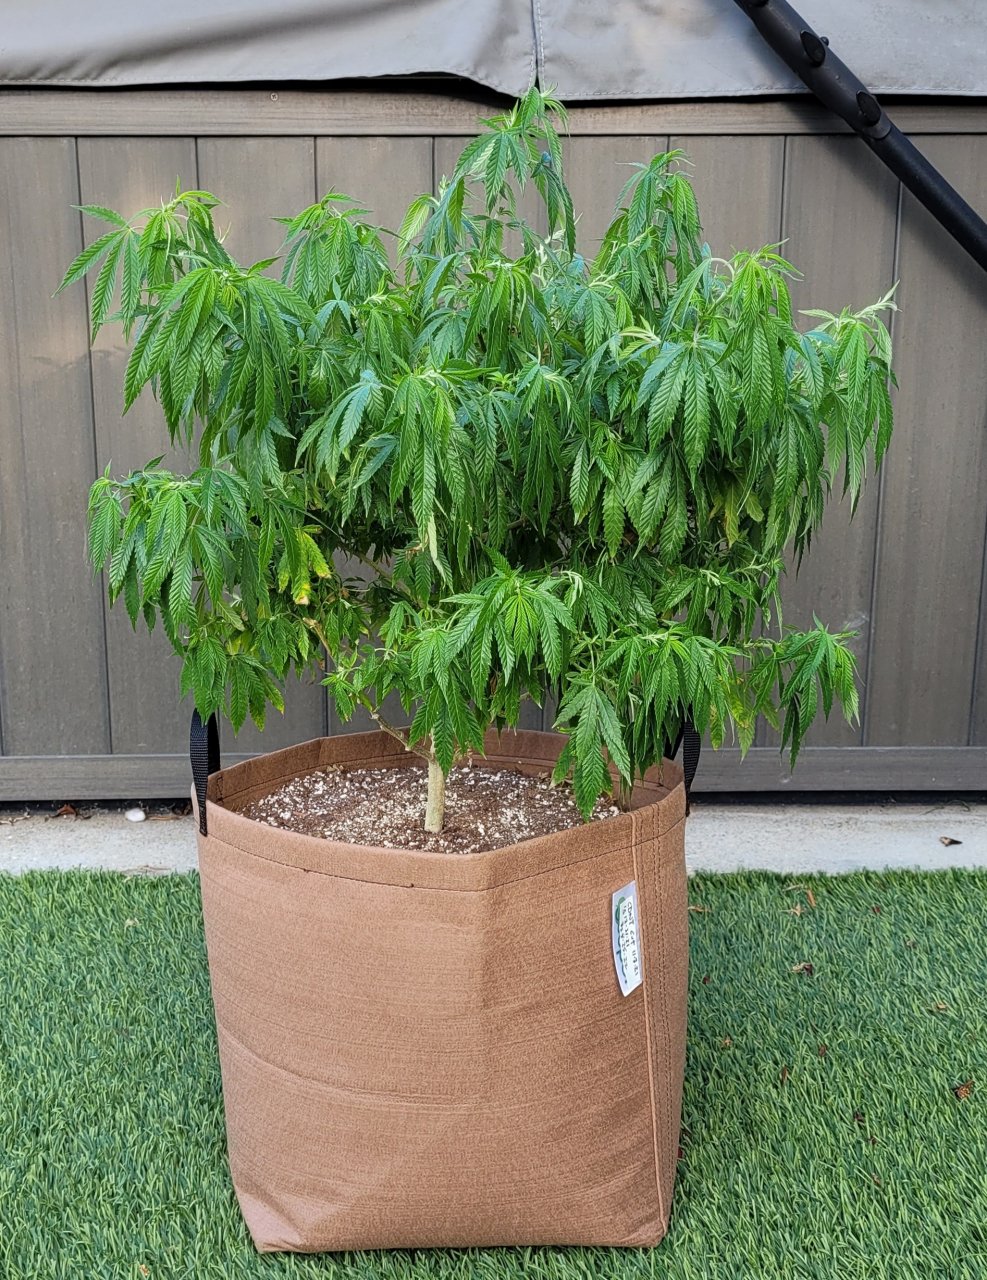
Be glad to. Taken yesterday of the Purple Urkle:If you stick around Carmen Ray shed will pull that clear cup out and show off his roots .
Thanks, I slept 2 hours which surprised me when I rolled over and it was 4:30pm.Thanks. No I am not. I have prepared solo cups and I have peat pucks for their first few days (is this a wrong thing?). I see that you and other experienced growers are up-potting to 4 litre pots before going bigger, so I will follow that process I think.
Have a good nap!
Excellent explanation, thanks Jon!Hi @Carmen Ray - Shed's got you on the right track, you're in good hands. Nice eye on observing the up potting steps that many of us take. The reason it is done like that is because every time you fill a small container with roots and up pot it, that entire root ball is nice and solid and bristling with roots. So when you up pot from a Dixie cup to say a 1 gallon pot and then to like a five or seven or whatever, you are up potting an awesome, full mass of roots into nice fresh soil that they immediately want to expand into each time. The entire plant will grow more vigorously and the supposed "transplant shock" (largely hype if you do it correctly imho) will be almost nonexistent. By gradually up potting it is easier to control your watering and establish solid roots in each container versus trying to estimate where the roots are and water to that point "blindly" like in the example Shed explained. As he said, when you up pot it is easy to see the line between the established root ball you just put in and the new soil, which makes it way easier to water effectively. If I was really good and really patient (which I'm not, lol) I would do something like four or five up pottings for each plant. (this never happens, lol, it's just a fantasy perfect world for me...)
Just my two cents in support of what you're already being told.
Well-said Graytail! Rotting roots take a long time to recover.It's pretty easy to kill a plant with too much water.
In my experience, it's really hard to kill a plant with too little water. Amazingly hard.
Dry soil is far better than soggy soil.
Nice root action! I'm super impressed at how organized you are given your busy schedule. You must have been tired to pass out for 2 hours... niceTaken yesterday of the Purple Urkle:
Have a great weekend Shed, and thank you for helping me so much. What do you think about the intensity of my light, to get another view? If I have measured correctly, my jiffy pellets sit at between 450 and 460 ppdf. I did a conversion online and it makes 19565 Lux or over a 24 hour period I think it is 39,74 DLI? Do you think that is safe or would you raise the light a bit? The cotyledons are not out yet.- Thread starter
- #29,039
If your plant hasn't sprouted yet then none of it matters, but when they emerge, I think in terms of lux and use this from Royal Queen Seeds as a general guide (also posted in your thread):What do you think about the intensity of my light, to get another view? If I have measured correctly, my jiffy pellets sit at between 450 and 460 ppdf. I did a conversion online and it makes 19565 Lux or over a 24 hour period I think it is 39,74 DLI? Do you think that is safe or would you raise the light a bit? The cotyledons are not out yet.
HOW MUCH LIGHT DO YOUR CANNABIS PLANTS REQUIRE?
- Clones and seedlings: 5,000–7,000 lux
- Vegetative growth: 15,000–50,000 lux
- Flowering: 45,000–65,000 lux
- Maximum recommended amount of light: 75,000 lux
- Thread starter
- #29,040
Damn I orphaned that whole pic-post on the previous page...please peruse!
Similar threads
- Replies
- 1K
- Views
- 91K
- Replies
- 139
- Views
- 7K
- Replies
- 26
- Views
- 2K
- Replies
- 40
- Views
- 4K