

Welcome to my 2022 outdoor balcony grow using seeds made from last year's Mulanje pollen
I will be growing 2 regular seeds from each of the 3 strains that I made using pollen from an African male Mulanje.
Mulanje x Purple Honduras/Panama* 100% Sativa
Mulanje x (Malawi/Ethiopian x Mulanje) 100% Sativa
Mulanje x Mango Sherbert Hybrid
* Note of correction; when I began my previous journal, I incorrectly transcribed the name as "Honduras/Panama x Purple Honduras". It should have been "Purple Honduras/Panama" as I am showing here.
Seeds began soaking on 27th September
Seeds soaked in a 6:1 solution of 6% Hydrogen Peroxide for about 12 hours (last year I used 3% solution but still with a dilution of 6:1, all still seemed fine, just saying)
Seeds were then planted in their beginning pots on 1stOctober
Aim of growing
The main purpose is to produce enough good quality bud for my own personal use and to be able to share with others. I have been using an Ardent decarb unit to decarb bud that I 'chomp into' an hour or two before sleep, which I find helps give me a great night's sleep especially when taking dose of Magnesium with it.
During the day I either use a Vapcap unit with an induction heater, or chew a little of the cobs I made 2 years ago.
If all goes well this grow, I will most likely make some more cobs as I am keen to try them using pure Sativa buds. I made some cobs from hybrid buds a couple of grows ago, for anyone interested --> here is a Cob overview. And also --> here is pictorial of some cob making I did.
Stealth Growing
Growing on the balcony necessitates restraining the height of the plants. In the last couple of months my neighbours have severely cut the height of the trees growing on their side which has now further opened up 'sight lines' to my balcony, so now I have to be more strict on their training to ensure that no cannabis plants are visually identifiable above the balcony rail planters.
Altho I am growing 6 plants, all males will be chopped when identified, so I am assuming I'll only end up growing out 3, give or take.
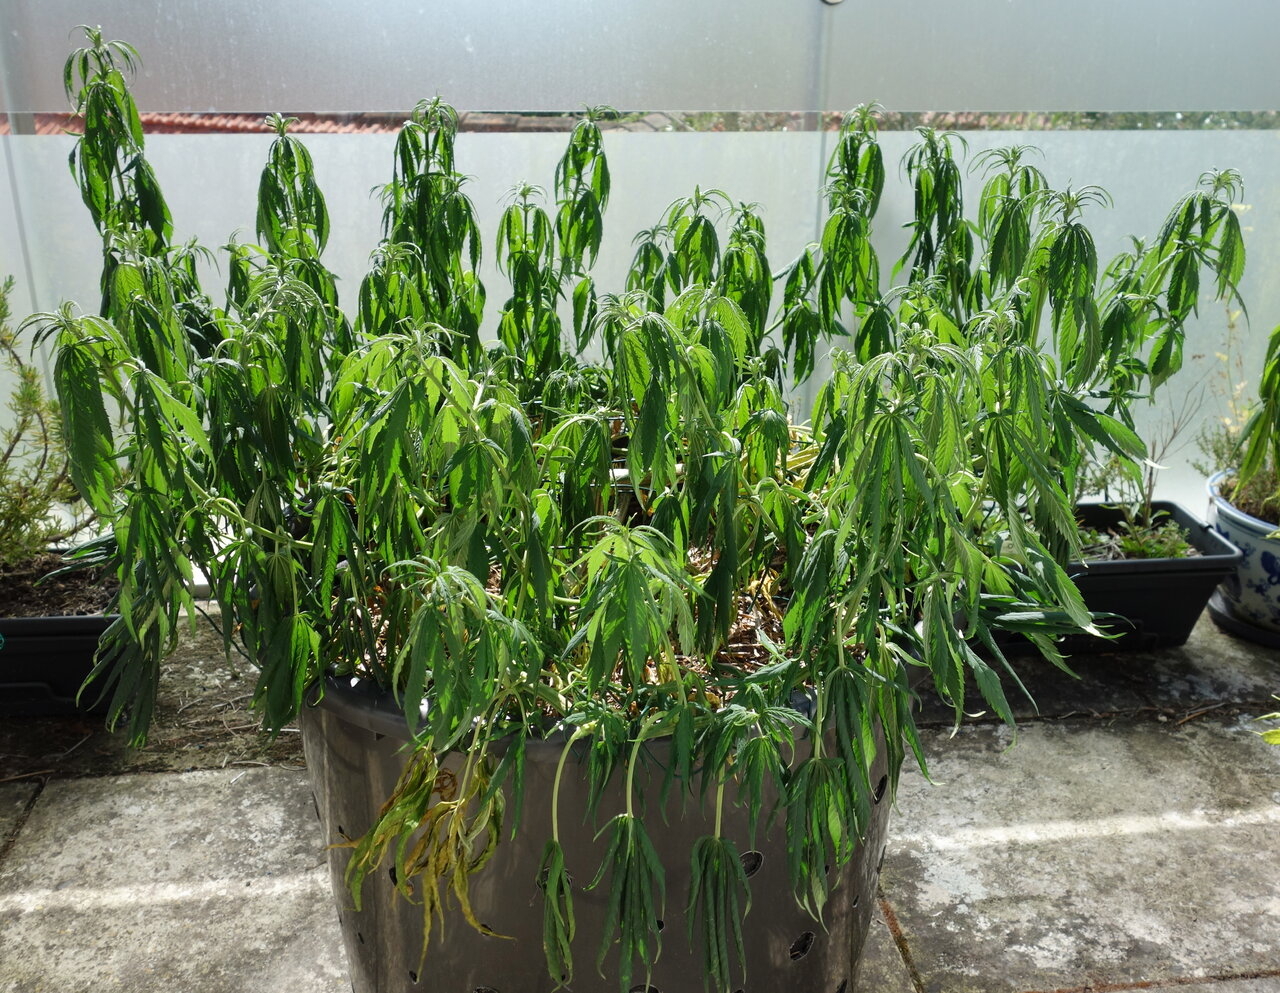
A flashback to last year's balcony grow showing that it was crowded with just 4 plants.
Here is a link to my previous grow journal --> Stunger's Organic Soil Stealth Balcony: Landrace Mulanje & Other Sativas
Grow Location
Southern Hemisphere, land of the long white cloud, temperate, humid summers. Growing outdoors on a balcony that only gets direct sun in the afternoon and is open to bouts of rain, winds sometimes in excess of 100kph, and generally known as 4 seasons in one day.
Growing in organic living soil
I have been using this same (evolving) soil for about 5 years. It started off as a locally adapted organic version of Subcool's supersoil (my adaptation turned out to be far too conservatively mixed). But over the subsequent years, additional amendments were added and used, like sources of Chitin and Malted Barley from Clackamas Coot/Jim Bennett's soil recipe, and some of the many fantastic ideas shared on this great site. I use homemade compost, and wormcastings from my home worm farm, and the resulting worm leachate (worm wee) I use in the watering of the plants.
Each year during the outdoor growing 'off season' I amend the soil of the containers and then let them settle/cook for a bit until planting.
In the off season just gone my amendments included;
I converted my containers into home made 'air pots'
I read about 'air pots' a few years ago, and the favourable effect of 'air pruning' on the roots, it seemed very exciting and compelling, but at the time there were no air pots available locally here, so instead I created home made versions by heavily drilling out my plastic pots and used landscape fabric lining to stop the soil falling out the holes (some are almost an inch across in the larger pots).
Heat on the balcony
My containers can be under a lot of heat during the peak of summer, so I need to be mindful of what can happen to heavily drilled out pots if left in the hot sun for a week, even if they were soaked prior...
One such time they were left for a week and there was no rain ...
However it did actually recover, and eventually produced over half a pound of nice buds
So, I am concerned with the containers overly drying.
Last year I put a thermometer on the stone tiles for a few minutes and it measured 50.5C or 122.9F, which was being radiated back at the containers and plants.
No wonder I could never walk on the stone tiles in bare feet in the sun, they can be burning hot. In those temperatures the containers do dry out quickly so I usually put a mulch layer of pea straw/lucerne or similar on top of the soil, it helps keep the moisture in and allows the roots to come right up to the soil at the top, and the earthworms like to hang out underneath the mulch too.
Container sizes
Mulanje x Purple Honduras/Panama - one 30 Liter/8 Gallon container
- one 50 Liter/13 Gallon container
Mulanje x (Malawi/Ethiopian x Mulanje) - one 30 Liter/8 Gallon container
- one 50 Liter/13 Gallon container
Mulanje x Mango Sherbert - two x 30 Liter/8 Gallon containers
In my next post I will describe the approach that I am changing to for watering...
I will be growing 2 regular seeds from each of the 3 strains that I made using pollen from an African male Mulanje.
Mulanje x Purple Honduras/Panama* 100% Sativa
Mulanje x (Malawi/Ethiopian x Mulanje) 100% Sativa
Mulanje x Mango Sherbert Hybrid
* Note of correction; when I began my previous journal, I incorrectly transcribed the name as "Honduras/Panama x Purple Honduras". It should have been "Purple Honduras/Panama" as I am showing here.
Seeds began soaking on 27th September
Seeds soaked in a 6:1 solution of 6% Hydrogen Peroxide for about 12 hours (last year I used 3% solution but still with a dilution of 6:1, all still seemed fine, just saying)
Seeds were then planted in their beginning pots on 1stOctober
Aim of growing
The main purpose is to produce enough good quality bud for my own personal use and to be able to share with others. I have been using an Ardent decarb unit to decarb bud that I 'chomp into' an hour or two before sleep, which I find helps give me a great night's sleep especially when taking dose of Magnesium with it.
During the day I either use a Vapcap unit with an induction heater, or chew a little of the cobs I made 2 years ago.
If all goes well this grow, I will most likely make some more cobs as I am keen to try them using pure Sativa buds. I made some cobs from hybrid buds a couple of grows ago, for anyone interested --> here is a Cob overview. And also --> here is pictorial of some cob making I did.
Stealth Growing
Growing on the balcony necessitates restraining the height of the plants. In the last couple of months my neighbours have severely cut the height of the trees growing on their side which has now further opened up 'sight lines' to my balcony, so now I have to be more strict on their training to ensure that no cannabis plants are visually identifiable above the balcony rail planters.
Altho I am growing 6 plants, all males will be chopped when identified, so I am assuming I'll only end up growing out 3, give or take.
A flashback to last year's balcony grow showing that it was crowded with just 4 plants.
Here is a link to my previous grow journal --> Stunger's Organic Soil Stealth Balcony: Landrace Mulanje & Other Sativas
Grow Location
Southern Hemisphere, land of the long white cloud, temperate, humid summers. Growing outdoors on a balcony that only gets direct sun in the afternoon and is open to bouts of rain, winds sometimes in excess of 100kph, and generally known as 4 seasons in one day.
Growing in organic living soil
I have been using this same (evolving) soil for about 5 years. It started off as a locally adapted organic version of Subcool's supersoil (my adaptation turned out to be far too conservatively mixed). But over the subsequent years, additional amendments were added and used, like sources of Chitin and Malted Barley from Clackamas Coot/Jim Bennett's soil recipe, and some of the many fantastic ideas shared on this great site. I use homemade compost, and wormcastings from my home worm farm, and the resulting worm leachate (worm wee) I use in the watering of the plants.
Each year during the outdoor growing 'off season' I amend the soil of the containers and then let them settle/cook for a bit until planting.
In the off season just gone my amendments included;
- a few handfuls of wormcastings
- 2 handfuls compost
- a few handfuls pumice
- ½cup Neem meal
- ½cup Kelp pellets
- ½cup Biochar
- ¼cup Gypsum
- ½Ocean Fertiliser
- ¼cup EF Fertiliser
- ½cup Alfalfa meal
- 2 cups Herbi's 4-4-4 for 30L containers or 3 cups for 50L containers
- 2/3 cup diastatic Malted Barley
- Watered in with Fish Hydrolysate, Humic/Fulvic acids and Seasol Kelp concentrate
I converted my containers into home made 'air pots'
I read about 'air pots' a few years ago, and the favourable effect of 'air pruning' on the roots, it seemed very exciting and compelling, but at the time there were no air pots available locally here, so instead I created home made versions by heavily drilling out my plastic pots and used landscape fabric lining to stop the soil falling out the holes (some are almost an inch across in the larger pots).
Heat on the balcony
My containers can be under a lot of heat during the peak of summer, so I need to be mindful of what can happen to heavily drilled out pots if left in the hot sun for a week, even if they were soaked prior...
One such time they were left for a week and there was no rain ...
However it did actually recover, and eventually produced over half a pound of nice buds
So, I am concerned with the containers overly drying.
Last year I put a thermometer on the stone tiles for a few minutes and it measured 50.5C or 122.9F, which was being radiated back at the containers and plants.
No wonder I could never walk on the stone tiles in bare feet in the sun, they can be burning hot. In those temperatures the containers do dry out quickly so I usually put a mulch layer of pea straw/lucerne or similar on top of the soil, it helps keep the moisture in and allows the roots to come right up to the soil at the top, and the earthworms like to hang out underneath the mulch too.
Container sizes
Mulanje x Purple Honduras/Panama - one 30 Liter/8 Gallon container
- one 50 Liter/13 Gallon container
Mulanje x (Malawi/Ethiopian x Mulanje) - one 30 Liter/8 Gallon container
- one 50 Liter/13 Gallon container
Mulanje x Mango Sherbert - two x 30 Liter/8 Gallon containers
In my next post I will describe the approach that I am changing to for watering...


