GreenChrome's Perpetual Grow Journal Volume 1 - Soil - Ice & Bubblicious

Cloning Tutorial

Hey everyone! We have created a Cloning Tutorial and partial update on our Veg Chamber. Enjoy!

Supplies:

IMG_9053.jpg


A standard nursery tray, dome cover and compartment insert. At this time of year, you can find these practically anywhere: garden nurseries, Home Depot, department stores like Target, Walmart, etc.


IMG_9055.JPG


Growing medium. This time around we used Jiffy Pellets, a dehydrated disc that expands when warm water is added. In the past we have experimented with Rockwool and RapidRooter starter plugs. Both seem to lose water quickly, and if you aren't on top of checking in on your clones, you run the risk of drying out. The pellets seen here have been holding a sufficient amount of water steadily.


IMG_9062.jpg


Cloning gel or powder. This will give your cuttings a burst of hormones it needs to quickly produce root cells. We have consistently used Clonex Rooting Compound with great results. As to not contaminate the product, we pour a small amount into a plastic cup (ketchup containers found at your local fast food joint work well) and discard the remaining solution when finished.


IMG_9060.JPG


Markers. Not a necessity, but if you are trying to keep track of your strains and seeds within a strain, these are extremely helpful. Here, we used purple markers for Bubblicious and blue for Ice. The letter dictates which plant the clone originated from. Keeping track of your plants and their clones help you determine not only who are the strongest, but also its pattern of growing.

(Not Pictured)
Small garden shears/scissors
A small shallow container (to hold cloning compound)
Latex gloves

How To Prepare and Cut Clones

IMG_9057.JPG


Figure out how many clones you would like to have, and fill your tray with that number of pellets. We have allowed for 23 clones, with the expectation of losing at least 2. If you have a plant whose line you definitely want to continue, I suggest cutting at least 3 clones from it to allow for error or unexpected disaster. This usually ensures at least one will make it through.


IMG_9058.JPG


To hydrate the pellets, pour an ample amount of warm water into the tray. It will take about 10-15 minutes for the pellets to come to their complete size.


IMG_9063.JPG


5 minutes. While you are waiting for your pellets to rise, you might as well start to ready your plants for cutting.


IMG_9064.JPG


Cut clones from your plants that are in vegetative state.


IMG_9066.JPG


15 minutes and all ready to go! You can see there is a hole at the top for inserting the stem/seed.


IMG_90791.JPG


1A and it's mutant growing tips pulled and ready to have clones taken. We looked for growing tips on the lower and mid part of the plant, that typically wouldn't be producing much due to the foliage above it preventing adequate light.

Use a CLEAN pair of plant shears - give it a good wipe down in alcohol and designate those snips only for your cannabis. You don't want to be using the same shears you just hacked down your garden pest-weeds. Handle your cuttings with a latex gloved hand.

Find the growing tip you would like to extract, and place your snips at the node below it. You don't want to cut directly below the growing tip, otherwise it's like being left with a head without a body. We aim for healthy, small fan leaves surrounding the tip to take along with the cutting. If your fan leaves are too large, you can snip off the points of the leaf. You want to have a leaf that will work for the cutting, without using too much of its resources.

After making your cut, angle the scissors and snip your stem at a 45 degree angle. You'll want to do this to increase the surface area so water may be easily absorbed. It is possible with this technique that air locks could form. To prevent this from happening, you can take your cutting and hold its stem under water and make your angled cut then.


IMG_9067.JPG


Always clean and sterile! Handle your clone with a clean gloved hand. Gently submerge the tip of the stem in the gel and hold for 15 seconds. Remove and place into your growing medium. Use gentle pressure to ensure that it has gone deep enough to be held, but not forceful enough that you will snap the stem.


IMG_9069.JPG


We have pinched the top of the pellet closed around our clone to ensure that it will not fall out.


IMG_9078.JPG


You can see here on 2A we have used a low stress technique of tying down her main stem. We find that this produces more favorable results than topping. Her growing tips below have all grown up to reach the main tip at the same height. We used rubber-coated wire we found in the Garden Center of Home Depot used to training plants. To use only wire seemed excessive and in the long run pricey, so we cut small portions that would only be used for gripping the plant. We then cut different lengths of rope that was secured around with a bit of electrical tape.


IMG_90881.JPG


While you have your plants out to cut clones, use this time to clean up your plant. Remove dead/dying leaves or stragglers hanging out in the dirt.


IMG_90981.JPG


All our clones snuggled up in their tray, marked, watered and under their light. Use the dome that comes with the nursery tray to cover your clones to keep humidity and prevent your plants from drying out. Remember to check them daily - use a timer if you have to! It only takes one missed day for a dry-out disaster. Keep a bottle of distilled water in a spray bottle handy and mist your little ladies. You'll want your growing medium to be moist and plentiful of water, but try to prevent it from hanging out in a large amount of standing water.


That's it! I hope you have enjoyed our Cloning Tutorial. Keep your greens happy and they'll do the same for you. Stay green, friends! :green_heart:
 
Nice cloning tutorial I use the exact same thing... I've never had alot of luck cloning with rockwool but I have a very high success rate with the jiffy pellets... I don't even use a rooting hormone anymore I started off using a few different ones but in the end I found out it wasn't neccessary but I'm sure it probably helps.... Once again an awesome update from " The Greens" lol :bravo:
 
Hey everyone! Here is a little update.

The clones are doing well, nice and green with a bit of new growth. The roots have not poked out yet, but a slight tug on the stem shows that there are some down there. The pellets are bigger than I am used too, so I assume it will take a bit longer to poke through.

Veg plants are doing well also, I may have let them go a day too long between waterings and noticed that some of the bottom branches had drooping and sad looking leaves, These will get clipped off when I flush anyway, so I am not too concerned. We have a nice even canopy going that is filling out the room well. They also got their nutrients last night.

The flowering plants are in their last week, and will be coming down on Sunday. Flushing was a ridiculous nightmare. We ended up filling a 65g garbage pail with water, and drained the pots into another pail. Unfortunately that pail leaked when 15 gallons were in it, so we had to keep dumping the water after each plant. We ended up only running 15g through each plant (7g pots), and it took about 5 hours. The plants were lanky from the low light in the beginning, so we had to tie them up in multiple spots to get them out of the room. Next time, I will take the door off of the flower room to make moving them in and out easier, and they should be bushier plants so they shouldn't bend as much. I will also get a water fountain pump to put in the drainage pail to push water out of the window and onto the lawn. I may also get another pail so two plants can drain at once. Finally, we will only have 4 next time, cutting down on the work. We temporarily corrected the heat problem by running some extra ducting across the garage to another fan that we mounted in the window. It will work until I can do the work to vent outside on Monday. Temps are around the mid to high 80's, not perfect but better than it was.

Thanks for checking in!
 
And another update. WE HAVE HARVESTED THE GIRLS!

Dont worry, we have plenty of pics to post. We were going to do it on Sunday but have friends visiting and a busy schedule. We decided to harvest last night, about 2 days after the trichromes turned milky white. We didn't bother weighing it wet, but I will give you the dry weights when we are done. We got some huge buds off of these girls, with a few being the size of a 22oz :high-five:
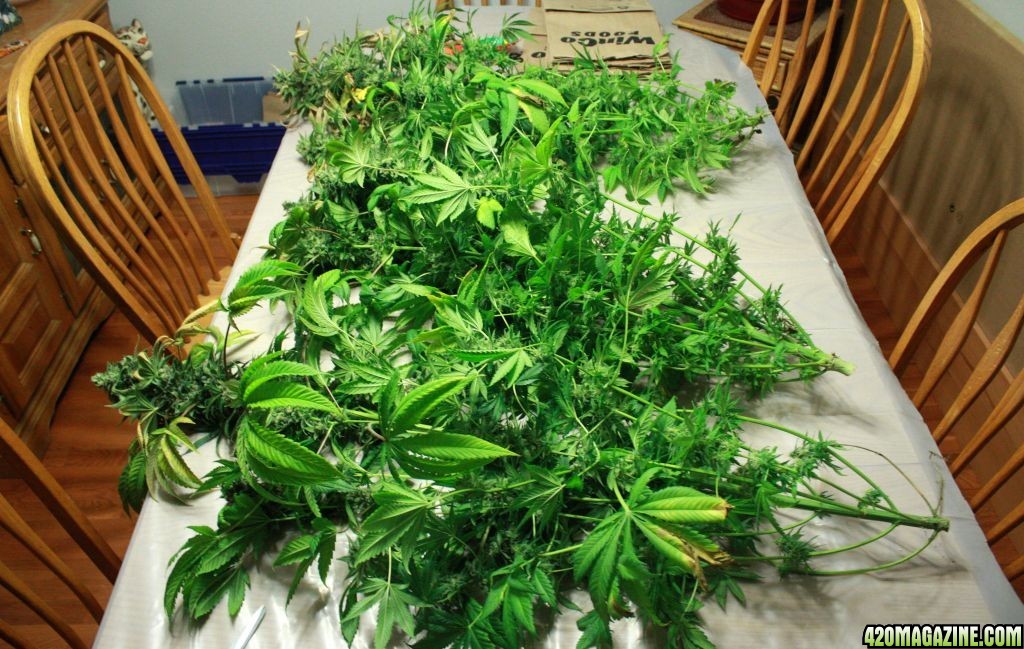
. We are drying them out oin the flower room for a few days while they hang, then onto a drying box my buddy made. Will post pics in a few days!
 
Hey team Green I just caught up on your grow and I have to say that I think you two have one of, if not the best thread on here keep up the good work and I can't wait to see them picks Smoke well my friends
 
And another pic-less update. We have taken the buds off of the string and put them into a drying box. We have begun the project of venting outside, and currently have a nice sized hole between our room and the outside world. I have to run to the hardware store to get a few things when Mrs. Green returns. The filter is up in its new spot, and the lights are down in preparation for cleaning them.

We also planted the clones today, tossed two because of small roots but had a 100% success rate, with more roots on some than I have seen before in my grows. That leaves us with 21 clones. We only need 5, so we will see how that react in their new dirt filled homes and then will pick the best 5.

The veg plants are doing well and will go into flower as soon as the flower room is clean and the projects are finished. Everyone gets nutrients tonight.

Thanks for stopping in and the kind words GoodOleDog!
 
Hey everyone! I apologize for the picture update delay. Like Chrome mentioned, we had a few friends from out of town visit for the week, so sitting in front of the computer and readying photos was out of the question for the time being. Our guests left today, and tonight I am currently uploading my stash onto the computer to fix and post. Hoping to get them up as soon as possible!
 
Whoa, its been over a month. Don't worry, we didn't forget about you. Mrs. Green and I decided to take an impromptu road trip across the U.S. and have been gone quite a while. We had many conversations about getting back on here to update all of our new friends. First, the harvest yielded a wonderful 13oz of some super high quality bud. In addition to that, we have about 2 to 3oz of trim, including the popcorn bud. All in all, about a pound of usable, cured, delicious marijuana. Next, the veg girls are now the flower girls and are a month in. The oddly growing Ice plant (1A) has multiple main colas, as do the rest. We have 4 plants in the room, and they fill the chamber wall to wall. Having them tied down really did wonders, but I hope we will get the same weight or better. The buds look a little skinny, but I am also remembering the big fat juicy ones at the end of the last harvest. We shall see. Finally, our clones from the tutorial are big and healthy. They may be the first plants to go through flowering in the now veg room. We realized that we can increase our harvests per year if we allow each room to serve as both veg and flower (if we keep two mothers elsewhere). Speaking of mother plants, 1A and 2A seem to be the most stable and consistently well growing plants. They will be the plants we clone from to make our moms.

In my opinion, the Bubblicious is a better plant. It is a heavy hitter and yields some good looking buds with some good weight. We pulled many that were over a 1/2 oz, with the biggest being 20g (here we come bud of the month). Pictures will come soon, we still have a lot to catch up on from the trip. I will try to get over to your journals in the next few days!
 
It was a lot of fun, we live in a very beautiful and diverse country. Having grown up in a big city, it is sometimes unimaginable to think of what my life would have been had I grown up in some of the small, small towns that we have passed through. Thanks for the warm welcome back!
 
Hey guys! As Chrome explained, we have been gone for a bit on a lengthy road trip. I had a few things to tend to after we returned, so my apologies for the delay in posts.

I've been caring for the current Bubblicious and Ice grow we are in the process of. Chrome'll be out of town for a few nights, and he bravely left me in charge. At the rate at which I manage to kill basil, I emphasize "brave."

I watered tonight; I added a decent amount of fish tank water to the plants in the Flower Chamber. Before Chrome left we noticed that the leaves appeared to be showing a nitrogen deficiency. We had a similar issue the last grow, and to my knowledge none of the current nutrients we have had an ample enough portion of N. Tested the PH beforehand, all was green.

On a harvest note I find exciting: I have a satisfying amount of popcorn bud and trim jarred and waiting to be used in edibles. I currently have a pound of cannabutter sealed and refrigerated. I first attempted a browned cannabutter, in hopes I could leave the nutty flavor of browned butter within the cannabutter. Results were pretty mellow; the subsequent classic chocolate chip cookies left one functional, but possibly drifting off in forgetfulness. I think I could exponentially improve on it next time.

Alright, thank you for humoring my food geek. Here's the harvest of Bubblicious and Ice:

IMG_91261.JPG


I believe these are the Bubblicious plants. Forgive me, it's been a little too long for my brain to retain that information. I've been staring at the photos for a decent amount of time now, trying to remember some distinguishing feature between the two. Chrome will remember which we harvested first. Chrome - what did we pull first?


IMG_9138.JPG


IMG_9141.JPG


IMG_9154.jpg


IMG_9155.jpg


IMG_9158.jpg


Of impressive size and questionable shape.


IMG_9161.JPG


Going down the line


IMG_9160.JPG


IMG_9159.JPG


IMG_9178.JPG


This should be Ice.


IMG_9179.JPG


IMG_91821.JPG


IMG_91872.jpg


Some bud porn for yous guys!


IMG_91881.jpg


Mmm...Red head.

IMG_9195.JPG


IMG_9196.jpg


IMG_92051.JPG


The lil' guys need love too.


That's it for harvest shots!
 
Thanks, dadums!

I'm happy to say that my sole tending is going well. I had added the fish tank water to the girls in Flower; the leaves that started to have a yellow hue didn't return to green, but nothing appeared to be yellowing further. Will the leaves that had started to show signs of N deficiency regain their normal coloration back?

I did some a significant amount of pruning and cleaning up last night. In the Flower Chamber, I tied up more stalks as the weight of the growing bud was beginning to cause the stems to bend. Crouching down and wiggling in under the canopy, I picked off every dead or apparent dying leaf. While doing so, I noticed that a main cola had fallen beneath the canopy, pulled there by its own weight. I worked it up back through the top and used Chrome's handy method tying up (or tying down in veg).

We use soft rubber-coated thick-gauged wire that Chrome found in the hardware store and attached a small (about two inches) cut of wire to different lengths of thin rope. The wire that we purchased was exclusively for tying down vegetation, but a small coil was a decent enough price that we didn't want to have to buy multiple rolls when all we needed was just enough to softly loop around the plant stem.

I also pruned back all the small popcorn bud sites and leaves at the very bottom of the plants. They receive such negligible light, they appear almost white. Chrome had originally did the large-scale pruning on this harvest, I was just cutting back what was reappearing.

In the Veg Chamber, everyone seemed happy, perky and beautiful. While what's most exciting happens in Flower, I prefer being in the Veg Chamber. That cool, blue spectrum lighting uplifts my mood and watching sprouts in a sea of dirt slowly overcome the room in an expansive blanket of hearty hand-sized leaves I find most enjoyable.

It being Sunday, I will do a picture update of the rooms later this evening.
 
Back
Top Bottom