I had the exact same problem. Never found a solution. I think we're all fussy at this point !!! lol

How To Use Progressive Web App aka PWA On 420 Magazine Forum
Note: This feature may not be available in some browsers.
With the vape pens I'm currently reviewing, there is no way to just drip it in there. I'm using a syringe with blunt tip needle to inject it. So far it's doing okay, but I just don't like the separation of the PG/VG and rosin. I haven't been able to get it to stay emulsified. I'm fussy.....LOL
I've got the Cubox and Sip. They don't leave much choice on how to fill without leaving a drippy mess. LOL Trust me, I've tried.Your just not tiring hard enough ,. Where there is a will there is a way. Me too & not going to smoke antifreeze
Artrix Giveaway & Product Experience Program - Free Vapes Await! Fittys are even tougher to fill being plastic pods
Somebody else used a glass pipet.
A lot of people don't. This is the first I've tried to make the vape liquid, and I had no terpenes to use as a thinner.I do not tolerate propylene glycol well.
Still using the same polish vodka I’ve always used that T recommended and 100% organic growing methods that I’ve picked up from our kind communities over the years.It really raises the question of the strength of your oil if you get 7g of oil per ounce (28g) of bud. Have you had it tested?
I get about 4g of oil per 28g of bud and it's almost 80% cannabinoid. What solvent are you using ? It could just be that you have twice as strong pot as I do.
And in the case of 4g oil per 28 it breaks down to 287mg oil per 2gStill using the same polish vodka I’ve always used that T recommended and 100% organic growing methods that I’ve picked up from our kind communities over the years.
It has a much better ability. Working with say 100 proof vodka will work to a degree but it leaves a lot to be desired, and a lot on the table when you're done. It won't dissolve nearly as well as 99% alcohol. Trichome goo is a tough to work with! Science could explain it better than me. It has more bounce to the ounce!So, if trichomes dissolve in alcohol in general, why the insistence on using only the very highest proof to make the oil? It would seem to me that most any alcohol would work. Is it that you need less of the higher proof ones and the lower proof ones have more water that needs to evaporate out so they are less efficient?
Why the focus on super high proof?
Meaning what, that there's more residue besides the cannabinoids in what's left over?It has a much better ability. Working with say 100 proof vodka will work to a degree but it leaves a lot to be desired, and a lot on the table when you're done. It won't dissolve nearly as well as 99% alcohol. Trichome goo is a tough to work with! Science could explain it better than me. It has more bounce to the ounce!
How can I explain.Meaning what, that there's more residue besides the cannabinoids in what's left over?
When distilling alcohol the grade of the solvent is specific to the healing essences which can be exacted from cannabis plants and the short duration of contact with the 190 proof 95% alcohol concentrates the medicinal qualities while limiting byproducts from. The method which alcohol is produced is far more practice to produce the required grade rather than remove byproducts from product designed for other uses. When performing the quick wash 190 proof 95% alcohol concentrates the medicinal cannabis into a concentrate and reduces additional byproducts.So, if trichomes dissolve in alcohol in general, why the insistence on using only the very highest proof to make the oil? It would seem to me that most any alcohol would work. Is it that you need less of the higher proof ones and the lower proof ones have more water that needs to evaporate out so they are less efficient?
Why the focus on super high proof?
Because the water would wash stuff out that the alcohol will not. Like dirt & other things that are water soluble.So, if trichomes dissolve in alcohol in general, why the insistence on using only the very highest proof to make the oil? It would seem to me that most any alcohol would work. Is it that you need less of the higher proof ones and the lower proof ones have more water that needs to evaporate out so they are less efficient?
Why the focus on super high proof?
As I understand it, the more potent the solvent is the more effective it is at extraction and freezing the material helps reduce the amount of non-beneficial plant material in the finished product. Hence, the reason to perform the wash as quickly as possible as well. However, I personally believe even with a longer soak will still be beneficial albeit possibly require larger doses to attain the same benefits and even possibly capture some other beneficial elements not captured otherwise. I have no empirical evidence for this as I don’t have mine tested. As always, I can only say it’s seemed to work for me with no harmful effects as of yet.Meaning what, that there's more residue besides the cannabinoids in what's left over?
I'll go buy some oil before I sit down and try to figure out this novel lol, keep it simple MacGyverDISCLAIMER:
The information contained in this post is provided for informational purposes only. 420 Magazine makes every effort to present accurate and reliable information, however 420 Magazine does not represent, warrant, or certify any information displayed, nor does it guarantee the safety, accuracy, completeness, efficacy, or timeliness of such information. It is your responsibility to evaluate text, content, opinions, statements, suggestions, strategies, tactics, or other information made available herein. Use of such information is voluntary, and reliance on it should only be undertaken by qualified individuals. Under no circumstances will 420 Magazine be liable for any damage caused by reliance upon information contained herein. Any reliance upon any information is at your own risk. 420 Magazine requires you to warrant and represent that you are at least eighteen years of age (twenty one years of age in some jurisdictions) and have the legal capacity to use this Website and Forums. 420 Magazine makes no representation or warranty that the content published in this post/forum complies with either Federal or the local laws of your jurisdiction. You are solely responsible for knowing and understanding laws concerning content legality. If you are unable to make the representations and warranties contained herein, please leave the website immediately.
Making Concentrated Cannabis Oil Extract:
Prior to making your first batch of concentrated cannabis oil, please read through all instructions thoroughly and completely. Please note that 420 Magazine does not condone the manufacture of Butane Hash Oil, BHO, the more hazardous method of Hash Oil manufacture. The extraction and concentration of Cannabis oil as described in the following process should only be attempted by qualified individuals. An overview of the safety issues is as follows:
There are different methods of extracting oils from cannabis and making a concentrate. The method of choice for this tutorial is Quick-Wash Ethanol, aka QWET. This is a popular used method using a food grade solvent/carrier to extract the oils. This tutorial will allow for a person with a serious illness like cancer to make their own medicine. We will use layman’s terms to keep things simple. Mentioning food grade solvents/carriers will be redundant as safety is a main concern. Making cannabis concentrate is something most people can accomplish themselves, and if using high quality bud/flowers results in potent medicine. After a couple of times making the oil you will not only see how easy it is to make, but will start to pick up speed and time in the process while feeling confident in your finished product.
- The process should only be performed with a clear head
- The use of flammables around open flame should only be performed outdoors
- Personal Protective Equipment (PPI) should be utilized as appropriate
- Ensure boil off of the solvent as per the instructions to avoid incomplete removal of alcohol
- Once complete, do not immediately seal the oil in an airtight environment
- Do not seal the solvent-wet spent Cannabis in garbage bags without first allowing the solvent to fully evaporate
Keep in mind, while food grade solvents/carriers may be safe for ingestion, they are still very flammable and caution should be used! Make sure you do the quick-wash and cook down outside in a well-ventilated area (for example, a covered patio). If there is a wind/breeze find out what direction it is coming from and have the wind to your back. Also use a small fan and have that positioned so it blows in the same direction as the wind/breeze. Doing so will also keep the solvent/carrier vapors blowing away from you. Do not smoke or barbecue while making your concentrated oil. Make sure the patio is swept and washed down so dirt and debris is not blown into your bud/flowers during your quick-wash or while you’re cooking off your solvent. Doing a dry-run practicing your layout, and a mock quick-wash before your first attempt is highly recommended to build your confidence and lesson your chances of making mistakes.
Materials Needed to Make the Concentrated Cannabis Oil:
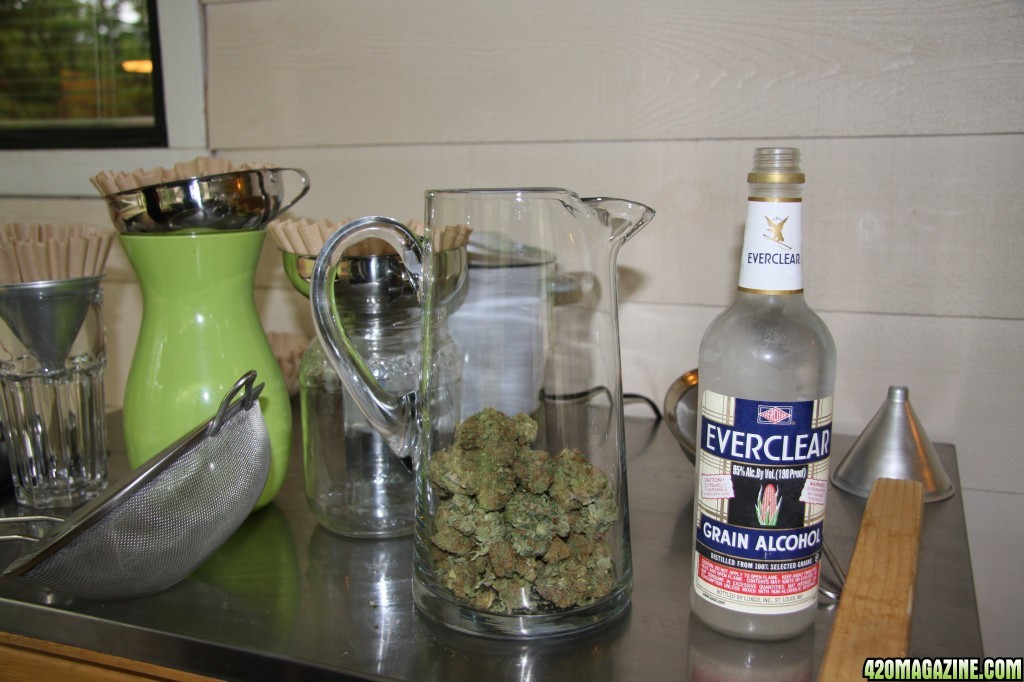
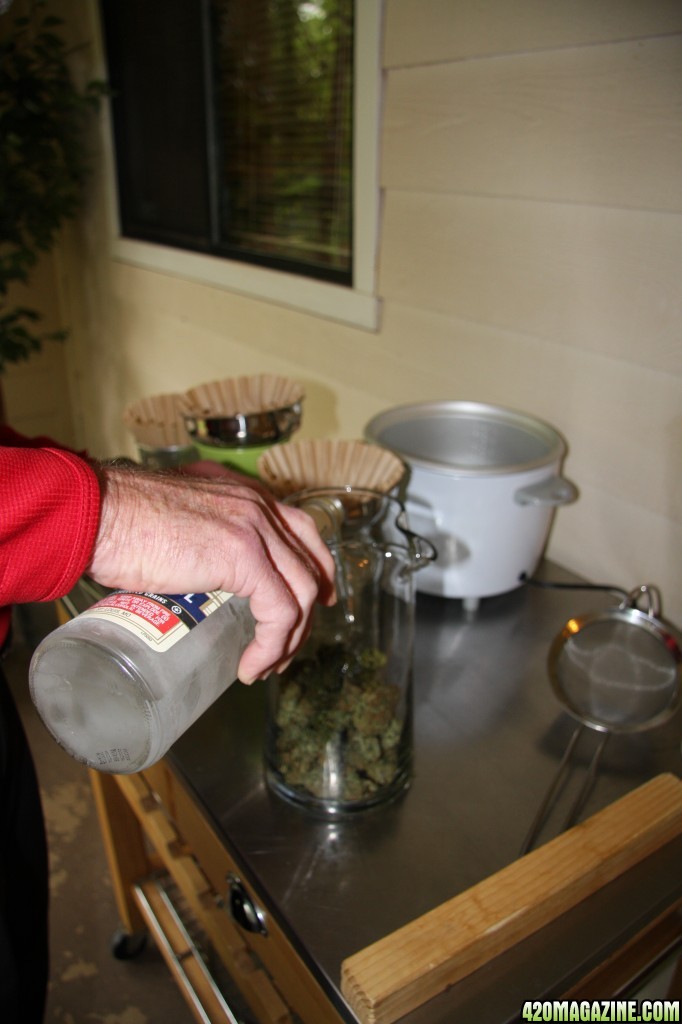
The materials listed were used to make the concentrated cannabis oil for this tutorial: Rice cooker, portable induction cook-top, 2 quart sauce pan induction use approved, mixing pitcher, mixing stick, (3-4) different size strainers, (3-4) funnels, (3-4) collectors to catch the carrier as it passes through the filters, (2) thermometers, eye dropper, (2) hot pads, measuring cup, high grade bud/flowers, and Everclear 190 proof / 95% proof by volume grain alcohol. The amount of Everclear used varies. For one ounce of bud/flowers one 750ml bottle should be enough, however, getting two would be a smart choice. Whatever unused alcohol is left over can be used at another time. Most equipment in this tutorial is common and can be found around the house.
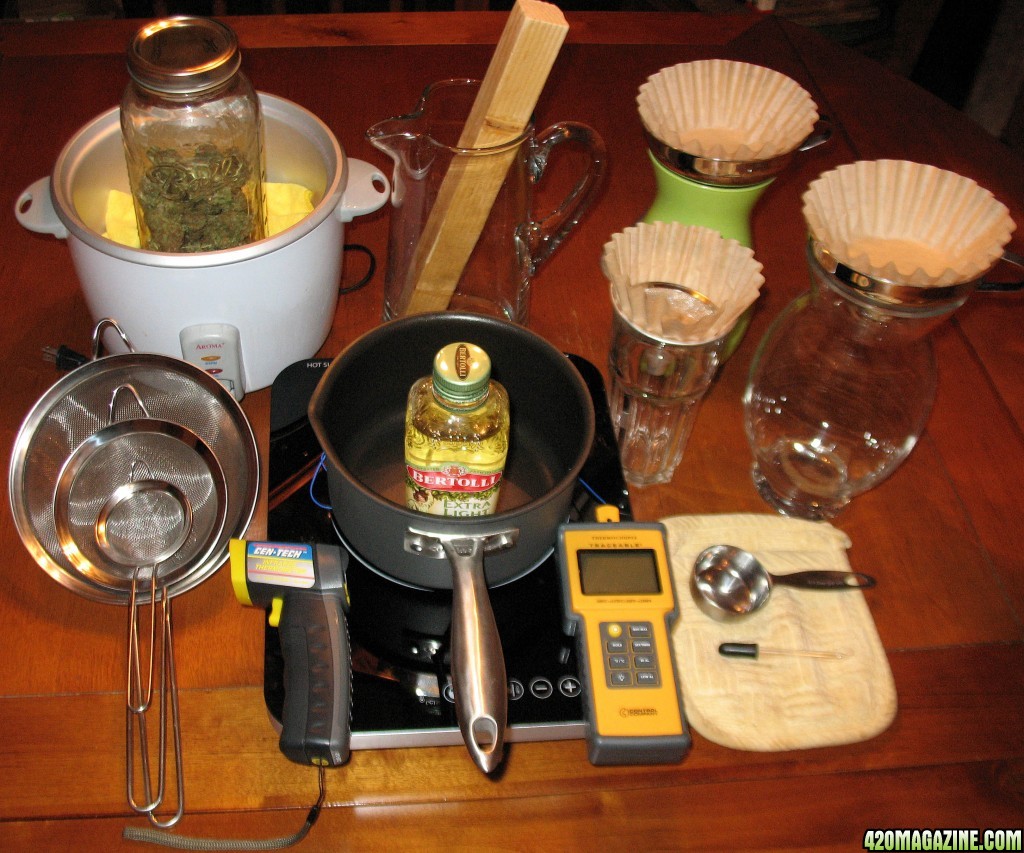
Setting Up Your Equipment:
Start off by setting up your rice cooker, mixing pitcher, funnels, filters, strainers, containers, hot pads etc. Put these on a solid table/platform or anything you can use to support the rice cooker and your other equipment solidly. Make sure you position your fan correctly. Have the fan blow air in a slightly "up" position, not blowing down into the rice cooker, while making sure the air is directed towards the back side of your rice cooking apparatus and between your wall plug. This keeps the vapors away from the outlets. If you’re using an extension cord make sure that it is a heavier gauge than the cord on your rice cooking apparatus and keep the fan positioned between the extension cord and rice cooker. Do not plug in your rice cooker until you have completed your quick-wash and it has been filtered and poured into the rice cooker.
Rice Cooker Disclaimer:
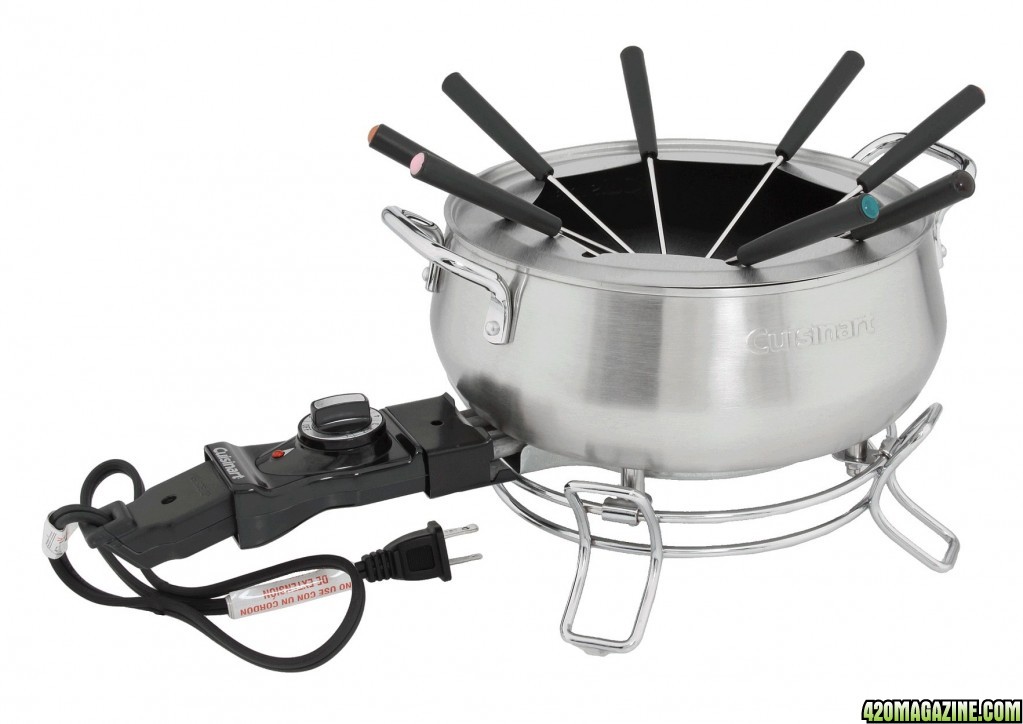
Please keep in mind that certain rice cookers may have a safety feature that prevents the unit from operating in the event it is tipped (anti-tip kill switch). You will need to tip the rice cooker when you are swirling the oil in the final stages of cook down, so in order for this to work you will need a rice cooker, or alternative, that doesn't turn off when tipped. For this reason we recommend only using the Cuisinart CFO-3SS fondue set which lacks this feature and would be a viable option should you choose to go that route.
Preparations Before the Concentrated Oil is Extracted:
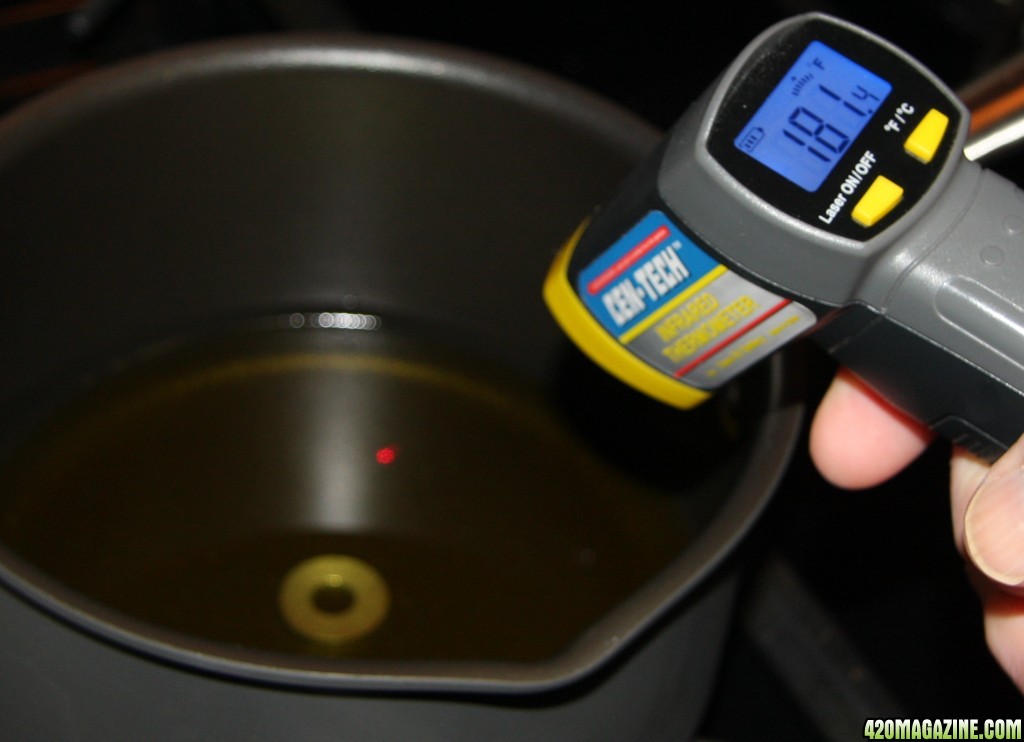
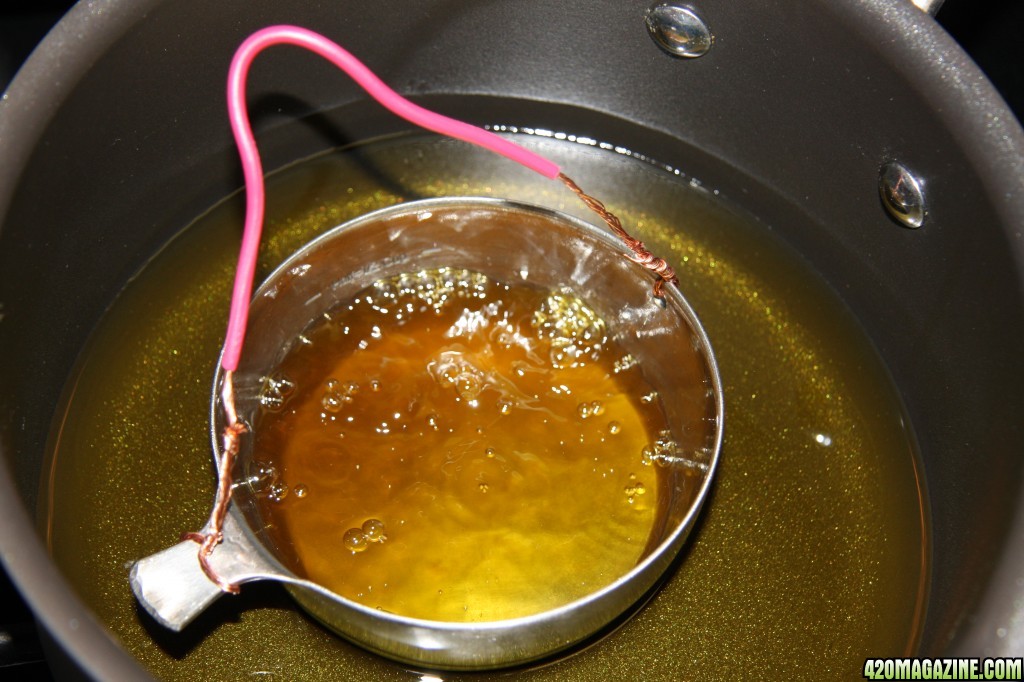
This is my preferred method for a faster decarboxylation process. I use a portable induction cook-top, an induction approved two quart pot, and a heavy stainless steel measuring cup so it won’t float on the surface. I modified the measuring cup by drilling a 3/16” hole in the side of the measuring cup opposite of the handle about 1/8” from the top and shortened the handle with a 4 inch hand grinder so it would fit in the pot. Then I used some wire I had, stripped off the shielding a few inches on each end, threaded it through the hole and twisted the wire until it was secured. Then twisted the other end of the wire around the stubby handle.
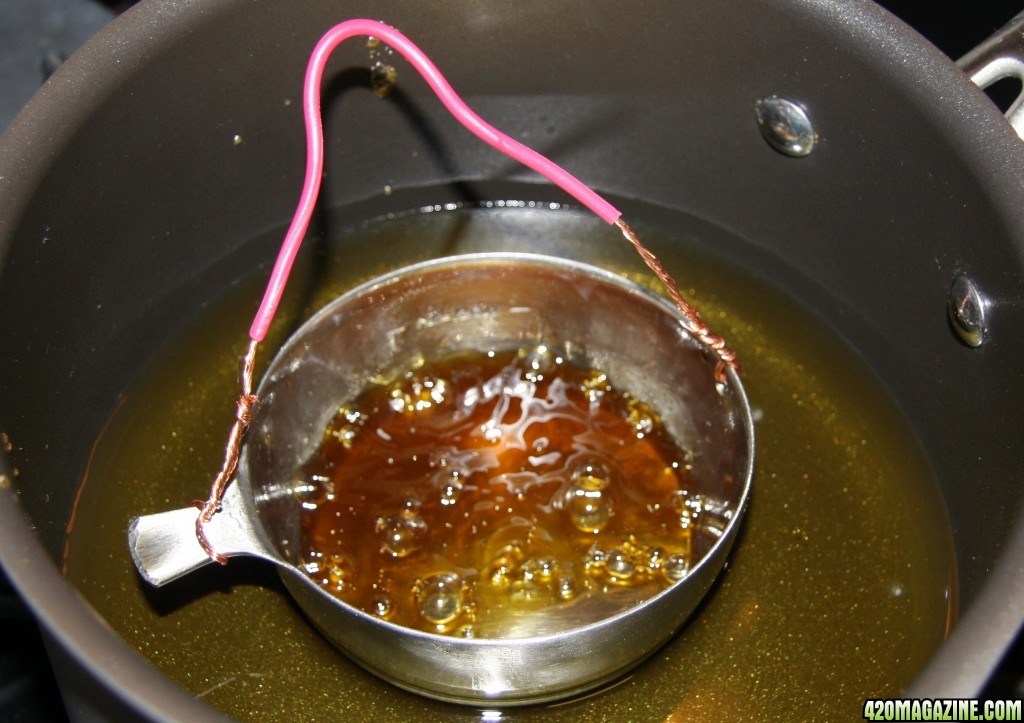
I used an organic olive oil, found in specialty markets like Trader Joes or health stores like Whole Foods. Place your heavy measuring cup in the empty sauce pan, and pour the light olive oil about 1/8" from the hole you drilled into the side. Have some paper towels handy, remove the cup and wipe off any excess oil and wash with dish soap and warm/hot water and place outside with your other equipment. I also insert a stainless steel washer in the center of the sauce pan. This is done so when removing the cup after the decarboxylation is completed it is much easier to remove and isn't suctioned to the bottom of the sauce pan. The olive oil is heated to 180 degrees and awaits the heavy measuring cup after the cook down of the concentrate is complete. Using this decarboxylation method requires a laser type handheld thermometer and a digital one as a cross reference. Others will suffice like a meat probe, but as a rule have something accurate to cross reference. Ensure that the temperature of the oil in the pan is at 180 degrees before starting the quick-wash process. 180 degrees will be the starting temperature of the decarboxylation process but will finish around 250 degrees (NOT to exceed 250 degrees).
Preparing For a Quick–wash Using Food-grade Solvents/Carriers:
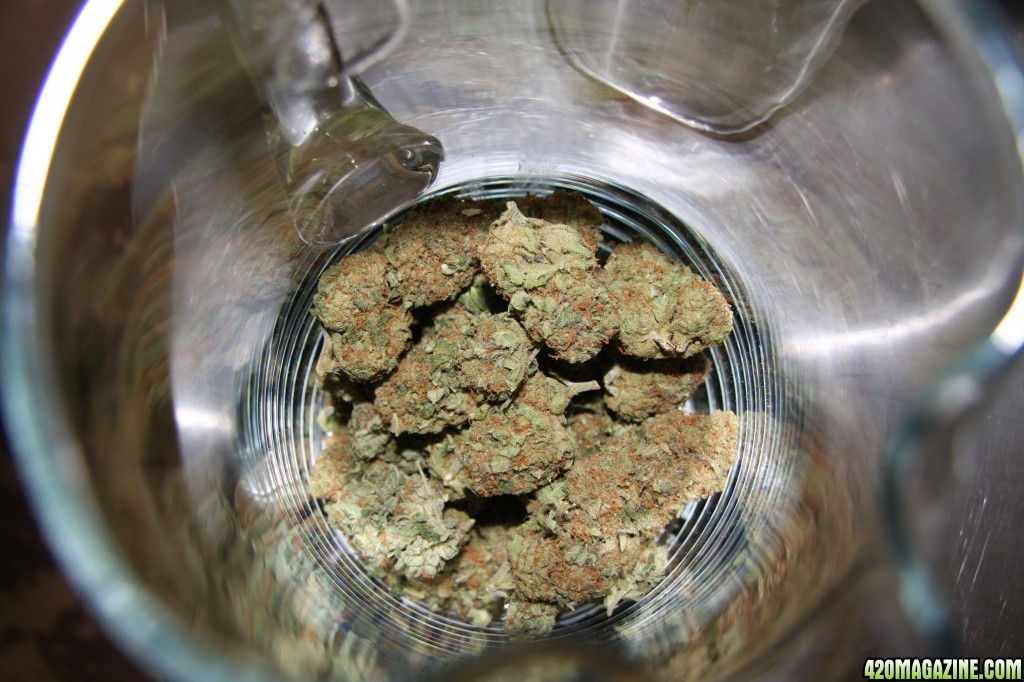
The purpose of doing a quick-wash is to avoid pulling out most of the chlorophyll and plant alkaloids, as well as the plant waxes and vegetable oil, though small amounts will still be retained. It’s not an absolute oil for the connoisseur, but for medical uses it is an excellent choice. By freezing your bud/flowers and getting your food grade alcohol/carrier down to 0 degrees you have about 6-8 minutes to complete your wash before pulling out previously mentioned bud/flower waste, hence “quick-wash”. Place your solvent/carrier and buds/flowers in the freezer set at 0 degrees for 24 hours. Do not freeze buds/flowers that are wet. An easy test is take a stem and bend it, if it snaps instead of bending its ready. A proper cure should have the same result. Properly drying and freezing the buds will keep excess moisture from the process. To remove any doubt, lay your bud on a cookie sheet covered with a couple of paper towels on top of the buds and air dry for a couple of hours even if the stem snaps.
Begin Making Concentrated Cannabis Oil:
Now let’s begin the quick-wash procedure. Get your mixing pitcher and your stirring tool ready, set up your funnels on top of your catch containers and line with two filters for each funnel. Remember the trick to a quick-wash is to go as fast as you can, so the more funnels and catch containers you have the easier and faster it is. An example is as follows: if you mixed up your first batch of bud/flower during your quick-wash and pour into your funnels with your filters inserted they start draining into your collector containers. When they fill up they take time to drain. By having more, you can start your second wash and when complete you have more empty collectors with funnels and filters ready without the need to wait for the ones you already filled to drain down. Once you master the quick-wash process you will start achieving a higher quality extract. Start off using one ounce of bud/flower as this amount is much easier to do when learning. You can increase the amount you make once you become familiar with the process using this “one ounce” amount. Also you'll be able to more accurately gauge the amount of Everclear needed per ounce.
Remove your frozen bud/flowers, food grade alcohol/ethanol/carrier from the freezer and move to your work-site. Place your bud/flowers into the mixing pitcher. Pour your carrier over the cannabis just enough to lightly wet it and pack it down with your mixing tool. Then add more carrier to a level about an inch over your cannabis and quickly squash the bud/flowers while mixing.
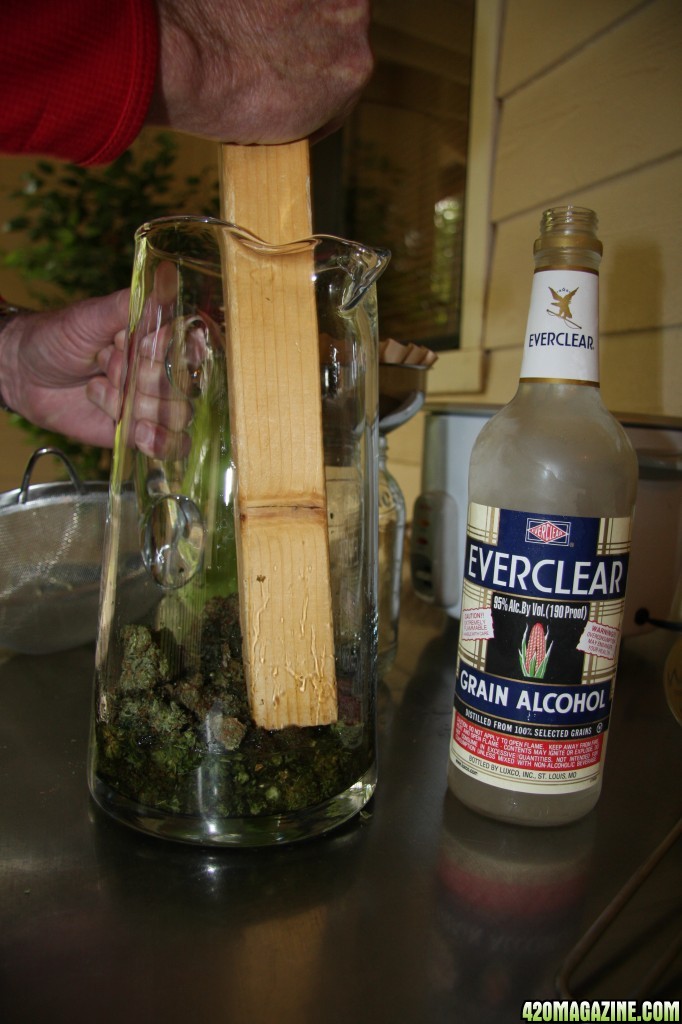
Be sure not use a lot of force or work too quickly in order to prevent slopping around. Remove your mixing tool, grab a strainer, and position over a funnel that is lined with a filter. Pour the contents of your mixing pitcher through the strainer into your filtered funnels. If any cannabis falls into the strainer after you finished draining the mix pitcher, dump the cannabis back into your mixing pitcher. If you filled one of the funnels about one inch from the top, stop, and move to another filtered funnel set up and continue pouring. Do not try to get it all out as this slows down the quick-wash process.
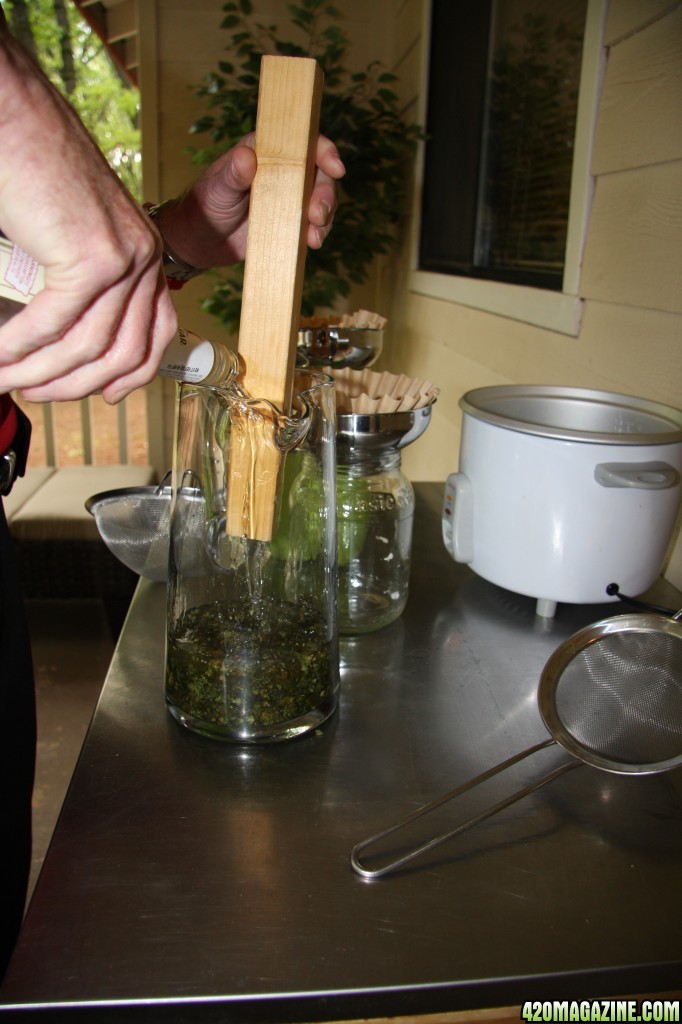
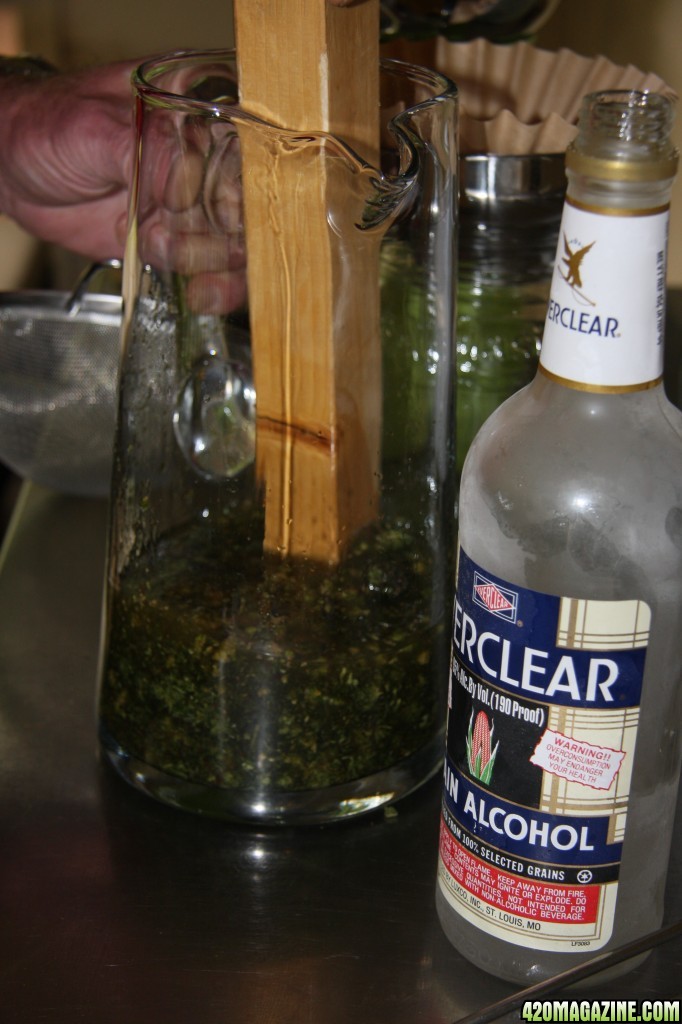
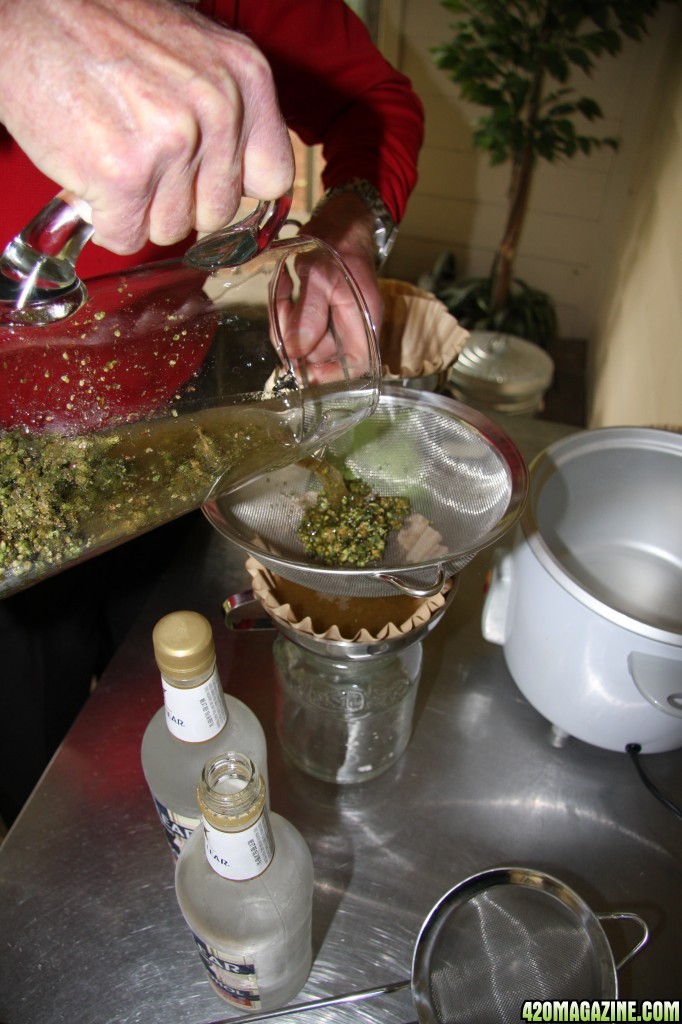
Set the mixing pitcher down, pour more carrier over the cannabis (same amount as before, one inch over the top of the cannabis). Repeat the same procedure as the first wash. Drain the pitcher where you left off filling your funnels. Once drained a second time, pour about a quarter cup of the carrier back into the mixing pitcher and do a short final quick-rinse. Pour the remainder through the strainer into the emptiest filter. If that one is filled to 1” from the top move to another one. Take the cannabis in the mixing pitcher and pour/scrape into the biggest strainer. Then make a fist and push down on the cannabis while holding the strainer over a filtered funnel and press down. Keep doing this until nothing more comes out. Practice and experience will improve efficiency.
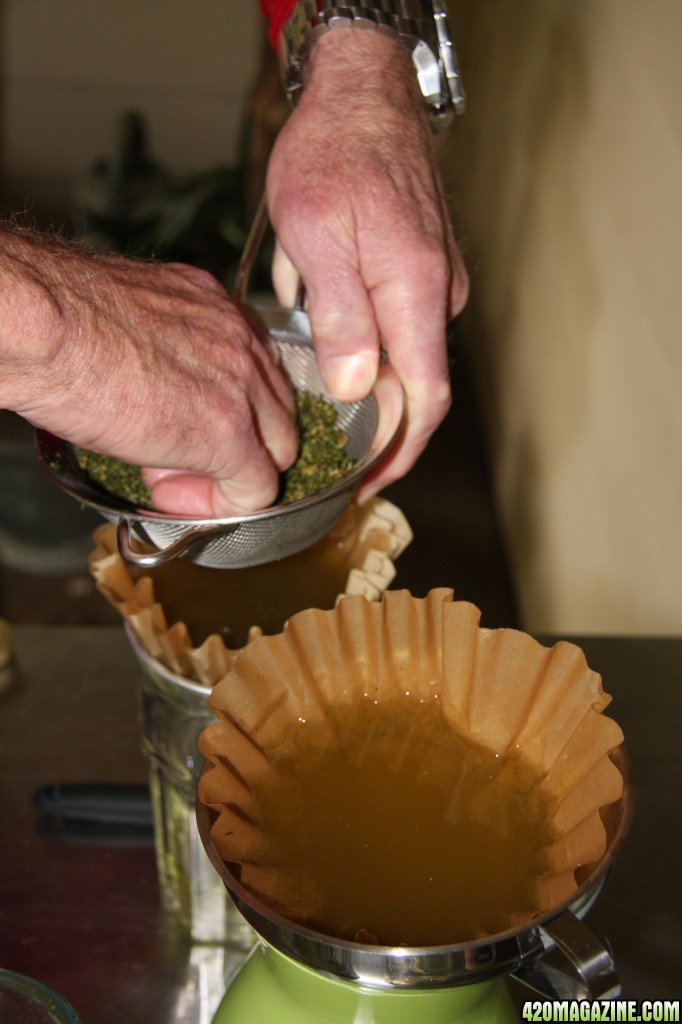
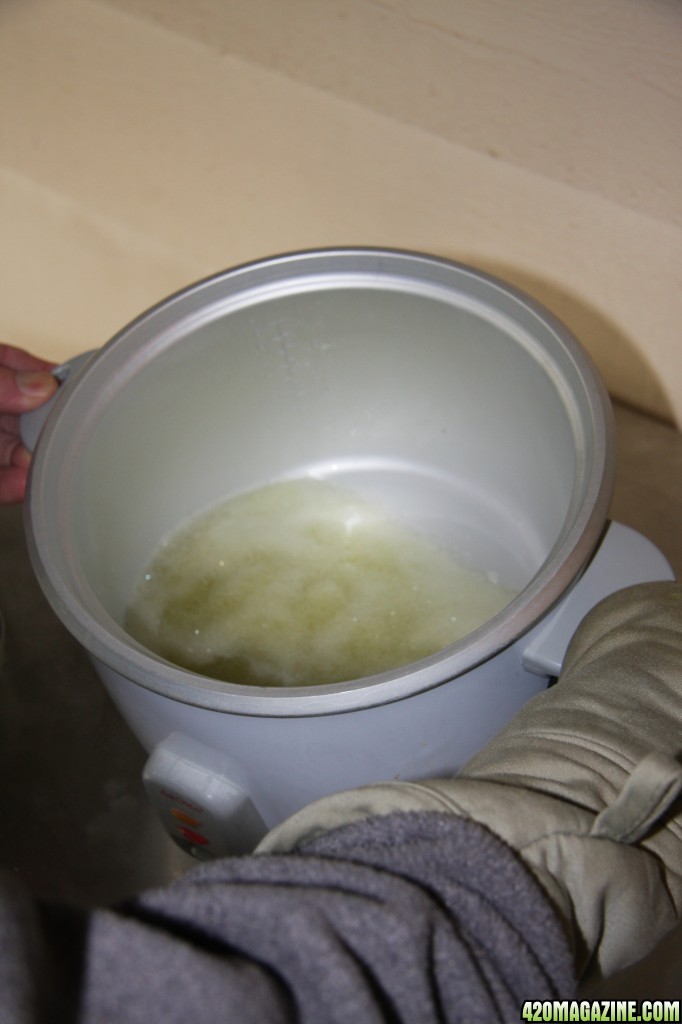
Allow the used Cannabis to air dry, then discard the cannabis in a trash bag for disposal. Make sure you tie the bag securely to keep the odor level down. Set aside the mixing pitcher and mixing tool. When the first set of filtered funnels have drained down grab the top corners and pull to the center and keep doing this until the filter is bunched, then gently twist and fold over so when you squeeze them out loose cannabis material does not fall into the drain containers. Keep repeating this until all the filters have been removed and have squeezed out any leftover carrier. Remove all funnels and set them out of the way. Now take a small, fine meshed strainer and hold over the rice cooker. Grab a container with the carrier in it and pour into the fine mesh strainer, as this will pick up any debris that might have fallen in and catch it. Once all the containers have been strained and poured into the rice cooker, set them out of the way of your work area.
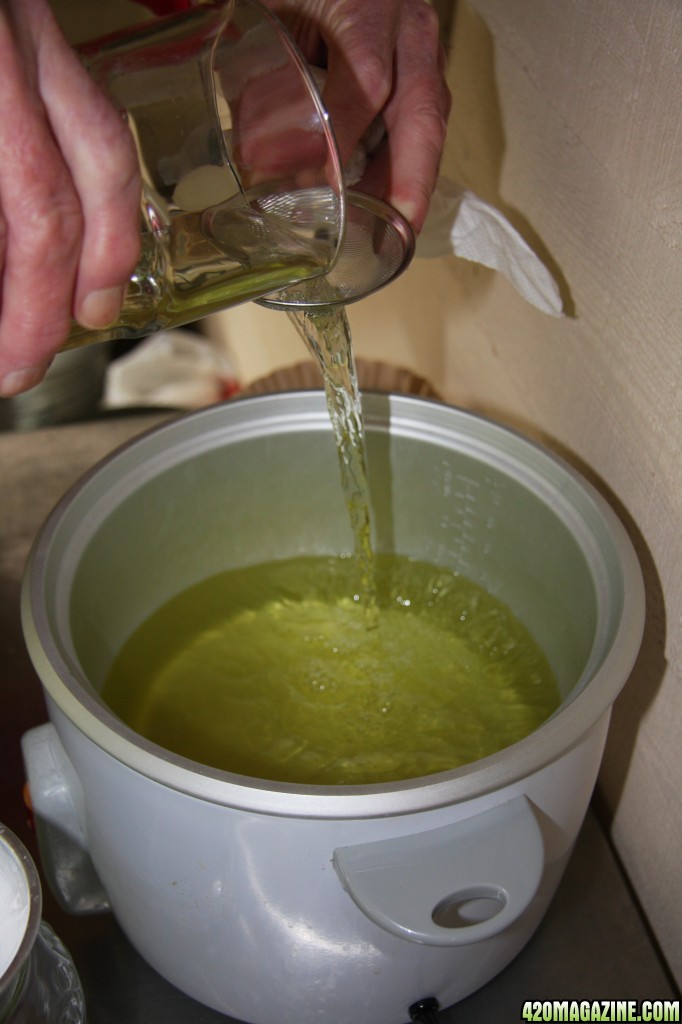
Plug in your rice cooker and turn it to “high”. Now is a good time to quickly pick up your dirty equipment and move it to an area for later cleaning. Also, while the rice cooker is warming up, check to see if your sauce pan inside is still around 180 degrees. This should all be ready to go when the oil is done cooking down and poured into the measuring cup. At this point it will go right into the two quart sauce pan on your induction cook top.
The rice cooker should be heating up and you should be able to see some movement as the solvent starts to cook off. Remember to stand with the breeze/fan to your back so it blows the vapors away from you. Keep observing - you will start to see more rapid movement as the carrier cooks off. Some rice cookers have a high/low switch that kicks down automatically when it gets down to a half cup mark or so. If so, it may not kick back up to “high” until the built in thermostat cools down enough. Not a deal breaker, just takes more time.
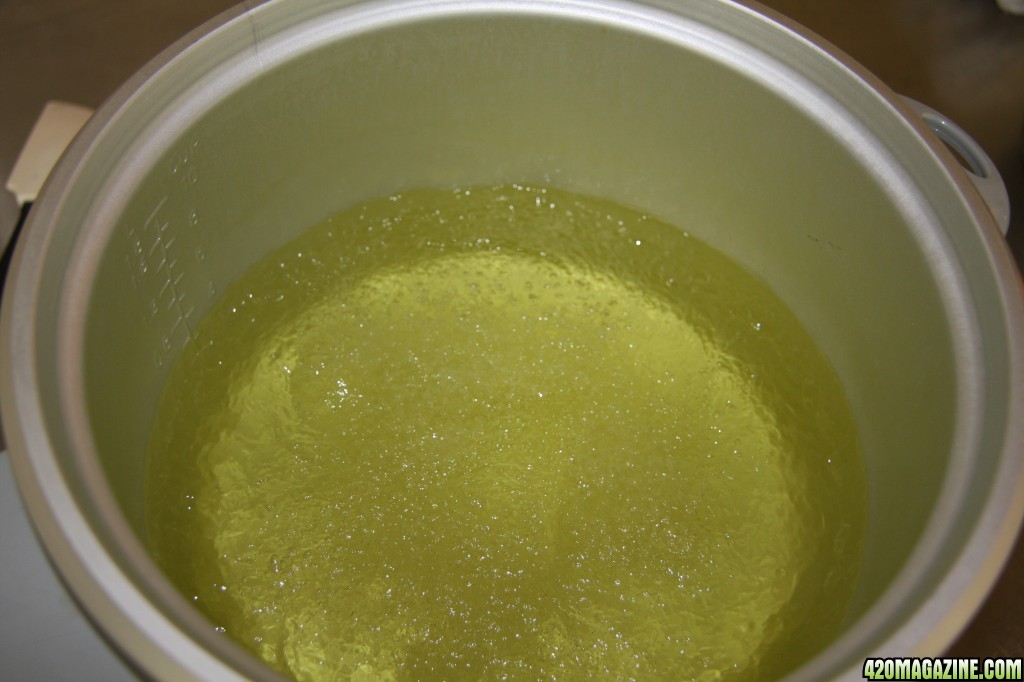
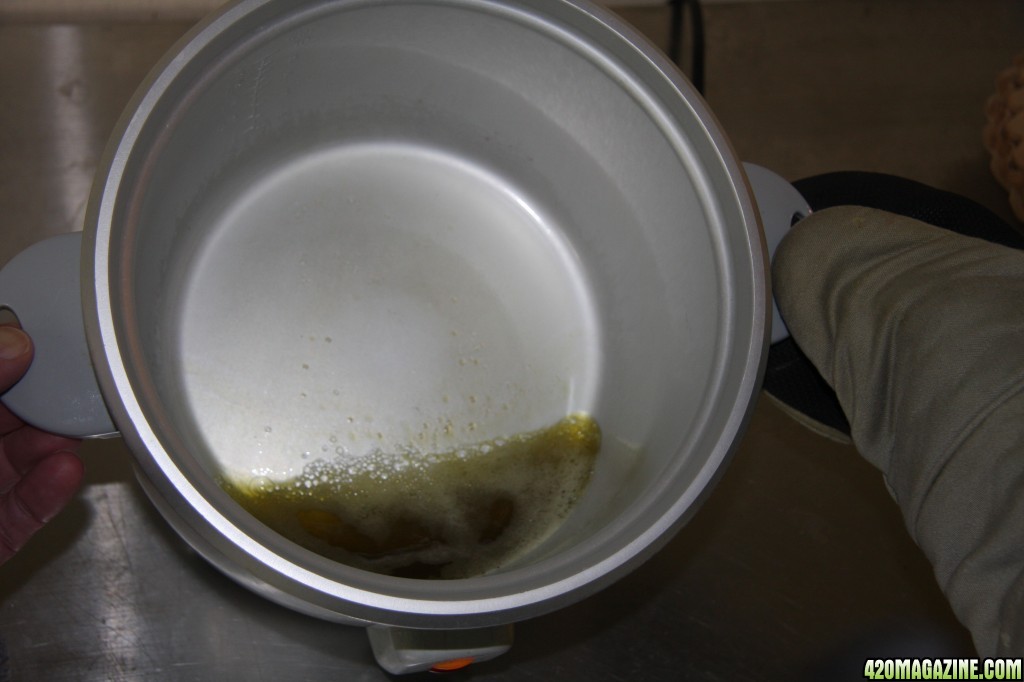
Put on cooking mitts and ensure all bare skin is covered. When the carrier gets down to about a cup, start tilting the rice cooker a little - like you’re panning for gold (swirling the carrier/oil in a easy circular motion). Be careful: swishing too vigorously may make the oil splatter. As it gets down to about a half cup flip the switch on the rice cooker to low so you don't burn the oil.
If the oil starts smoking, grab a hot pad and carefully lift out the inner bowl with the oil in it. Cool slightly before replacing back into the cooker (which has been switched to the low position). When the solvent doesn't bubble as much (your still slowly swishing and keeping the rice cooker tilted) grab the hot pad and a stainless steel measuring cup, (for one ounce a 1/3 cup measuring size is perfect). Lift out the inner bowl. Hold the measuring cup in one hand, the inner bowl in the other hand, and carefully pour the contents of the bowl into the measuring cup.
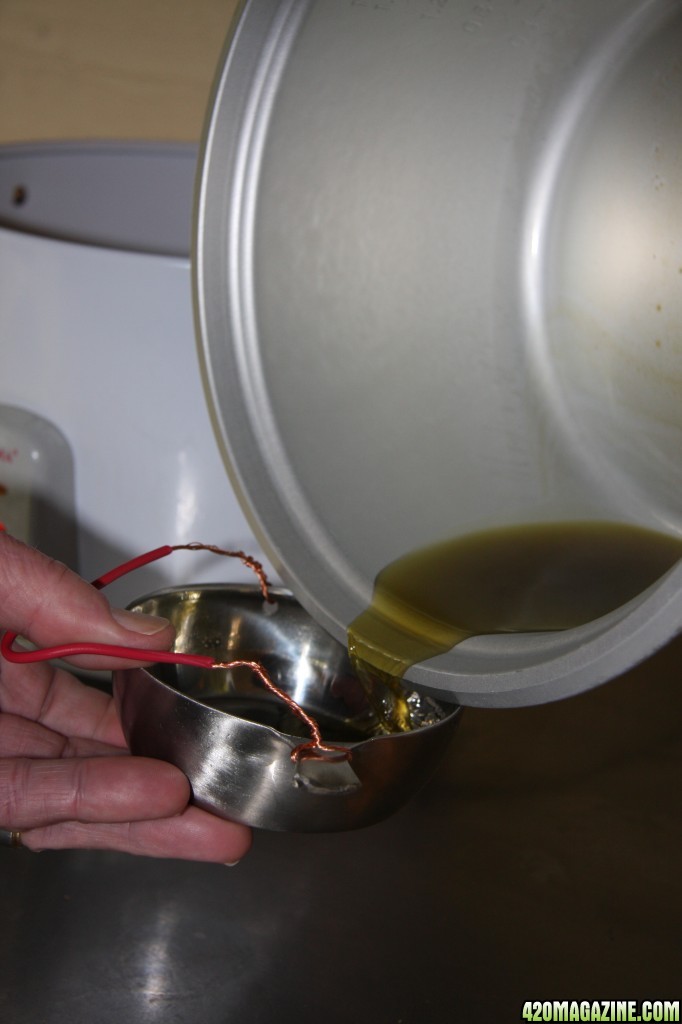
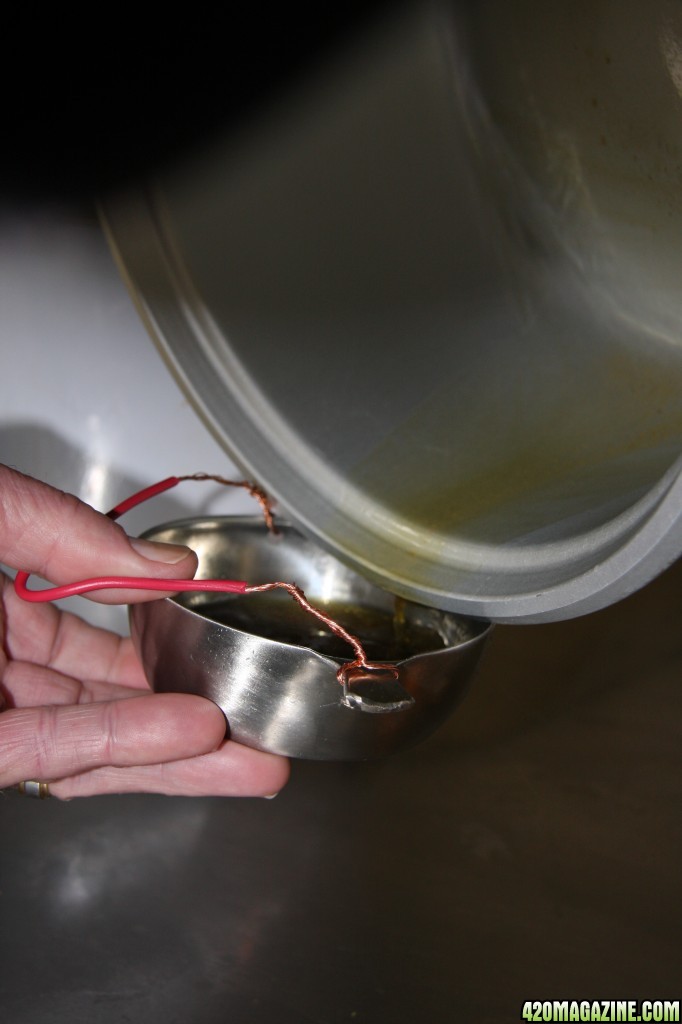
Get as much as you can into the measuring cup, then set the inner bowl back into the rice cooker (still set on low). Then, take your measuring cup and proceed to your sauce pan with the organic olive oil inside warmed to 180 degrees. Set the measuring cup inside on top of the washer.
You’re done cooking down your concentrated cannabis oil, and the decarboxylation process has begun. Quickly go outside with a hot pad in one hand, and a small silicone spatula in the other, then scrape out as much of the oil that is still warm onto the spatula. Then, using a cuticle pusher scrape off the oil from the spatula onto the inside lip of the measuring cup. It will flow down to the rest of the oil and join the decarboxylation process. Use caution as the oil may still be hot.
Decarboxylation Process:
Cannabis produces phytocannabinoids in a carboxylic acid form that are not orally active at least at the CB-1 receptor sites, because they don’t readily pass the blood brain barrier in their polar form. To enable them to pass the blood brain barrier, they must first be decarboxylated, to remove the COOH carboxyl group of atoms, which exits in the form of H20 and CO2.
Decarboxylation occurs naturally with time and temperature, as a function of drying, but we can shorten the amount of time required considerably by adding more heat. The more heat, the faster it occurs, within reasonable ranges, and in fact occurs spontaneously when the material is burned or vaporized. There is another mechanism at play however, which suggests that we need to control the decarboxylation temperatures carefully. When we heat cannabis to convert the THCA and CBDA into THC and CBD, we are also converting THC to CBN at a faster rate. At about 70% decarboxylation, we actually start converting THC to CBN at a faster rate than we are converting THCA to THC, after about 70% decarboxylation, the levels of THC actually start to fall sharply. That of course means that the CBN also begins to rise and the medication is becoming more sedative.
Once the measuring cup with concentrated oil is placed into the sauce pan, the temperature should be 180 degrees. Observe how the concentrated oil reacts. If it starts to bubble immediately it’s burning off any excess carrier. If it doesn't start to bubble, turn it up to 190 degrees. Pay attention and do not leave the decarboxylation process. When it starts to bubble and the bubbles are big and more defined the decarboxylation process has begun.
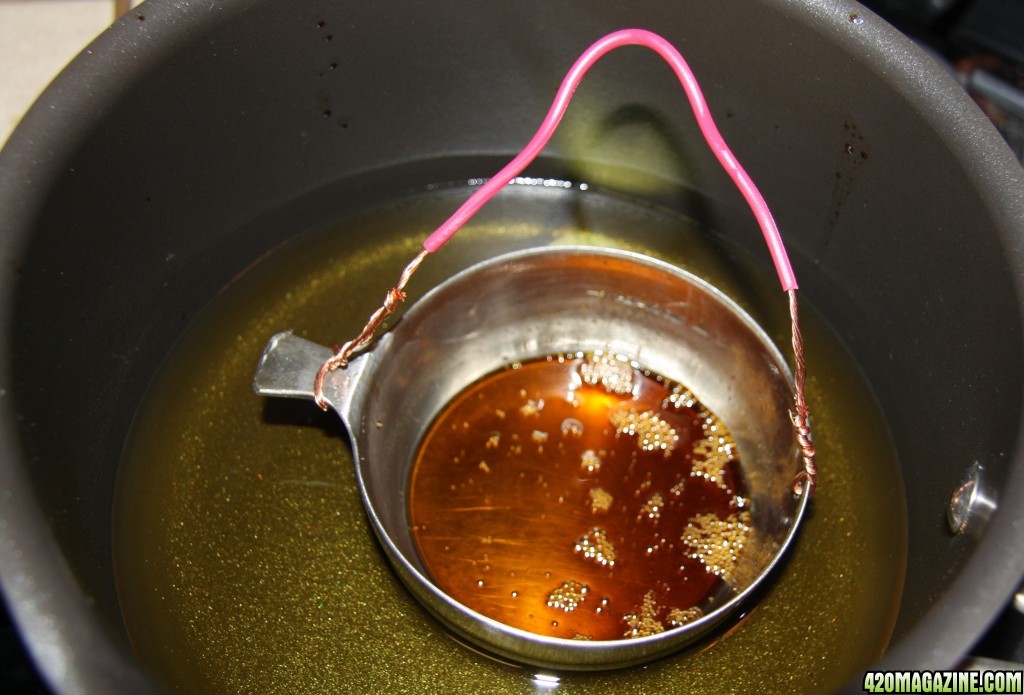
When the bubbles start tapering down in size turn the temperature up another 10 degrees. Keep bumping up the temperature by 10 degrees until the 250 degree mark has been reached. Depending on the ambient temperature inside, you might not achieve 250 degrees if no bubbles are present and there is no movement in the measuring cup. At which point, the decarboxylation process is complete.
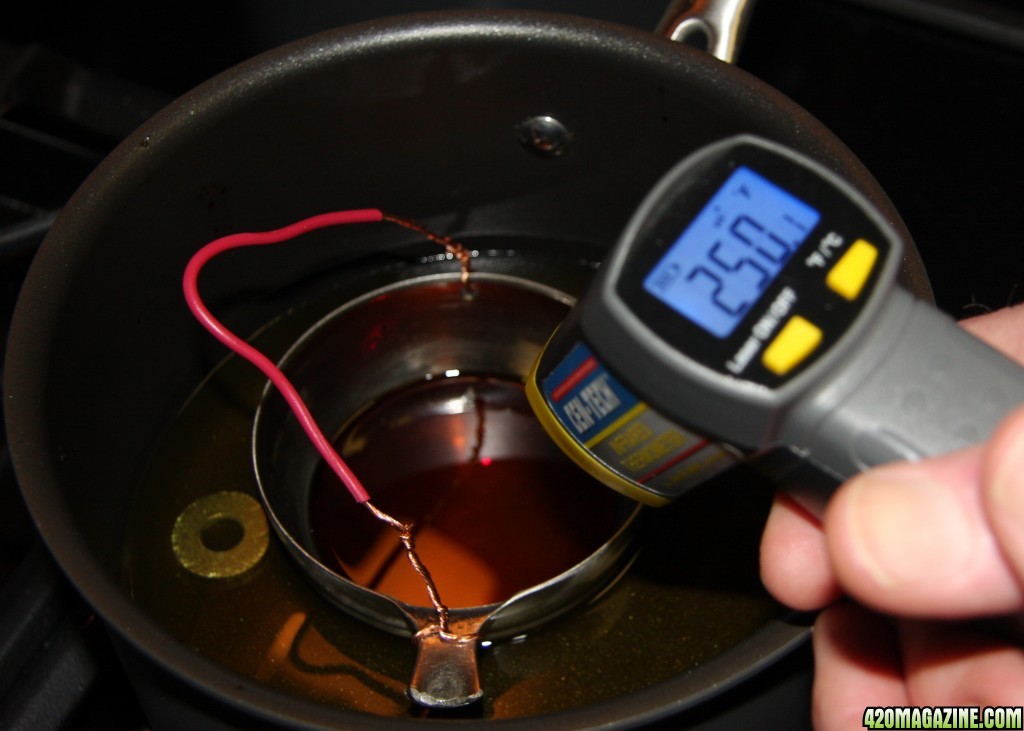
NEVER EXCEED 250 degrees! Do not touch the sauce pan when removing the measuring cup as it is hot. Use hot mitts to remove the measuring cup, Using caution not to tilt the measuring cup and accidentally spill your concentrate out. I did not use hot mitts because they were over-sized and blocked the view of the oil in this tutorial. However, I would always otherwise do so to prevent any danger of burning my hands. Think safety at all times.
Remove the measuring cup and place on a couple of cotton terry cloth towels to absorb some of the oil off the bottom of the cup. Sit the measuring cup on the counter, then take the terry-cloth towels, fold in half, and set the measuring cup down using the edge of the hot pad to angle the measuring cup. The cannabis concentrated oil is now ready to put in a oral syringe/storage container.
While the oil is still hot from the decarboxylation and now tilted on the terry cloth towels, it is the time to suck it up with a oral syringe. Before you start, quickly pull back on the syringe plunger as this frees up the gaskets so when you start pulling up the oil it is a much smoother process. As you pull up the oil move the syringe slightly from side to side, making sure the tip is in the oil and very slightly angled.
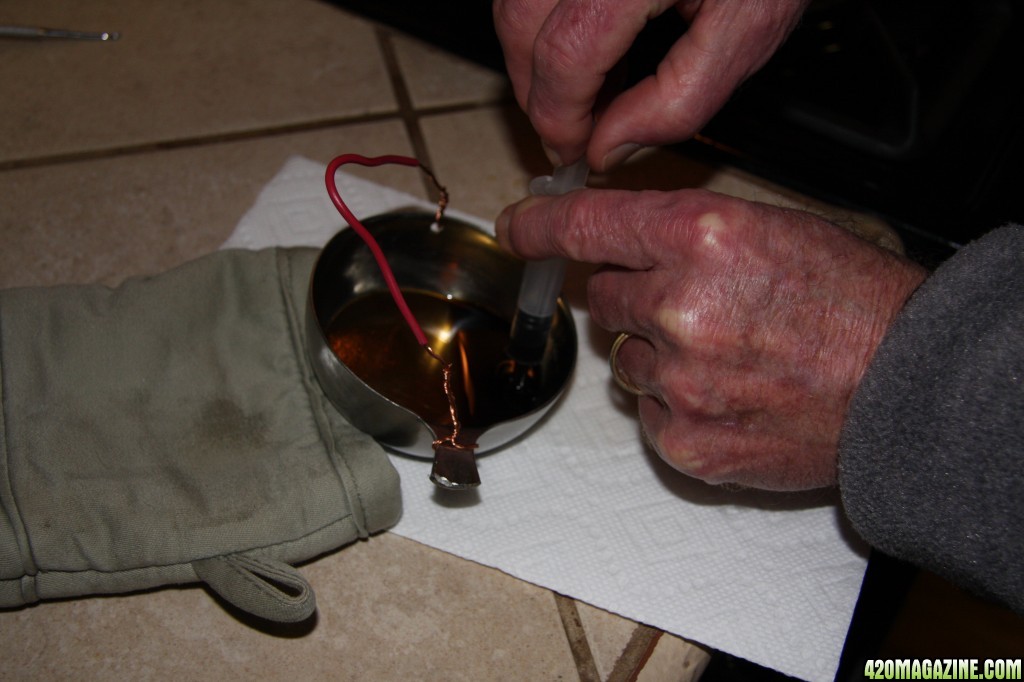
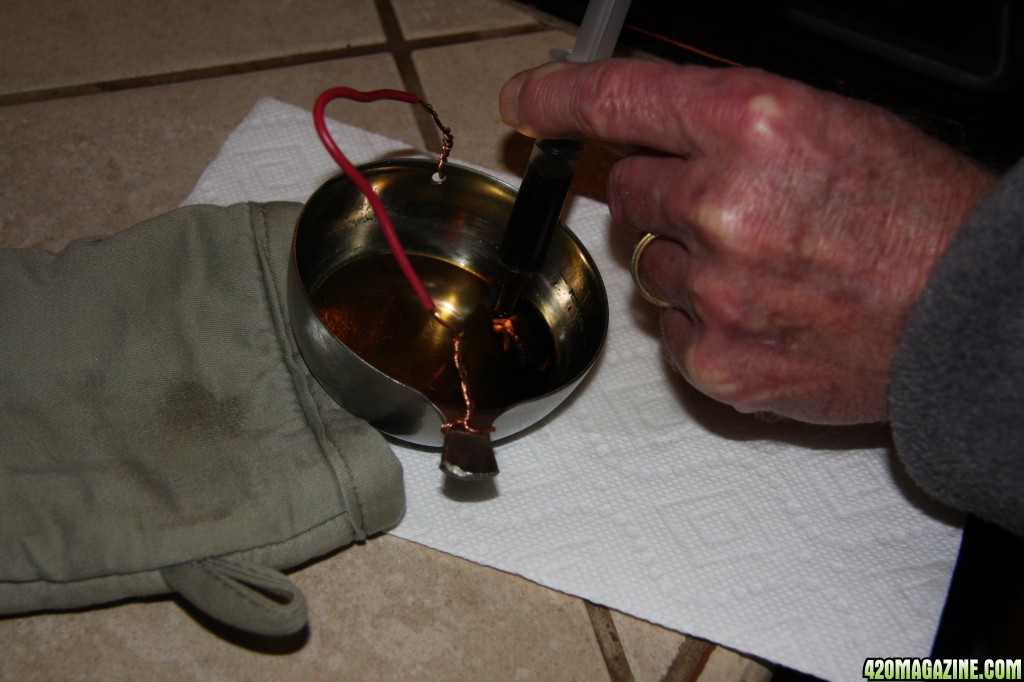
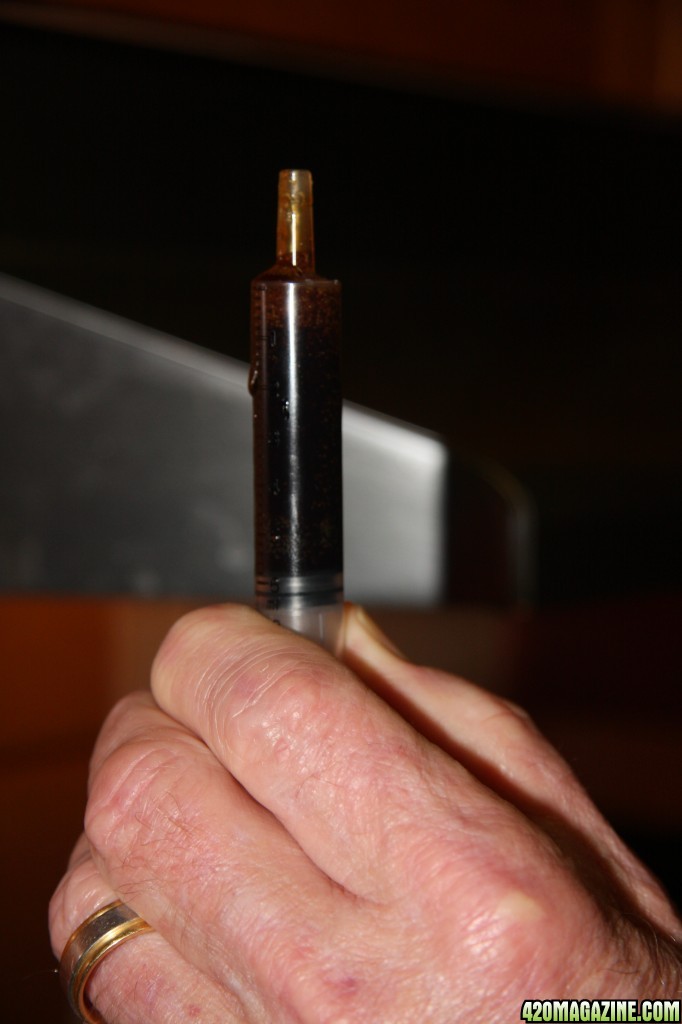
Towards the bottom of the measuring cup, as the oil gets low, you might get a mixture of oil and air creating little bubbles. I set the oral syringe down with the tip facing up on the counter with no cap overnight. If the air bubbles in the oral syringe have not dissipated I take a hair dryer on low and keep the air on the bubbles until they dissipate completely. You’re not going to be able to get it all in the syringe. That's fine, as you can leave it in the measuring cup to cool. Later, you can use your cuticle pusher to scrape off doses, make oilers, add some coconut oil and make a really potent salve for cuts, burns, skin cancer and a plethora of other topical applications.
Storing Concentrated Cannabis Oil:
Stored correctly, many have stated that concentrated cannabis oil should last up to 5 years. I've never stored the concentrate for that long so I cannot verify this personally. I keep mine in oral syringes with the cap on tight and place those in a container that has been vacuumed sealed. A safe is an excellent place that is cool, dark and secure. The syringes may also be placed in a dark container and refrigerated. Do not freeze!
Optional Decarboxylation Process:
This decarboxylation process is done using a plate warmer that has been plugged in and preheated before you make your concentrated oil. The decarboxylation process has taken me anywhere from 30 minutes (ambient temperature was 95 degrees) to over 11 hours using a plate warmer (ambient temperature was 60 degrees inside). On average, I would say the plate warmer has typically taken me three to five hours. Remember, the process isn't done until the oil has completely stopped moving with NO BUBBLES.
Keep in mind that when you first put your measuring cup on the plate warmer, and the oil heats up, the initial bubbling starts burning off the alcohol first when the temperature of the concentrated oil gets around 180 degrees. Then, it settles down and the bubbles become more defined in appearance. As in the earlier method, the same applies using the food warmer. The bubbles start off bigger and later get smaller. When there are no bubbles and the concentrated oil stops moving it is ready to store in an oral syringe/container. It should be noted, you can choose how long you want the decarboxylation process to go before you stop it. When the bubbles are large and start to get smaller the peak THC level has been reached. As they get smaller, the CBD/CBN start to develop and when decarboxylated to the point of no bubbling or movement it is completely done. Having no more bubbles or movement is my choice for full medical value cannabis concentrated oil.
If you decide to stop the decarboxylation process at peak THC, then you need to purge any alcohol left in the concentrate. For our purposes, just unplug the plate warmer, set up a small fan turned on low, and have the breeze flow over the cup for 20-30 minutes. The heat from the plate warmer keeps the oil warm enough after it is unplugged for the grain alcohol to dissipate. Any trace elements left over should be minute and safe to consume. Again, NEVER GO OVER 250 degrees using any heat platform for your decarboxylation process! Using a food warmer for the decarboxylation process does not need the attention of the double boiler method. Do a walk by every 30 minutes to check the size of the bubbles. When they get real small check every 15 minutes until movement has stopped completely.
Optional Equipment:
Although a rice cooker does the job efficiently there are some other more expensive options for those who prefer something more versatile with temperature settings. The pictures of these items are displayed along with what items they would replace. For bigger batches you will need bigger funnels, bigger filters and bigger catch containers. I only do a max of a quarter pound at one time to keep the quick-wash efficient using the equipment in this tutorial. I've have done up to a pound in one day but still did the process using a quarter pound at a time. For these larger amounts, I use the plate warmer for the decarboxylation process because it doesn't need as much tending as the double boiler method does. After each quarter pound, I took the measuring cup (half cup size) with the concentrate inside after the cook down and added to the other measuring cup already on the food warmer. These are kept in order after each cook down process and as they end the decarboxylation process. When the first measuring cup has completed the decarboxylation process it is removed and ready to go into an oral syringe. As each batch completes the decarboxylation process repeat again until done.
Price of the Cuisinart CFO-3SS Electric Fondue Set is approximately $60.00 and would be an upgrade to the rice cooker. It has much better heat control. Another one could be used for the double boiler process during decarboxylation.
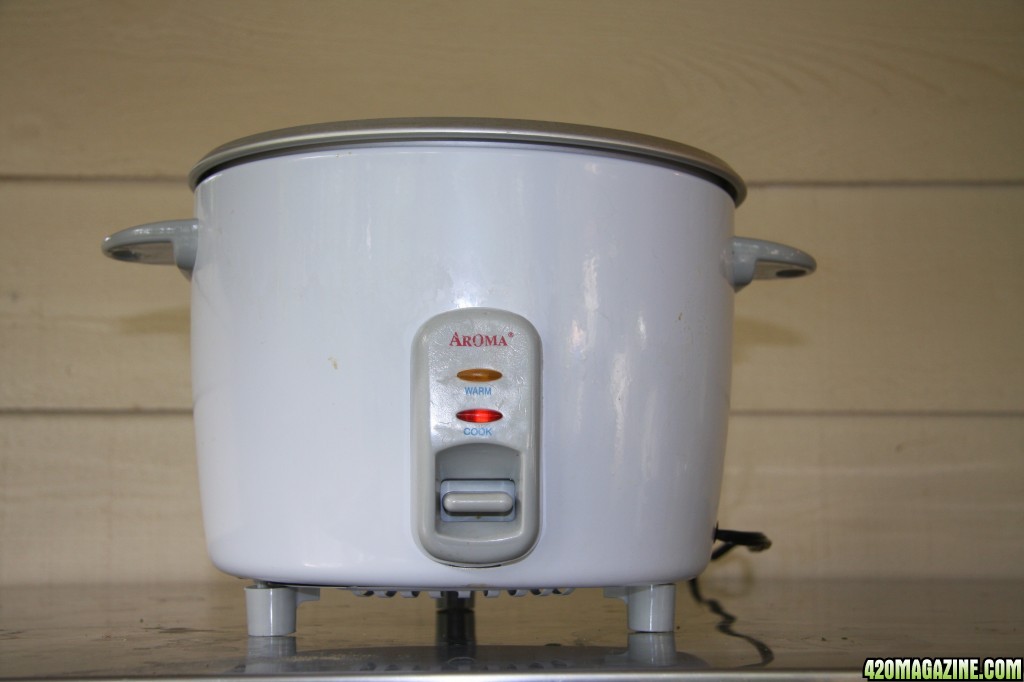
Aroma rice cooker was $30.00 on sale. I've been using mine for about 2 years.
Waring Pro WT90B 400-Watt Stainless-Steel Warming Tray. Cost is approximately $50.00 and has adjustable heat settings. This is a middle of the road one. More expensive units run around $100.00 and have higher wattage heat settings.
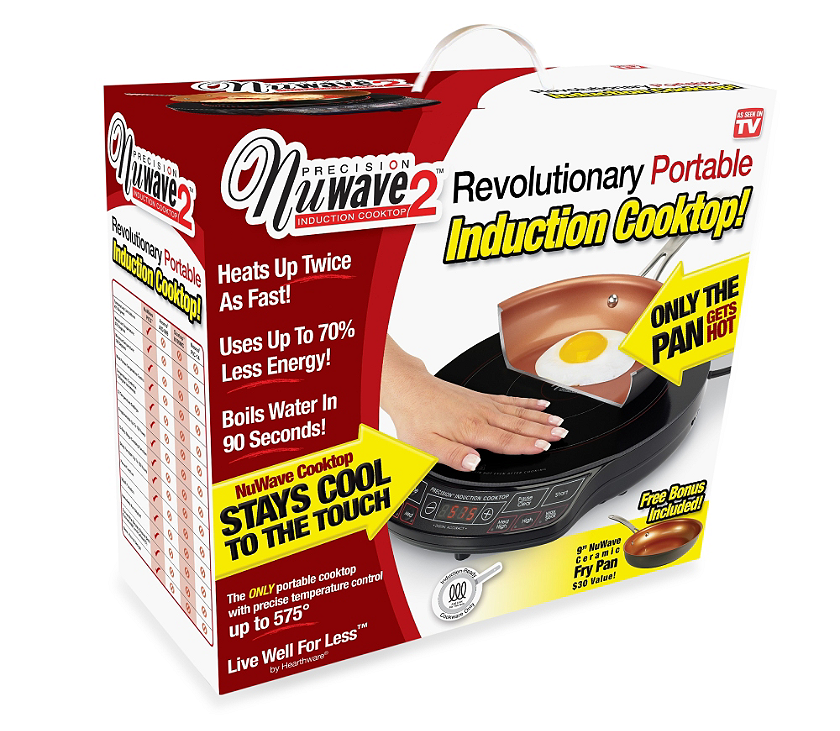
NuWave Portable Induction Cook-top. Important mention, this induction cook-top has preset temperature settings but can be adjusted in ten degree increments, which is a important feature during the decarboxylation process. The one I have has preset temperature settings only and has to be closely monitored when going up to the next preset. It was gifted, as I wouldn't of selected this particular model. I have the NuWave ordered and bought it at the "2 for 1" price. Once you pay the shipping and handling, for the pair, it came out to around $200.00. It has mixed reviews, but keep in mind they sell a lot of them. The extra's that come with them are shipped separately. I have a back up if one fails. These are not a big size - an a 8" sauce pan is the maximum size - but is all you need for the decarboxylation process. You'll need to make sure the sauce pan is induction use approved.
This Vollrath 59500P Mirage Pro Countertop Induction Range, 14-Inch portable induction cook-top would be my hands down favorite despite the price of over $420.00. It's large, but the feature that really stands out is an adjustable knob for heat settings. Definitely on my want list. Shop for your best price.
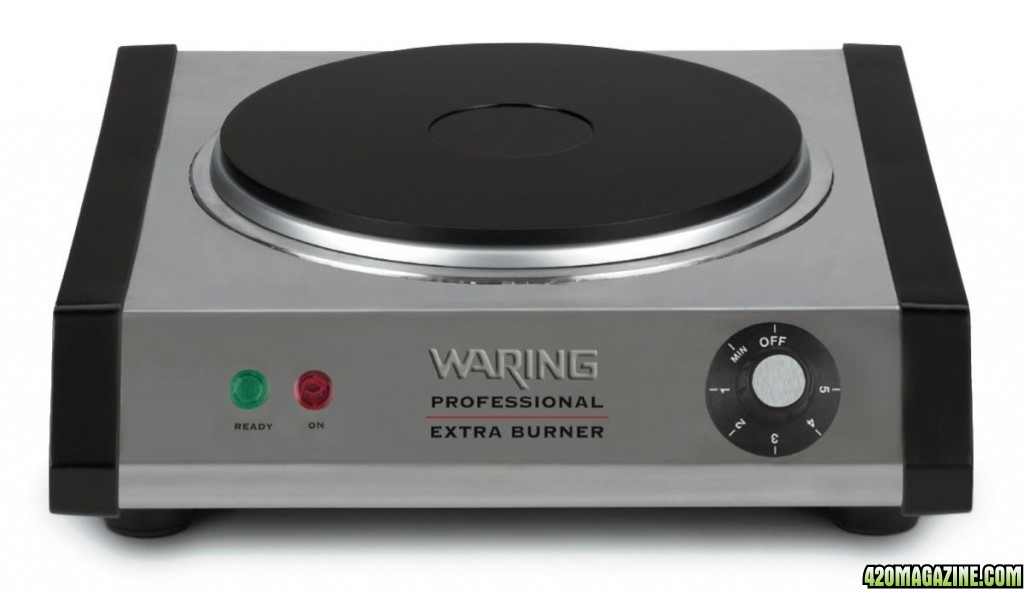
This Waring Pro Portable Burner is budget priced but has excellent reviews. Although it doesn't display the temperature, it is adjustable. Simply turn the adjustable rheostat and check your temperature with your meters and keep notes. Any steel sauce pan would work, magnetic or not. Variable rheostat would be excellent for decarboxylation process at an affordable price.
There are many choices to choose from. From larger funnels, specialty size filters with different micron specs, straining screens, collectors, to full-blown laboratory equipment. These are only recommendations. Your selection decisions are your choice and yours alone.
This completes Making the Concentrated Cannabis Oil.
This tutorial is for education purposes only. Misuse of this information and not following safety precautions is your responsibility and yours alone.
Written by Motoco 1982
Edited by XLR8
I may have better solvent than you........BUT.....Still using the same polish vodka I’ve always used that T recommended and 100% organic growing methods that I’ve picked up from our kind communities over the years.
 I am Soooooooo jealous of your herb. Can't afford to grow indoors and I'm absolutely blessed to get local growers buds from last years crop for free, but nothing beats your own grow !! Also, at 77, I just don't have the energy to make oil and treat folks while growing an expensive crop (electric rates...I just paid $560 today for January
  for climate controlled art collection and separate work shop) at the same time (plus another side job). Ramblin' ...sorry. Not sorry, stoned!
Exactly what I got....1/4+gram.And in the case of 4g oil per 28 it breaks down to 287mg oil per 2g