DarkStar Project - Advanced Growing

I have decided to keep the whole project under one journal. I am not a big fan of long journals because so much info is posted but most of it stays hidden when journals get real long so this is the reason why alot of my journals are kinda short but to the point. I do go a lil overboard on pics but I like pics and they can show more than I can say.
Part one is the aeroflo 36 SOG grow, this will continue til harvest.
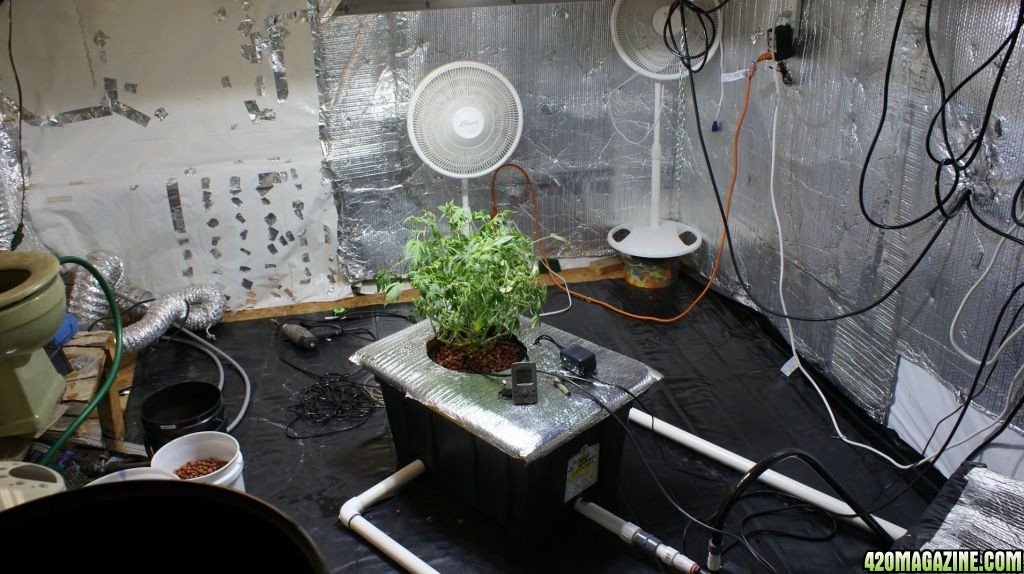
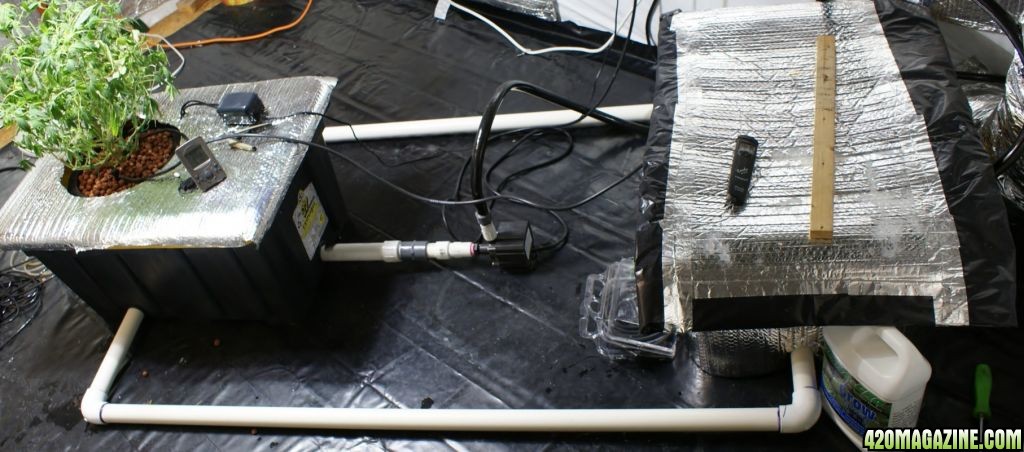
Part 2 is vegging and flowering one of the DarkStar Mother plants, this grow is in diy rdwc and will overlap all 3 grows.
Part 3 is the grow that will fill my satelite vertical tube diy. The clones just previously taken are for that grow and rooting and veg will done while we wait for the SOG to finish up. Vert tube setup and flowering will start as soon as the SOG finishes.
That's the plan.
 
Re: DarkStar Project Pt2 Big fat mom

Have you ever wondered just how far you can push a one plant grow in a indoor environment? If the answer is yes your gonna love part 2 of the DarkStar Project. Part 2 is taking one of the motherplants from my diy ebb and transplanting it into my diy rdwc, vegging it for about 2 weeks after set up and then bombarding her with 1800watts of light during the flower period.
The goal is to grow a plant that produces 40 ounces plus.
If you are interested in my diy rdwc (Do It Yourself Recirculating Deep Water culture) hear is a link to the first build and testgrow of this system.1 Plant DIY Recirculating DWC Test
That grow produced a plant that I was able to harvest over 9 ounces of bud.
I learned a few things from that test grow and even expand it to a multi-plant rdwc where I fine tuned most of the problems I had. Here's the link to that multi-plant test grow.Multi-Plant Recirculating DWC Test
Each of those test grows are short and to the point with lots of pics and info.

This plant was setup to veg in the rwdc saturday with 1 600 watt metal halide overhead. More lighting power will be added in the near future. I won't be running a chiller this grow because my temps are low enough that there is no need for one. The medium is a STG storm insert sitting in a 10 inch basket covered with hydrotron. The hydrotron helps fill in the gaps on the side and covers the top to prevent algae growth.

050_dsM2_veg1.JPG


At the moment I am using dynagrow 1part grow and nothing else but ph adjustments. The system holds 25 gallons of aged tap water and the nute is set at 1150ppm.
She just gave me about 60 good clippings and got a trim so she is looking a lil on the rough side. She should bounce back fast.

054_dsM2_veg1.JPG


2 drippers were installed because of how thick the medium is and will help with root growth.

051_dsM2_veg1.JPG


058_dsM2_veg1.JPG


I will be switching nutes to BPN next waterchange.
 
Wow 40 zips indoors for one lady is huge. Thats alot of big tops.

Mr. Smith, have you ever heard of anyone taking a 20 day budding plant and stick back into veg room? I just did it bcz it turned out to be really sweet strain. Will it go back to vegging? Hermie?
 
Wow 40 zips indoors for one lady is huge. Thats alot of big tops.

Mr. Smith, have you ever heard of anyone taking a 20 day budding plant and stick back into veg room? I just did it bcz it turned out to be really sweet strain. Will it go back to vegging? Hermie?

I haven't done it personally, but the plant should go back into veg. But, it will take some time to revert back to veg, and, you should definately let it veg for a while before you put it back in flower to reduce the chance of hermying then.
 
You can reveg anytime. If there are buds just cut them off, it speeds the revegging process and keeps the plant from looking funky. If buds are left on it can slow the revegging process from 2 weeks to a month and buds will develop multiple branches that look stress and almost mutant looking. I learned this in my early years of experimenting with revegging and cloning from a flowering plant.
Like Mr. Krip said, if you put back into flower too early you take a chance of light stressing the plant and get a hermy. 3 blade leaves is a good indicator of stress so you need to veg until the new growth shows no leaves with 3 blades before flowering or taking clippings for cloning. You take clippings too early and the stress can effect potency and high.
 
Thanks to the two Mr.'s for the solid advice. Im going out back to snip buds now. I was worried about hermie, im just going to keep as a mother for awhile. Not sure of her name but high resin glads and big nugs.

thanks fellas
 
Thanks to the two Mr.'s for the solid advice. Im going out back to snip buds now. I was worried about hermie, im just going to keep as a mother for awhile. Not sure of her name but high resin glads and big nugs.

thanks fellas

Whoa... the Two Misters... There's a "mad science" project gone good if those two ever worked on the same project! I, personally would love to see it!
 
Thank you for checking out my journal.
Its been a while since I have had the time or energy to update my journal. I am sorry, its been a busy month. When you get behind on your journals its hard to keep it complete and info can be lost. I'll do the best I can.
I'll update the SOG first and then move on to the rest.
This is a pic of day 34.

065_sog_d34f.JPG


This is a pic of day 40 in flower. Nute burn signs are just starting to show up. I check the ph and it was 5.4 and the ppm was at 1450. My ppm was set at 1200 and was not suppose to go over 1300 but the plants used alot of water and reservoir was not topped off in time. I may have been pushing the nutes too hard also. I don't get to see my grow daily and can sometimes only see it weekly. My friend that helps me with ph checks didn't do anything else and ppm was not checked and res wasn't topped off. This problem hurt me in this SOG and with the darkstar mother I am keeping in veg.

019_sog_d40f.JPG


020_sog_d40f.JPG


These are pics on day 47 in flower. The nute burn is easier to see now. Even though the problem was already corrected damage is still showing. Makes me wonder how much bud I won't get because of one mistake. I should still get a decent yeild but I know it could have been better. Good thing that darkstar is a long flowering strain. The pistils are still white but leaf damage is strong on the left side of the SOG. The left side is from darkstar mum 2, the right is from DS mum 1.

004_sog_d47f.JPG


005_sog_d47f.JPG


006_sog_d47f.JPG


007_sog_d47f.JPG


Same day 47. I removed alot of the damaged leaves on the left side.

022_sog_d47f.JPG


12/21 day 51 in flower. Its not a bad sog but I do hope they build up more. Time will tell, I have at least 19 more days so I hope they thicken up more. 10 week strains are harder to judge than 8 week strains. I still haven't grown a 12 week strain.

027_sog_d51f.JPG


028_sog_d51f.JPG


029_sog_d51f.JPG


030_sog_d51f.JPG


031_sog_d51f.JPG


032_sog_d51f.JPG


12/23 day 53f

004_sog_d53f.JPG


005_sog_d53f.JPG
 
DarkStar Log 12/10
The clones don't look too good. The ph went to 6.7, temp is low 80s and there was that dirty aquarium smell. Not sure what went wrong but I think it was either poor cleaning or my nute was too old(2 years) and warmed during the summer months. I did a waterchange but these are bad signs.

016ds_cl_60.JPG

017ds_cl_45.JPG


The darkstar mum1 I am keeping in veg don't look too good. The ph was way down and ppm was over 1200. She was ignored too long and now has problems. I did a nute change and will fix her in the near future.
018DSM1.JPG


The darkstar mum 2 which is on its 6 day veg in the diy rdwc is looking pretty awesome under a 600w mh.

021DSM2.JPG
 
DarkStar log 12/17
The DarkStar mum2 in the diy is looking very good. I just started the extra light bombardment. 2 600w hps on the sides broadsiding her with light for 12 hours a day and 1 600w mh above her hitting her with light 24/7.

001DSM2.JPG


002DSM2.JPG


The clones look like shit. I decided to throw them away and make a fresh batch after I give the machines a good cleaning. 1 cup bleach in each system with hot water running for 1 hour, rinse and clean, run a few hours with water and drain then add age tap water, new nutes and clone gel I purchased earlier. I labeled dates on nutes and gel.

008ds_cl_60.JPG

016ds_cl60.JPG

009ds_cl45.JPG

017ds_cl_451.JPG


018_ds_cl.JPG


019_nutes.JPG


While I was cleaning the cloners I also worked on the Darkstar mum1. The ph keeps dropping and she is not the healthiest looking plant.

011DSM1.JPG


She has root rot. Looks like a good time too strip the root zone and cut out the rot on the bottom. I removed about a inch stg that teared apart easily and line the bottom of the bucket with hydrotron inch to 2 inched deep. I also flushed her with sledgehammer for 1 hour then rest the nutes to 900ppm.

012DSM1.JPG

013DSM1.JPG

015DSM1.JPG

014DSM1.JPG


After the mum was taken care of and the cloners were cleaned and set up I took 140 clippings from the bottom of the darkstar mum in the diy rdwc. She's a big plant and needed to be thinned out anyways. I took 5 clippings from the other mum only because I removed 2 major lateral branches.

021ds_cl_2ndtry.JPG


That was alot of work for one day and it was a lonnng day. This is what the mum looked like after I took 140 very nice clippings.

023DSM2.JPG
 
DarkStar log 12/23
Its day 1 in flower for the ds mum2 in the diy rdwc. I rearranged the 600w bulbs to surround the plant in a triangular formation. The light above the plant is no longer being used but 3 600w hid surround the plant giving her 1800watts of light for 12 hours a day.

002DSM21.JPG


The root mass is impressive looking and very healthy. Sorry about the red/orange lighting.

001DSM21.JPG


Cloners been running for 6 days. Starting to show roots. I think it was worth starting the clones over.
006ds_cl_2ndtry.JPG

007ds_cl_2ndtry.JPG

009ds_cl_2ndtry.JPG

008ds_cl_2ndtry.JPG

010ds_cl_2ndtry.JPG

012ds_cl_2ndtry.JPG

011ds_cl_2ndtry.JPG

013ds_cl_2ndtry.JPG


DS mum 1 just got a haircut.

014DSM11.JPG


End of updates. I think I am caught up. Any questions, please ask and I hope to clarify or answer. The real grow show is beginning.
 
Back
Top Bottom