

...I have no idea...but pretty fancy gear clamps...cheerz...  ...h00k...
 ...
...
...h00k......How To Use Progressive Web App aka PWA On 420 Magazine Forum
Note: This feature may not be available in some browsers.
...h00k......
So what’s this “whatchacallit” device !?
I would lose my mind with all that equipment!Since I'll be making the STS soon, I thought I'd mention what I use to measure weights and volumes.
Accuracy is very important for growers when mixing nutrients, or making chemical solutions for tasks such as sex reversals. I use weight for most measurements. You can easily measure the volume of liquids such as water by weight, if you know their specific gravity. Specific gravity is simply the ratio of the weight per unit volume of a substance compared to that of water. Knowing that 1 liter of water weighs 1Kg makes this easy.
My personal standard for accuracy of solids and liquids for my nutrient solutions is ±5%. Chemical solutions such as STS require greater accuracy, so my standard for them is ±1%. Because of this, I have a variety of equipment I use.
Weight Measurement:
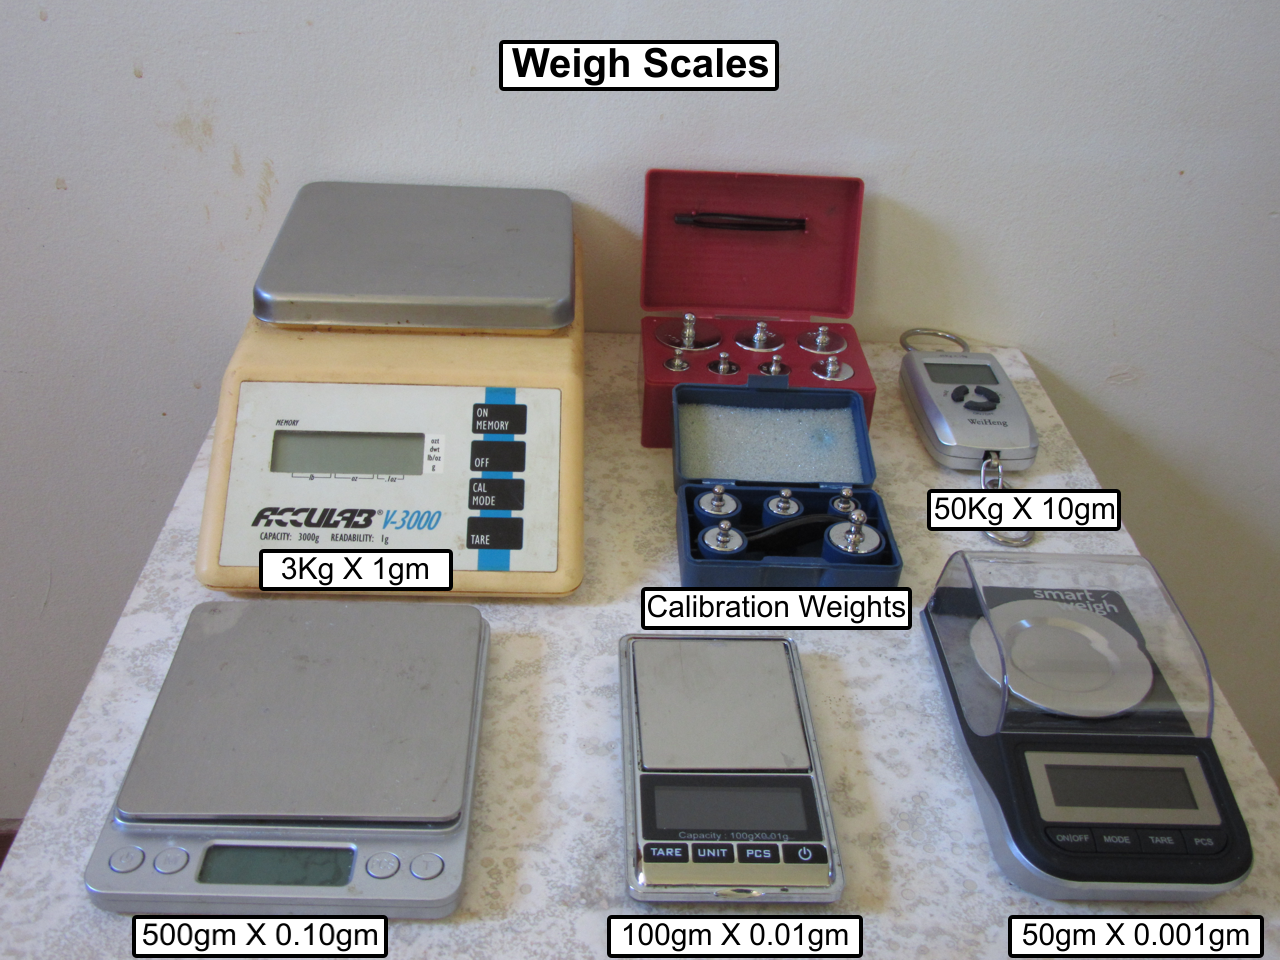
Scale Typical Usage 50Kg X 10gm water 2l - 20l for nutrient solutions 3Kg X 1gm water 250ml - 2l for nutrient and chemical solutions, also larger harvests 500gm X 0.1gm water 50ml - 250ml for chemical solutions, 50gm - 300gm harvests 100gm X 0.01gm 5 - 50 gm dry goods such as Dry KoolBloom, buds 50gm X 0.001gm anything less than 20gm (rosin, Dry KoolBloom, chemicals for STS) Weigh Scales and Their Usage
Note: Scales are useless unless they are calibrated. I have a variety of calibration weights from 1gm to 500gm. These are used to calibrate the three lower capacity scales, and to make calibration weights for the two larger capacity scales. The calibration weights for the larger scales are a gallon jug, or pail filled with sand, and/or water measured on the lower capacity scales.
Scales interpolate the measurement from the unloaded value to that of the calibration weight. The actual weight may deviate from the interpolated value by a small amount. If you need more accuracy you can put your empty container on the scale, add calibration weights equal to your desired value, and tare the scale. You then remove the calibration weights. Using this method you add material until your scale once again reads zero.
Liquid Volume Measurement:
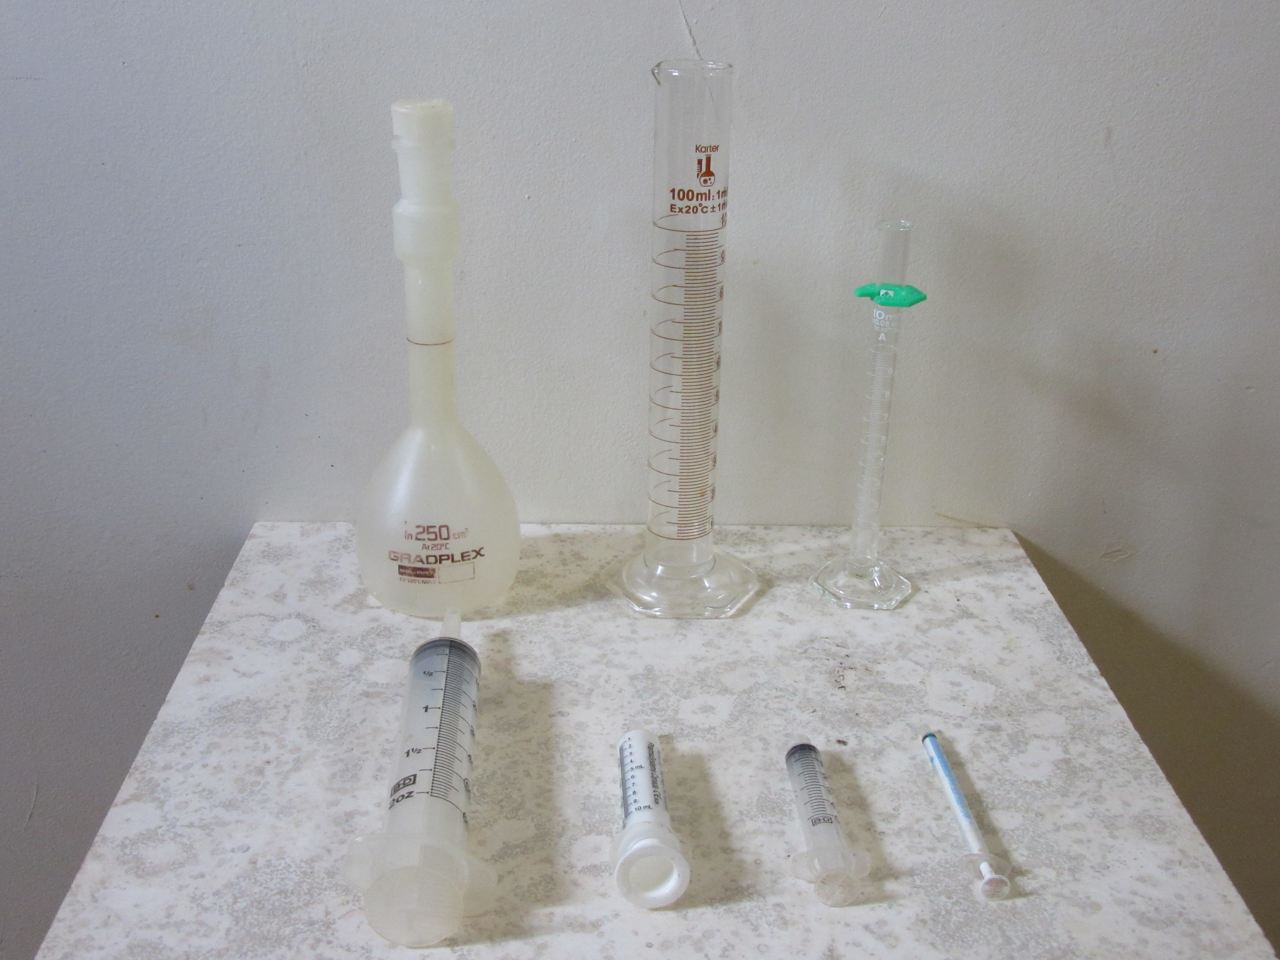
Equipment to Measure Liquid Volume Directly
These are what I have to measure volume directly. The most accurate is the volumetric flask on the left in the back row. It will measure only one volume, in this case 250ml. It's accuracy is better than 1%. The graduated cylinders are used when 1% accuracy is not required. The 100ml graduated cylinder is accurate to within +/- 1ml, and the 10ml is accurate to within +/- 0.1ml. An accuracy of 1% is realized at their maximum volumes, but it decreases as the volume to be measured decreases. Both the volumetric flask, and graduated cylinders can be used to determine the specific gravity of a liquid. The syringes are accurate to +/- 2% of their rated volume, so the 10ml syringe is accurate to +/- 0.02ml. I use the syringes to add the nutrients to the nutrient solutions.
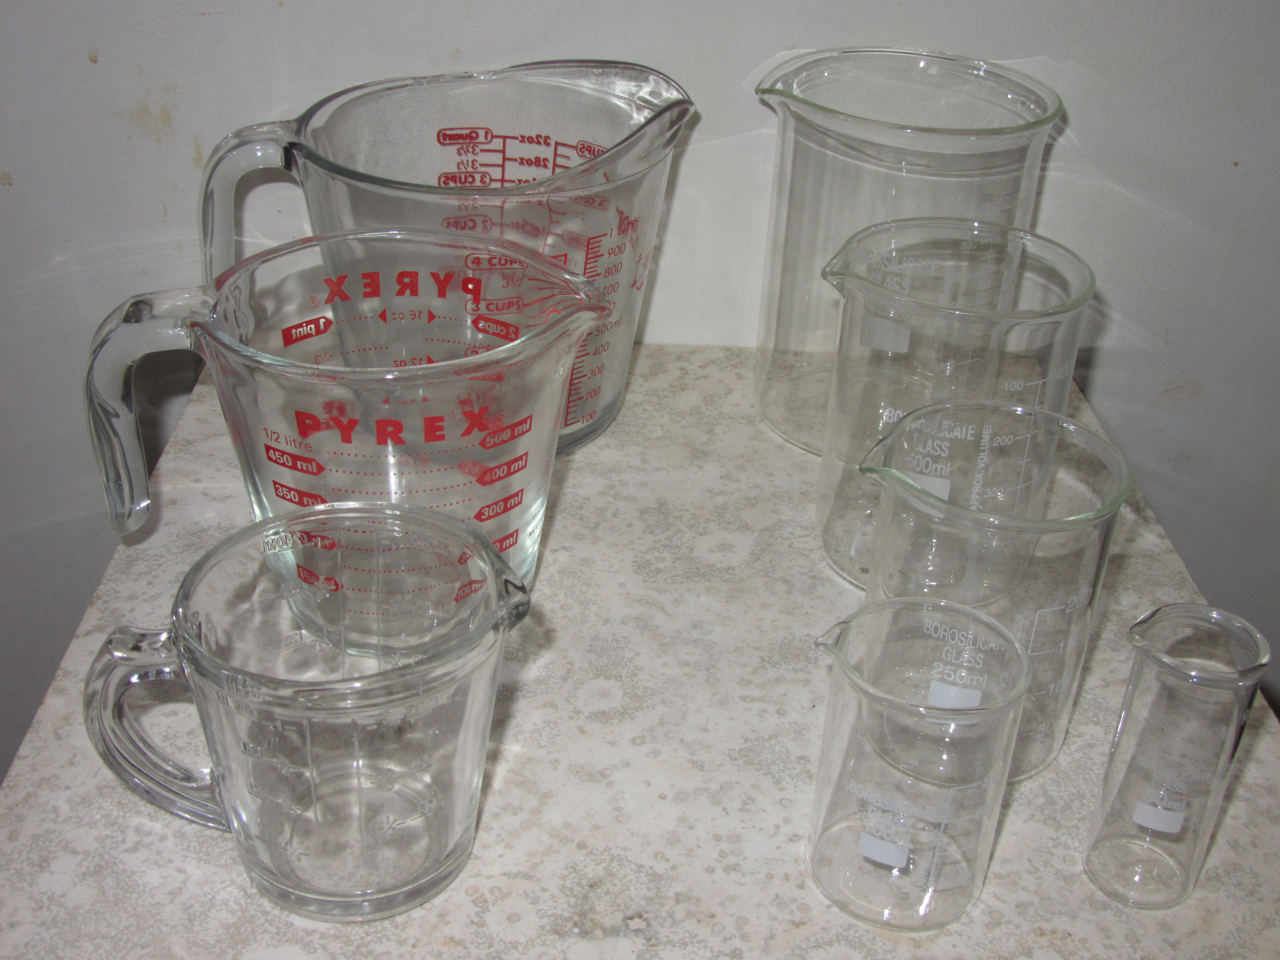
Equipment that Should Not be Used to Directly Measure Liquid Volume
Although these items have volume markings on them, they are not accurate enough for our purposes. The measuring cups are sturdier than the beakers and less prone to breakage. These are but some of the items that can be used to indirectly measure the volume of a liquid. I use the beakers for chemicals so they don't get mixed up with the measuring cups used in the kitchen.
Indirect Liquid Volume Measurement:
The best way to indirectly measure the volume of liquid is to use weight. Multiply the desired volume of the liquid by its specific gravity to find the weight you need. Specific gravity is the ratio of the density of a substance to the density of a reference substance, normally water which weighs 1Kg / liter (1000cc).
How to accurately measure out desired volume of a liquid with an unknown specific gravity:
1. Turn on and calibrate a scale
2. Place the volumetric flask on the scale and tare it
3. pour the liquid into the volumetric flask until it reaches the line
4. read the scale to determine the weight of 250ml of the liquid
5. calculate the specific gravity of the the liquid (weight/250gm)
6. place an appropriately sized beaker on the scale, and tare it
7. calculate the weight of the desired volume (volume * specific gravity)
8. pour the liquid into the beaker until the scale reaches the weight computed above.
") you sure have made it a science! Love it. Grow is looking good and plants are liking all your gadgets!
you sure have made it a science! Love it. Grow is looking good and plants are liking all your gadgets! 
I'm here now @oldsalt looking good In those tents! I don't have floralicous, what's that one supposed to provide?
I have diamond nectar wbu? And I have liquid Kool bloom but haven't used it yet cause I thought it was for flower.
Super healthy girls in veg!Veg Tent Update:
Looks like they're loving the TS2000 and whatever you'ere doing to them!Flower Tent Update - Day 7 of 12/12 Lighting:

Love the ingenuity Salt, damn that's cool! Looks like it works perfectly.Making an Adjustable Pole Mount
Love the ingenuity Salt, damn that's cool! Looks like it works perfectly.
I may give that a try. I have a ZooMed Hygrotherm as a humidifier. I could run the hose behind the fan to move the humidified air around.Hey Mr. Salt...
Finally got by to catch up. Lots of great stuff to see here. Plants look so healthy! Hope the problem you are eyeing turns out to be nothing, or easy to fix. Love the fan-mounting gizmo, very clever.
On the fan-placement with respect to your COBs... Just an idea/suggestion. What if you moved the fans way down towards the bottom, and up-ended them so that they point up? I have mine placed that way, and they blow a nice current of oscillating air across the bare branches at the base, and up through the canopy. I imagine you have already considered this, so just raising it as an option. Good luck!
Edit to add visual aid...

I may give that a try. I have a ZooMed Hygrotherm as a humidifier. I could run the hose behind the fan to move the humidified air around.